When you connect a new COM device or a USB device to your computer (USB modem, mobile phone, Bluetooth adapter, serial to USB converters, etc.), Windows detects it using Plug-n-Play and assigns it a COM port number in the range of 1 to 255 (COM1, COM2, COM3, etc.). If this device is connected again, the reserved COM (Communication, or Serial) port number is assigned to it. A new device gets the first free COM port number. It often happens that when connected, external devices create several COM ports at once. In my case after connecting a Bluetooth adapter 10!!! new COM ports have appeared in the system.
A number of legacy applications are able to address only two-digit COM port numbers, and won’t work with COM100 and higher. In the worst cases, these programs work only with COM1-COM9 ports. What if a device has got a higher COM port number? Is it possible to reset the numbering for reserved COM ports and delete assigned ports?
How to Change a COM Port Number for a Device in Windows?
In Windows, you can manually change the COM port number assigned to a device. Suppose the necessary COM port is already busy, and you want to try to free it.
- Open the Device Manager by running the
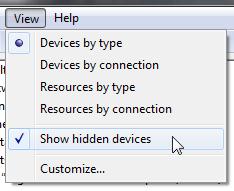
devmgmt.msccommand; - Select View->Show Hidden Devices in the menu;
- Then expand Ports (COM & LPT) and find your device in the list;
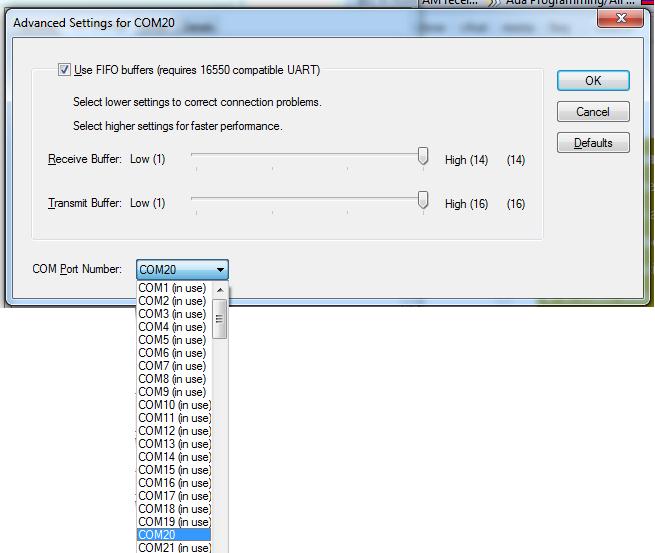
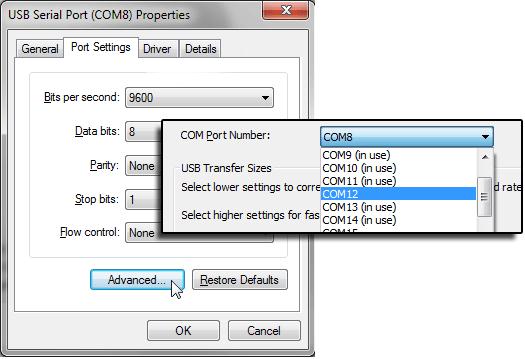
- Go to the Port Settings tab and click the Advanced button;
- The current COM port number assigned to the device can be found in the COM Port Number field;
- To change it, open the drop-down list and select the COM port number you want to set.
But more often you cannot change the assigned COM port number to another one in the hardware properties, since all the “lower” COM ports are already in use.In this case, you need to try to remove the COM port reservation
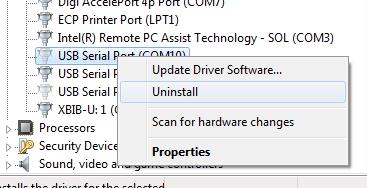
- Expand the Ports (COM & LPT) branch, find which COM port number you need is assigned to (a pale icon means that this COM port is assigned, but this device is not currently connected);
- Right-click it and select Uninstall;
- Now you can assign the freed COM port to another device. Once again open the properties of your device, go to the Port Settings -> Advanced tab. Then go to the Port Settings tab and click Advanced. Select the free COM port in the dropdown list.
However, this method does not allow you to free the busy COM port in all cases.
Get-WMIObject Win32_SerialPort | Select-Object Name,DeviceID,Description
You can get the COM port number for a specific device by its name, for example:
Get-WMIObject Win32_SerialPort | Where-Object { $_.Name -like "*Arduino*"}|select name, deviceid
or
Get-WMIObject Win32_SerialPort | Where-Object { $_.Name -like "*GPS*"}|select name, deviceid
Find Out Which Process is Using a Serial COM Port in Windows
You won’t be able to release the COM port of a device that is used by Windows or a running program (process). First, you need to stop the process that is currently using the COM port. You can use the Process Explorer tool (by Sysinternals) to find out the name of the process using a particular COM port number (https://docs.microsoft.com/en-gb/sysinternals/downloads/process-explorer).
First, you need to display the name of the service that uses the COM port. Run the PowerShell command:
get-pnpdevice -class Ports -ea 0| Select Name, PNPDeviceID, Status, Service
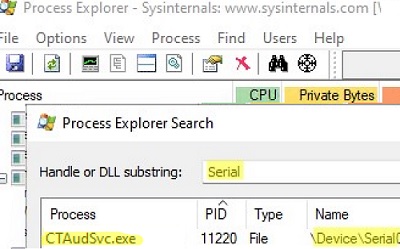
The service name of the specific COM port is shown in the Service column. For example, for COM2 it is Serial. Now you need to run Process Explorer as an administrator and select Find -> Find Handle or DLL from the menu. In the Handle or DLL substring line, enter the Service value obtained earlier. In our example, this is Serial .
Process Explorer should show the process name that is currently using your COM port. To release the COM port, kill the process or program.
Resetting COM Port Numbers in Windows Registry
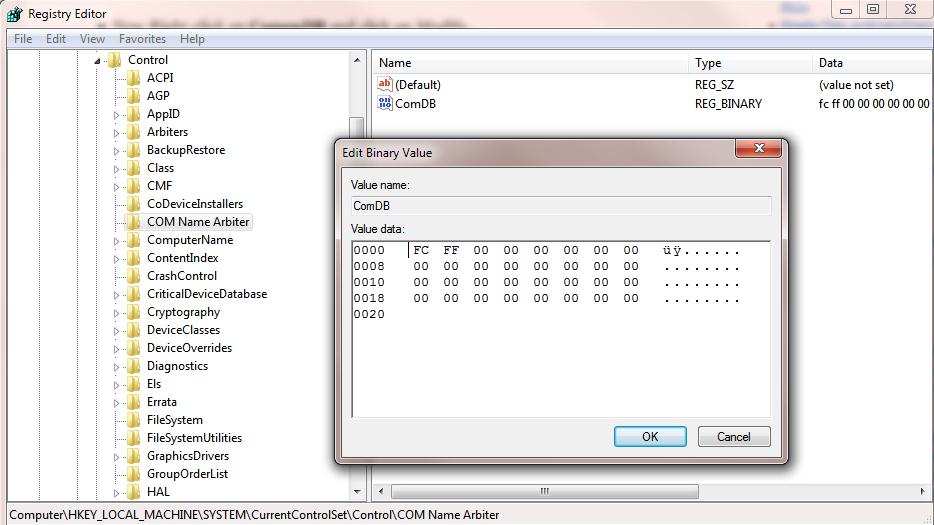
Information about the COM ports in use is stored in CommDB registry parameter under the HKEY_LOCAL_MACHINE\SYSTEM\CurrentControlSet\Control\COM Name Arbiter reg key.
- Open the Registry Editor (
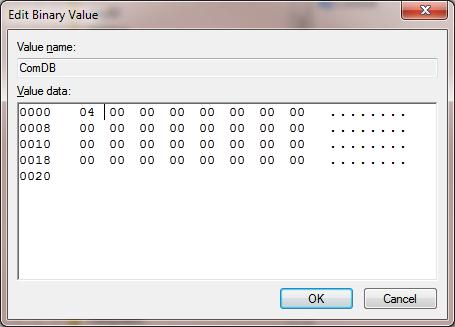
regedit.exe) and go to the registry key mentioned above;Important! We strongly recommend you to backup this registry key (File -> Export) before doing anything. If something goes wrong, you can restore the original COM port configuration. - The value of ComDB parameter in the binary format determines the list of COM ports reserved in Windows. Each bit determines the state of the corresponding port (from 1 to 255). For example, if you need to leave the reservation only for COM3, the hex value of ComDB will be equal to 04 (0000 0100); Important! Be very attentive, and don’t add any additional bits to the parameter, or the system will start to fail into a BSOD.
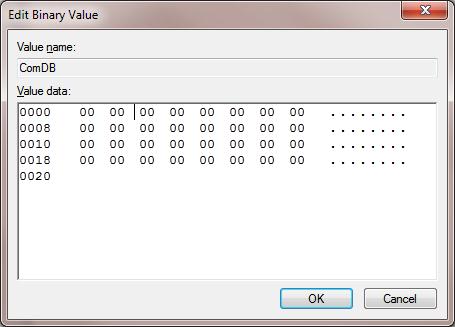
- If you have to reset all COM port bindings, change the value of ComDB to 0;Note. You can see the complete list of COM ports connected in Windows under the registry key HKEY_LOCAL_MACHINE\HARDWARE\DEVICEMAP\SERIALCOMM. The registry entries under the SERIALCOMM can only be present only when underlying devices are connected and ready. This subkey is part of the HARDWARE key, and it is recreated each time the system starts.
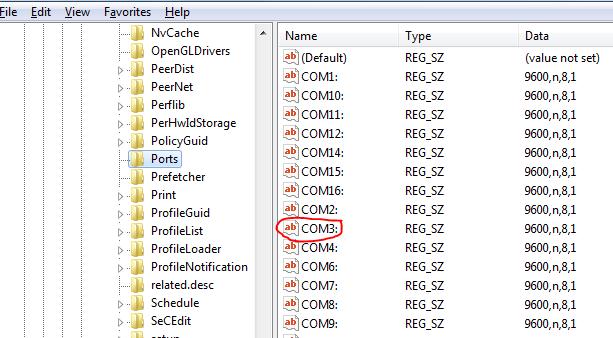
- The HKEY_LOCAL_MACHINE\SOFTWARE\Microsoft\Windows NT\CurrentVersion\Ports registry key contains the list of all assigned COM port numbers. You can remove all unnecessary port reservations. In our example, we’ll leave only COM3 and delete the rest ports;
- Unplug all external devices and restart your computer;
- After the reboot, connect the devices in the necessary order, reinstall USB-to-serial converters, etc. All detected COM port devices will be automatically detected by the system and assigned sequential COM port numbers.
You can also use the following free tools to clean up reserved COM ports:
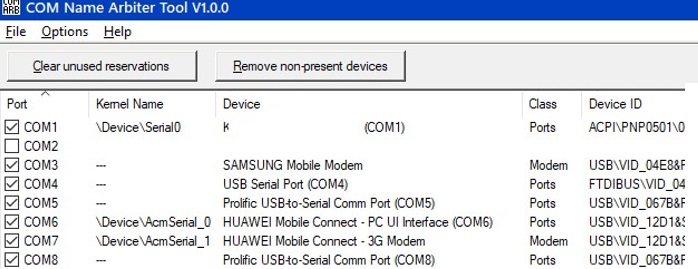
- COM Name Arbiter Tool – this tool can help you to reset COM port reservations and find the used COM port numbers. Download the tool and run it as an administrator. Select the COM ports you want to release and click Clear unused Reservations and Remove non-present devices;
- Device Cleanup Tool – the utility is used to search the registry for previously connected devices (under the registry key
HKEY_LOCAL_MACHINE\SYSTEM\CurrentControlSet\Enum), remove unused devices, and clear COM port reservations.


4 comments
Hi dear
When I open Device Manager there is no branch of (COM & LPT) to expand. How can I Add or Find it?
thank you so much
thanks you so much , life saving post 🙂 , i mostly work with iot devices and sometime com ports get busy and am getting com port busy returns in code so this saved my life in flushing com port
Thank you for the post, very helpful