In this article we’ll show you how to make a USB flash drive or an SD card to be identified in the Windows as a common local hard disk. Probably, you may ask why it’s necessary? The matter is that by default Windows identifies all the USB flash drives and SD cards as removable drives that can’t be split into several partitions with the built-in Windows tools. And even if you partition the USB flash drive into two or more volumes using third-party utilities (say, in Linux), only the first partition will be available in Windows. Windows supports multiple partitions only for hard disk drives identified as local (i.e. non-removable).
RMB bit and USB drives
Windows recognizes USB flash drives as removable devices due to the presence of a special descriptor bit RMB (removable media bit) on each of the devices. If the system determines that RMB=1 when polling the connected device using StorageDeviceProperty function, it concludes that this device is a removable drive. Thus, in order to convert the USB-flash to the hard disk it is enough to modify this descriptor. You can do this directly (which is quite risky because of the differences in the device-specific hardware implementations, and not always possible), or indirectly – by replacing the response of a USB device using a special driver, which allows to filter out the information in the device response.
Connect the USB flash drive to any available port on the computer, then open the Disk Management console (diskmgmt.msc) and make sure that it is determined by the system as Removable.

Also you can view the type of device in the Volumes tab in the properties of the drive (as we see here Type: Removable).

Or using the diskpart command:
diskpartlist volume
In this article we’ll take look at two ways to change the RMB bit on a USB stick: using the Hitachi filter driver (changes are made only at a specific computer on the driver level) and changing the removable bit in the controller firmware using the BootIt utility from Lexar (more universal way, but there is a number of restrictions and is not applicable to all models of USB flash drives and SD cards). Although both of these methods are quite old and I originally tested them in Windows 7, they continue to be relevant and work equally well in modern Windows 10.
Lexar BootIt Utility: Flip Removable Bit
Recently I got a pretty interesting tool – Lexar BootIt. This is a free portable program that can change the RMB of a removable drive and make a removable USB device fixed (or vice versa). Despite the fact that the utility Lexar BootIt is developed only for Lexar devices (Micron, Crucial), it can work with flash drives from other manufacturers. The BootIt utility supports all versions of Windows, starting from Windows XP and finishing with Windows 10.
You can download BootIt from Lexar website lexar_usb_tool.zip
- Run exe elevated
- Select your USB flash from the list of devices
- Press the button Flip Removable Bit
- Save changes by clicking OK.

Unplug and reconnect the device. Using Device Manager, make sure that its type has changed from Removable to Basic.

In the event that the BootIt utility did not help to change the RMB bit on a removable drive, try the following method based on the Hitachi Microdrive filter driver.
Hitachi Microdrive Filter Driver for USB Flash Drives
To mount a USB flash drive or an SD card as a hard drive, you need a special filter driver, which allows you to modify data sent via the system stack of the current device driver. We will use a filter driver for USB flash drives by Hitachi (Hitachi Microdrive driver), which allows to change the USB device type from removable to fixed (USB-ZIP -> USB-HDD) at the OS driver level. Using this driver, you can hide from the system that the connected device is removable. As a result, the system assumes that it works with a usual hard disk, which can be split into several partitions available in the system simultaneously.
Hitachi Microdrive Driver Files:
- Hitachi Microdrive version for 32-bit systems – Hitachi Microdrive x86 (2.9 Kb)
- Hitachi Microdrive version for 64-bit systems – Hitachi Microdrive x64 (3.6 Kb)
You need to download the version of the driver according to the bitness of your system. Both archives have identical structure and consist of two files:
- cfadisk.inf – is the installation file with driver settings
- cfadisk.sys – is a Hitachi driver file
The next step is to identify the device ID of your USB / SD flash drive. To do it open Device Manager and select the properties of your USB drive. On Details tab in the Device Instance Path setting, select and copy (Ctrl + C) the code for the device instance.

In our example this would be:
USBSTOR\Disk&Ven_Linux&Prod_File-CD_Gadget&Rev_0000\9876543210ABCDEF&0
Suppose we are going to install a driver on the 64-bit system. To edit it, open cfadisk.inf in any text editor. We need the sections cfadisk_device and cfadisk_device.NTamd64.
[cfadisk_device]
 %Microdrive_devdesc% = cfadisk_install,IDE\DiskTS64GCF400______________________________20101008
 [cfadisk_device.NTamd64]
 %Microdrive_devdesc% = cfadisk_install,IDE\DiskTS64GCF400______________________________20101008
Change the value DiskTS64GCF400______________________________20101008 with the ID of your device.
We get:
[cfadisk_device]
 %Microdrive_devdesc% = cfadisk_install,IDE\USBSTOR\Disk&Ven_Linux&Prod_File-CD_Gadget&Rev_0000
 [cfadisk_device.NTamd64]
 %Microdrive_devdesc% = cfadisk_install,IDE\USBSTOR\Disk&Ven_Linux&Prod_File-CD_Gadget&Rev_0000
Save the file.
If the driver is installed on a 32-bit system, you have to download the corresponding archive, unzip it and open cfadisk.inf for editing. Find the section [cfadisk_device]:
[cfadisk_device]
 %Microdrive_devdesc% = cfadisk_install,USBSTOR\Disk&Ven_LEXAR&Prod_JD_LIGHTNING_II&Rev_1100
 %Microdrive_devdesc% = cfadisk_install,USBSTOR\Disk&Ven_JetFlash&Prod_TS1GJF110&Rev_0.00
 %Microdrive_devdesc% = cfadisk_install,USBSTOR\DISK&VEN_&PROD_USB_DISK_2.0&REV_P
Then change the data in the last line, having specified the instance ID of our flash drive, i.e. in our example, we get:
%Microdrive_devdesc% = cfadisk_install,USBSTOR\Disk&Ven_LEXAR&Prod_JD_LIGHTNING_II&Rev_1100
 %Microdrive_devdesc% = cfadisk_install,USBSTOR\Disk&Ven_JetFlash&Prod_TS1GJF110&Rev_0.00
 %Microdrive_devdesc% = cfadisk_install,USBSTOR\Disk&Ven_Linux&Prod_File-CD_Gadget&Rev_0000
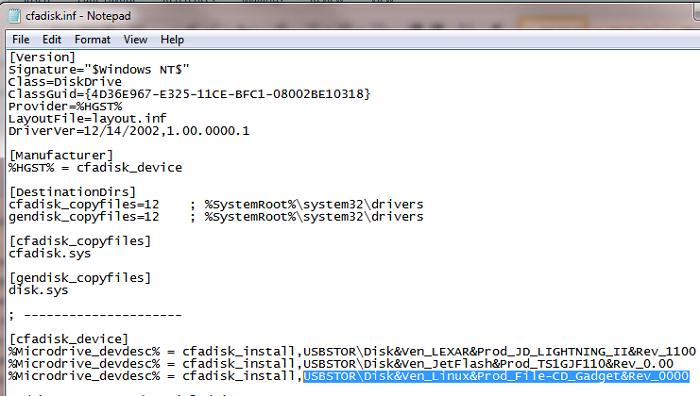
Microdrive_devdesc = "Trascend 64 GB DIY SSD"Installing Hitachi Microdrive Driver Instead of the Native USB Flash Driver
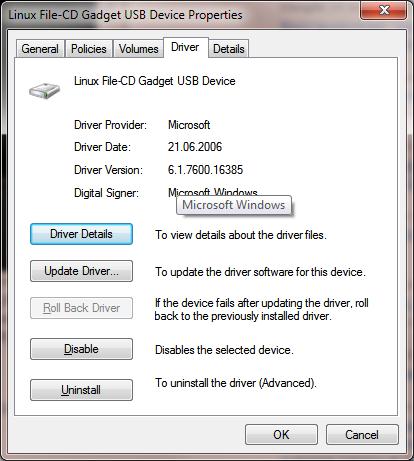
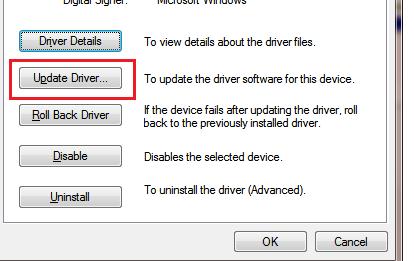
You only have to replace the driver used by the USB flash drive.
Open the Drivers tab and click Update Driver.
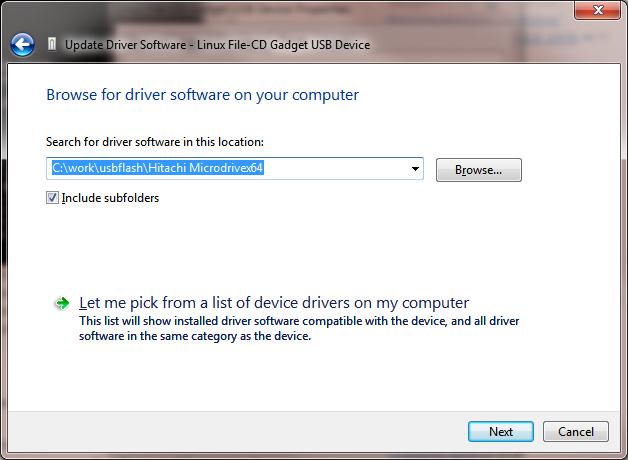
Specify the path to the directory in which you’ve extracted the archive with Hitachi driver that you’ve downloaded earlier.
Select the new driver.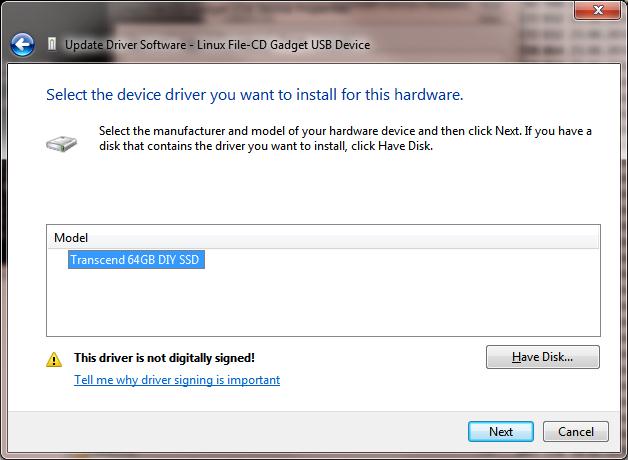
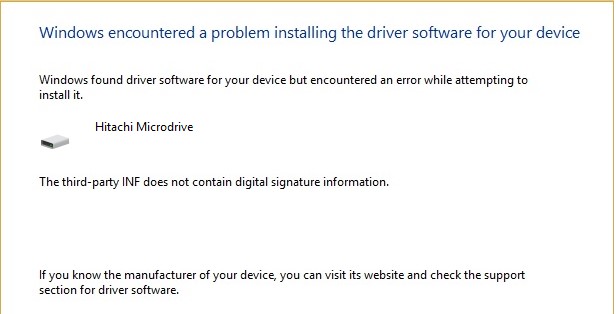
Ignore the warning of the missing digital signature of the driver.

Windows found driver software for you device but encountered an error while attempting to install it
Hitachi Microdrive
The third-party INF does not contain digital signature information
To disable the digital signature verification of drivers, run the following commands:
bcdedit.exe /set nointegritychecks ON
 bcdedit.exe /set TESTSIGNING ON
Restart the computer and try installing the driver again.
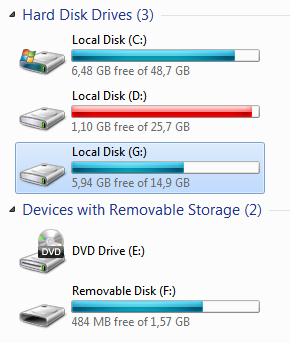
Now you only have to restart the computer and when open the Disk Managment console, verify that the flash drive is identified as a common hard disk (Type: Basic) and uses Hitachi driver.

By opening Windows Explorer, you can also make sure that the icon of the flash drive has changed: it is displayed as a common hard drive.
Now this flash drive can be used as a regular HDD: you can create partitions, specify the active partition, create dynamic disks, install software that does not work from USB flash drives, etc.
How to Remove Hitachi Microdrive Driver
To delete Hitachi Microdrive driver, open the properties of the drive and click Update Driver on the Drivers tab. The system will install the native driver.
- cfadisk.sys in the folder %windir%\System32\drivers
- Folder “cfadisk.inf_amd64_…” in %windir%\System32\DriverStore\FileRepositoty
Restart the computer.
42 comments
really thanks for your effort and simply address this issue
I followed all steps but an error with code 52 prevent me from using the drive
(Windows cannot verify the digital signature for the drivers required for this device. A recent hardware or software change might have installed a file that is signed incorrectly or damaged, or that might be malicious software from an unknown source. (Code 52))
please advise me
Hi !
I’ve got the same issue here …
Did you find how to resolve it please ?
Thx !
Thanks for sharing such kind of good information but I met a trouble. Does it also can workable for windows 8.1 system 32-bit? Because no matter what I did, the windows 8.1 always got the problem when I want to intall the new driver.
After choose file hitachi micro drive i clikc next and get. “the best driver software for your device has already been installed.” Any ideas?
Try to install hitachi driver by selecting “Let me pick from a list of device drivers on my computer”
hey Max
I have the same issue as Gavin but attempting to choose file location presents the same way “driver up to date” i haven’t uninstalled the old drivers as it’s multiple sys32 files in driver details for my usb and i’m unsure not wanting to brake my pc 🙂
do i have to delete all 5 corresponding drivers in my usb’s driver details tab before windows will recognize the new driver to turn usb from removable to local?
also will this affect all preciously removable devices connected to my computer I.e will all flash drives plugged into my pc show up as local not removable if i delete all 5 windows drivers and replace with the new one?
thanks srry if this is convoluted lol
I had the same issue, but went to the Browse my computer for driver software – let me pick from a list of device drivers on my computer – and pushed the “Have Disk” button. Browse to where you saved the Hitachi folder and select the cfadisk.inf file.
I suspect that it only affects that brand/model of usb stick ( hence the modified .inf file)
1. changed cfadisk.inf as instructed but saw another post that said to delete everything after the comma i.e. delete “IDE\” as well.
2. Windows hangs at the “starting Windows” screen (W7 64-bit). Any idea why?
Please note that the USB flash drive in question will only appear as hard disk on the computer you installed the Hitachi driver on. On all other computers, it will still appear as removable drive. Thus, the entire exercise becomes questionable.
I have a SanDisk Cruzer Blade 16gb flash drive. Recently i used Rufus tool and formatted it using GPT settings to make windows 7 bootable USB. From then, it’s removable disk property is gone. It is identified as local disk every time i connect to my laptop. I want to make it as a removable device again. I tried the suggestions from another website by installing some kind of filter drivers but it totally messed up. My Windows OS could not start and does start up repair. So i made system restore. Without any of these problems, Anyone please help me with step by step instructions on how to do it. My OS is Windows 7 Ultimate 64 bit. Thanks.
Boot from LiveCD and delete:
file cfadisk.inf from Windows\System32\drivers
folder cfadisk.inf_amd64_……. from Windows\System32\DriverStore\FileRepositoty
you need to add that users can skip automatic repair by doing the ‘F7’ trick again. this will allow them to boot back into windows and not have the issue with automatic repair. After this, they can go to the driver properties of the drive, click driver at the top and then click delete driver at the bottom. this mitigates the need for a live usb.
for those that have to use a live usb, Hirens boot cd will work.
I get “Access is denied” during driver install. any ideas?
You will have to install the driver as administrator. But, as mentioned earlier: The USB stick will then appear as local disk only on the system wher this driver was installed. It still appears as removable disk on all other systems.
See the end of this article here:
http://hardforum.com/showthread.php?t=1655684
Note: When I rebooted the first time, windows would not load, this was due to the driver being unsigned. When booting hit F8 to enter the bootloader, and choose to disable driver signing. Alternatively you can disable driver signing by doing the following:
run->cmd.exe
Now type the following
bcdedit.exe -set loadoptions DDISABLE_INTEGRITY_CHECKS
press Enter:
bcdedit.exe -set TESTSIGNING ON
press Enter:
When you reboot, you should find your USB or SDHC device listed as a fixed disk. You can now partition, make it a dynamic disk, install picky programs that wont run on a removable disk etc
I was able to do it successfully, but whenever i try to install another OS on the partition, it doesn’t finish the installation.
When I try to convert my devices to a dynamic Device, the error “not supported by object” appear.
Anyone who can help me?
Beware. I followed these instructions TO THE LETTER and they corrupted the operating system. I will now have to back up the system from a previous image. There are too many variables that the author does not seem to be aware of for this hack to be useful.
Yes, I killed my Windows, too.
Had to do the same…
I will try again 😛
Try to boot from the Live SD (LiveUSB).
Then delete file cfadisk.sys from folder Windows\System32\drivers and folder cfadisk.inf_amd64_…… from Windows\System32\DriverStore\FileRepositoty
This is absolutely brilliant! Thank you soooo much! I can now use windows backup to create a system image on a USB drive. You rock.
Does it work even with micro SD cards?
No mater what i do window reinforce driver signature at boot and there is no way to bypass this ! I have tried it all !!! I don’t understand ms disk management ! I wish to RAID0 USB sticks in order to have x2+ speed on that array for WinReadyBoost/eBooster on systems that have 4 GB RAM or less for internet browsing purposes ! Browsers tends to kill user experience a lot with their RAM leak problems, huge RAM consumption’s and so on ! I even start to put 2 cheap 60 GB SSD in RAID0 so browsers do not kill my nerves ! But seems to me that MS intent is forcing user to buy new hardware/new windows to have just as crappy experience with even crappier GUI on Win10 ! And just about everything that would have massive gain on performance is simply not supported ! The above moded driver problem is that windows reinforces driver signature checking just about every time at boot no mater what i do ! Solution for that problem would be driver loading where user would decide how to use it supported by microsoft ! So user will not be limited ! But sadly ms tends to reinforce their will and we are dumb enough to let them ! The other solution would be some sort RAID support in bios for USB as it is ”defacto” standard but this is pure wet dream ! So why we user allow MS to decide how many performance we get on our computers and why we tolerate stupid MS limitations ? For running MS OS newer enough hardware power and majority of middle end Home PC’s are acting choked like x286 with lack off just about everything ! 8 GB RAM is pure minimum for running Chrome on x64 not to mention hard drives bottlenecks ! And hardware that ”overcomes” that limitations is expensive very and mostly over 1000 euro ! The other problem is one can not upgrade memory it is already upgraded ! And that’s the problem with MS ! We should all go to Linux ! The other solution would be we go to store and for same amount of money start demanding some sort of home supercomputer in order not to be choked by/off MS OS Browsers and so on then users would not pursue such idea/solutions !!! Every good damn Windows is hardware performance killer and we then add Chrome Browser and must be AIO security solutions then choked system is announced by it self !!! In the future we will had even faster USB do we can RAID USB devices approved and allowed by MS i doubt !
Or you could just pick up a cheap SSD. Don’t see what you’re getting so worked up about. A USB hard drive is supposed to be more of a temp solution for copying / backing up stuff “off system” deliberately.
You could try getting a USB flash drive. I just picked up a Sandisk one a couple days ago. performance is almost similar to an slow SSD or (fast HD). ie bout 200mb per sec read and 80mb write. (128 gig)
Mean to say “USB3” flash drive. They are quite cheap in £20 range.
For those who have the problem: “the best driver software for your device has already been installed.”
You need to select: “Let me pick from a list of device drivers on my computer”
Then click on “Supplied disk” and choose your driver’s path.
I hope this can help you.
Paul
Ok so i may be screwed but i had to checks here. So i did the thing and it worked great until i pulled out the usb like an idiot. It wouldnt start up no matter what i did. It kept bringing me to the menus about troublshooting. I went to the cmd page and deleted the cfadisk.sys and cfadisk.inf_amd….. and i thought it worked but now im stuck in a infinite restarting loop where there is no repair mode, options, or anything. The boot key doesnt do anything and i dont know what to do. Please help.
I was trying hard to get it work but its not working for me for some reason. Can you please help me in this regards.
Even after running the BCDEDIT commands under an admin cmd session, I still get the error about no digital signatures.
Windows 10, 1703
Thought I had found THE guide for this problem. Followed it all, ended up not being able to boot Windows.
So I issued the BCD commands and restarted and…. Nothing changed. Boots into the Automatic Repair prompt over and over. Investigated the BCD store, both options are active and enabled.
I was however able to get it to boot by selecting Startup Options, letting it reboot, then selecting Option 7 to disable driver signing checks. The end result was as intended with my microSD now listed as a local disk.
However, this is certainly not a permanent solution as the recovery sequence would need to be repeated at every boot…
This shouldn’t be so damn difficult. Especially when manufacturers release laptop/tablets with 32gb eMMC… A second “hard disk” is a necessity!
I ordered 3 different Lexar USB flash drives, one of them even an older USB 2.0 drive. BootIt did not change any of the drives. Possibly the software no longer functions with Win10 1803…?
I wasn’t able to get any of the Lexar’s drives working. In fact, I bricked two of ’em. However, I did have luck with other USB sticks using a combination of two tools. The first is a utility called GetFlashInfo from antspec.com/USBFlashInfo.
After that returns certain information about the USB stick, there’s a Russian website I went out to the for the utilities. http://www.Flashboot.ru
Visit & download at your own risk. Win10 Defender said there were viruses on the downloads. I went to the site and downloaded the utilities on a burner laptop connected to a cellular hotspot. The utilities worked. Running the USB sticks through various systems and malware checks, they came back clean. I suspect due to the nature of the utility’s code (“changing low level hardware info”), that triggered some malware alerts during the post-download scan. Again, this worked on about 50% of all the various USB sticks I tried (Lexar part of the non-working group).
Your mileage may vary.
Hi
I have a flash memory (Transcend – T3) that converted to basic disk. when I connect it to windows and right-click on it doesn’t show “Eject” choice. also doesn’t appear “Safe Remove” on the system tray.
my questions are :
1- Is it safe unplug it without any action? (i know unplugging during the file transfer may destroy the memory)
2- what’s the best way to unplug it (basic disk)?
Thank you
As others hwve said this guide doesnt work. At least not anymore. In my case with windows 10 it says that it cant find a file. It does not specify what kind of file, but I noticed that the cfadisk.sys file fas an ascii path in it: D\programs\cfadisk\objfree\i386\cfadisk.pdb in one version and c:\winddk\fdrv\objfree_wiin7_amd64\amd64\cfadisk.pdb in another version. Is that the file Windows cant find? Who knows. Maybe this still works in windows 7 but not in windows 10.
Thank you OP for a fantastic trick. The Hitachi Microdrive Filter trick worked for my windows tab. I successfully converted my microSD card into basic disk. Here are the details :
Host : Win 10 Home (ver 1809) 32 bit
Card : MyMemory 256 gb microSD ( https://www.mymemory.co.uk/mymemory-256gb-v30-pro-micro-sd-sdxc-a1-uhs-1-u3-adapter-100mb-s.html )
Procedure :
1. Open the Device Manager and locate the microSD card under ‘Storage controllers’ section. Extract microSD card’s ‘Device Instance Path’.
2. Update the appropriate cfadisk.inf as OP instructed. In my case it’s in x86 folder. Then update the driver. Windows shouts at you, but just ignore. This made the microSD appear under ‘Disk drives’ in Device Manager. Now I my microSD card appears in two places with two distinct device instance paths. There is a yello exlamation mark next to disk drive instance saying that I need to reboot for the new device to work properly.
3. Reboot. My machine being x86, it did not complain about driver signing during the boot.
4. After rebooting get the ‘Device Instance Path’ of the new disk drive. With the changed instance again update the cfadisk.inf file.
5. Again update the driver. This time it is disk drive’s driver. As usual ignore window’s shoutings for unsigned driver.
6. After successful updation, the disk drive’s label changes from removable to basic. To check you can go to :
Device Manager –> New Disk drive –> Properties –> Volume –> Populate
The disk type will be basic.
Or you can use diskpart.
7. Reboot (just in case) and enjoy.
Thanks!
-Ninad
Judging by the comments left here, most people ran into all sorts of problems with the Hitachi Microdrive method, so I’m going to be a coward and not attempt it! Using the Lexar BootIt tool method sounds much simpler, but finding a Flash Drive that will work with it appears to be the big problem. Here is a list of Flash Drives that I found which are claimed to work with the BootIt tool:
Ativa 325-300 16GB
Buffalo Firestixx 1 GB (RUF2-S)
Buffalo Super High Speed USB Flash Type R 8 GB
Corsair Flash Voyager 8 GB
Corsair Flash Voyager 16 GB
Corsair Flash Voyager GT 4 GB (VID_1B1C&PID_1A90)
Corsair Flash Voyager GT 16 GB
Corsair Flash Survivor 32GB
Corsair Flash Voyager 32GB (NON-GT)
Intenso USB Drive 8 GB Slim Line
Lexar Jumpdrive Lightning II
LG USB Drive 2 GB (UB2GVMS01)
OCZ ATV 4GB
OCZ Rally2 32 GB
OCZ Rally2 Turbo 8 GB
PQI Intelligent Drive i820 4 GB (8 GB does not!)
Powerram mini Pro (16GB)
Sony Tiny Vault 2GB
Super Talent Pico-C Chrom 8GB
Verbaitim 4 GB Store’ n Go
Only problem with this list is that these drives are all from around the 2010 period and would probably be quite difficult to buy today.
So, can anyone please name a present day type Flash Drive (16GB or 32GB for my needs) that you have successfully managed to convert with the Lexar BootIt tool?
@ Neville,
This is from an article I wrote for a modding site around Jan./2014 –
“… this does not work on every flash drive. It does work on every Lexar drive, i have 3 that it works on. It works on my Sony 4 gig, it works on some beat-up no name 1 gig somebody gave me, it works on my Crucial 2gig but not on my Patriot 4gig.”
NOTE – I believe it only works on 2.0 vs flash drives. There is a way to generate a text file in Notepad that the Registry will refer to to achieve the “RMB=0” results. (Removable Media Bit = No)
BUT – I can’t find that file or the instructions, ATM.
I do know that modifying the Hitachi driver files works on W7x64 and W10x64. I use the BCDEdit app and check the “Use unsigned drivers in Wx64” box which triggers it at every start/restart.
I had a discussion with the developer of Rufus (great tool) the other day and he told me the is no way to do what myself/others are doing, ha.
Noticed the link to Lexar’s site didn’t actually go to Lexar.com and I’m not familiar with getusb.info site. Can you clarify if that is indeed Lexar’s site?
This link is not to the official Lexar website. The lexar_usb_tool.zip file was safe when I tested this tool. But this is a third-party site, and I can guarantee its safety.
In any case, check the downloaded file using antivirus or via Virustotal.
Hello,
Congrats for that tutorial, but on my side I did not try anything yet because what I want to do is about a Sata internal hard drive, but detected as usb… And you’ll see it is unbelievable. I’ve never seen such a thing before.
I’ve bought a T11 mini pc where there is a dedicated sata port under the box to insert a hard drive.
The system is already installed on pc on an internal flash drive with windows 10 pro (64go only) in Uefi mode (GPT partitionned) .
The external port is supposed to be to extend the size of the OS. I’ve bought a crucial hard drive on purpose… And then big surprise!
No information in BIOS of any drive (no drive menu, nor sata, nor ahci, no usb drive).
Nothing appears in the boot sequence menu except windows manager and Uefi shell.
Cloning the whole disk, or the system, did not allow to boot on it (the new HD).
Installing windows from external usb key gives a classical W10 message that it cannot be installed onto usb drive.
And to finish, inside windows the HD is recognize as a USB, but looking at it in device manager it says that is basic and not removable!!!
I’ve tried also MBR mode it does not show up in BIOS starting menu (boot sequence) as for GPT.
I do not know what to do here. It seems that they have connected directly Sata connector onto USB bus on the motherboard. Is such a thing possible?
I did not open the PC for warranty purpose as the PC is for a gift, and I’m afraid to use one of the tools you mention as I could loose my Crucial mx2 (which I know is a bomb)!
So, I know it is not a forum here, but I’m turning around. Don’t know what to do… If you have any idea, where to look. Of course BIOS update seems no longer available on acepc site… But anyway if they linked Sata with USB I think I’m f… up.
Thank you very much for any idea….
I do NOT like the fact that with the Hitachi driver I need to configure it for a specific device by device ID. Is there a way to REPLACE the Windows USB flash drive driver entirely with a 3rd party driver that reports ALL USB flash drives that may ever be plugged into the system in the future as fixed-drives (instead of removable)? I ask this, because I see NO ADVANTAGE to having a drive be handled by Windows as removable. I see a MAJOR advantage though in tricking Windows into seeing any USB flash drives as if they were fixed-drives (normal internal harddrives). The reason for this is that ONLY fixed-drives are capable of having more than one partition on them (sadly a limitation of Windows, but a limitation that could be worked around if I could trick Windows into seeing all external USB flash drives as being fixed-drives instead of removable).
If anybody knows of a good replacement driver to replace Windows’ built-in USB flash drive driver, PLEASE reply to this post. The Hitachi driver WILL NOT WORK, because the Hitachi driver hack requires being configured for only a SPECIFIC DRIVE (meaning that when I get a new USB stick, I will need to repeat the procedure all over again), and that is NOT an acceptable solution.
I used my old laptop and USB FDD: Just unplugged it from the PC (Win 10 Pro) and plugged it into the Windows 7 laptop. For God’s sake, it works. Many Thanks To Windows 7. I’ve used all the methods: install/reinstall, update drivers, and more-it looks like Certificate IS THE PROBLEM – Microsoft’s FacePalm….
OSHub, Thank You!