An automatic reply feature (Auto-Reply, Out of Office Message/OOF) allows an Exchange user to configure a rule in their mailbox to automatically send a specific message in reply to all incoming e-mails. Usually, an auto-reply is enabled when a user is absent from the office for a long time (vacation, business trip, etc.). A user may configure an automatic reply themselves through Outlook or Outlook on the web graphical interfaces. In this article, we will show how to enable, disable and configure an automatic reply message in Exchange Server 2019/2016/2013/2010 and Exchange Online (Microsoft 365) from the Exchange Admin Center (EAC) or using PowerShell.
How to Enable Automatic Reply Message in Exchange Server?
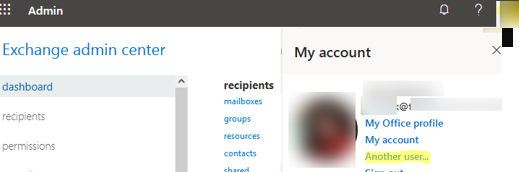
You can configure an auto-reply for another user’s mailbox through the graphical Exchange Control Panel (ECP):
- Sign in to Exchange Control Panel, click your user icon in the top right, and select Another user;

- Select a user mailbox you want to enable an automatic reply for;
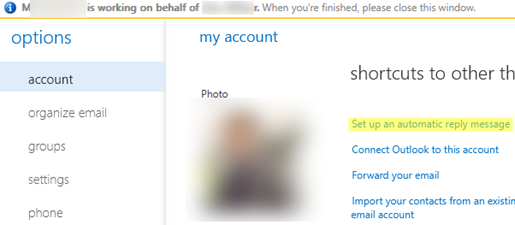
- Click Set up an automatic reply message;
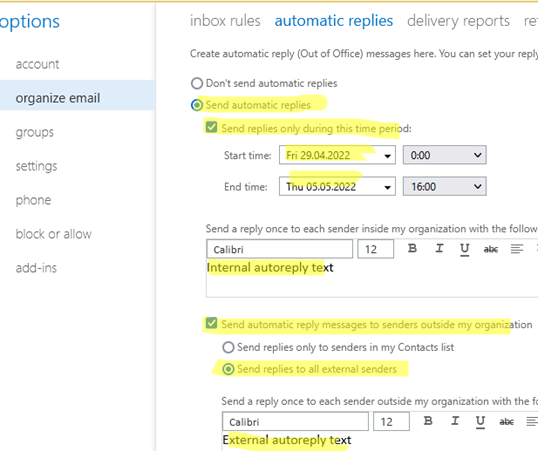
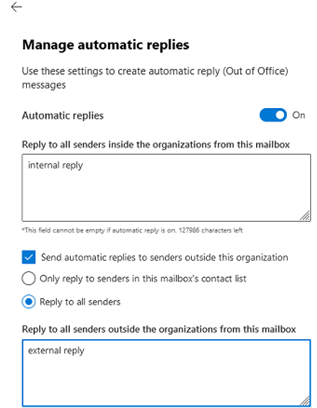
- Here you can enable OOF by checking the Send automatic replies option and setting a period when you want auto-replies to be sent (Send replies only during this time period). Then enter a text of automatic reply message for users in your organization and a text for external users (Send automatic reply messages to sender outside my organization);
- Save the changes and close OWA.
Now if you send an e-mail to a user mailbox, you will get a message with the auto-reply text. Please note that only one reply is sent to each sender (if you send another e-mail to the same address, you won’t receive the OOF message). It helps to protect Exchange from e-mail loops.
In the Exchange Server, you can configure an automatic reply using the Get-MailboxAutoReplyConfiguration and Set-MailboxAutoReplyConfiguration PowerShell cmdlets.
Open the Exchange Management Shell on your Exchange Server or connect it remotely using PowerShell.
To enable automatic replies for a user mailbox, use the following PowerShell script:
$username="[email protected]"
 $starttime = "10/17/2022 00:00:01"
 $endtime = "10/21/2022 23:59:59"
 $msg_internal ="Dear recipient, I am out of office from {Date} to {Date} due to {reason}. If you cannot wait, call me at {phone number}"
 $msg_external ="Dear recipient, I am out of office from {Date} to {Date} due to {reason}. If you require immediate assistance, please contact {Name} at {Email}"
 Set-MailboxAutoReplyConfiguration $username –AutoReplyState Scheduled –StartTime $starttime –EndTime $endtime InternalMessage $msg_internal -ExternalMessage $msg_external -ExternalAudience All
In this example, the automatic reply period was set (from October 17 to 21). Internal users in the Exchange organization and external users will receive different OOF messages.
In order to disable automatic reply for a user mailbox, run the following:
Set-MailboxAutoReplyConfiguration [email protected] –AutoReplyState Disabled –ExternalMessage $null –InternalMessage $null
You can additionally configure automatic forwarding of all incoming e-mails to a specific e-mail address:
Set-Mailbox [email protected] -ForwardingAddress [email protected] -DeliverToMailboxAndForward $true
[alert]To disable email auto-forwarding:
Set-Mailbox [email protected] -ForwardingSmtpAddress $null
To check if auto-reply is enabled for a user and display the current OOF message, run the command below:
Get-MailboxAutoReplyConfiguration [email protected]
To get a list of all mailboxes in an organization with auto-reply enabled:
Get-Mailbox | Get-MailboxAutoReplyConfiguration | Where-Object {$_.AutoReplyState –eq "scheduled"} | fl identity,MailboxOwnerId,AutoReplyState,StartTime,EndTime
If you want to find users with permanent auto-responder, replace scheduled with enabled.
Configuring Out Of Office Messages in Microsoft 365 (Exchange Online)
In Exchange Online (Microsoft 365), you can also enable automatic replies for user mailboxes.
You can enable OOF through the Exchange Admin Center (https://admin.exchange.microsoft.com/):
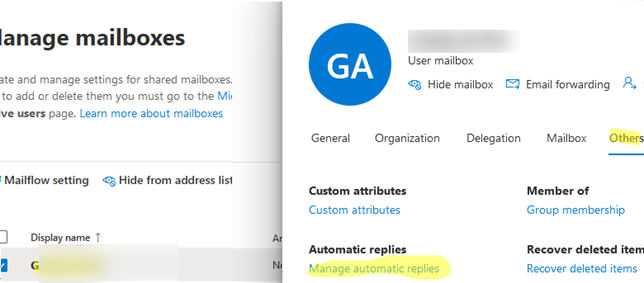
- Go to Recipients –> Mailboxes;
- Select a mailbox;
- In the mailbox properties window, click the Others tab and select Automatic Replies -> Manage automatic replies;
- In the next window, you can enable an automatic reply and enter a reply text for internal and external senders.
In Exchange Online (Microsoft 365), you can also configure auto-reply for mailboxes using PowerShell. The same commands as in the Exchange Server are used (Get-MailboxAutoReplyConfiguration and Set-MailboxAutoReplyConfiguration).
Connect to your Exchange Online tenant using the EXOv2 PowerShell module:
Connect-ExchangeOnline
To enable an automatic reply:
Set-MailboxAutoReplyConfiguration -Identity b.hoffmann -AutoReplyState Enabled -InternalMessage "Internal autoreply message text" -ExternalMessage "External autoreply message text"
To list current auto-reply settings for a mailbox:
Get-MailboxAutoReplyConfiguration -Identity b.hoffmann

To disable OOF:
Set-MailboxAutoReplyConfiguration -Identity b.hoffmann -AutoReplyState Disabled
Microsoft 365 has some additional auto-reply options you can set using the Set-MailboxAutoReplyConfiguration cmdlet:
-AutoDeclineFutureRequestsWhenOOF $true– decline all meeting requests while OOF is active;-DeclineAllEventsForScheduledOOF $true– reject all accepted events scheduled for the out-of-office period;-DeclineMeetingMessage– set a message text to a meeting organizer if it is configured by one of the previous options;-CreateOOFEvent $true– create a calendar event for the OOF period. This will make it easier for meeting organizers to use a scheduling assistant;-OOFEventSubject– set an OOF event subject to be displayed in the Outlook calendar.
2 comments
Hi.
I look for possibility to send more as one reply to each sender.
Can someone help me please?
Thanks
When the Out of Office Assistant is enabled, only one reply is sent to each sender, even if you receive multiple messages from that person.
If you don’t like this behavior, you can create an inbox rule (rules -> have server reply using a special message) in the user’s mailbox that is sent in response to each e-mail.
But the advantage of OOF is that it is displayed as mailtip in outlook