Windows OS Hub
  • Windows Server
    • Windows Server 2022
    • Windows Server 2019
    • Windows Server 2016
    • Windows Server 2012 R2
    • Windows Server 2008 R2
    • SCCM
  • Active Directory
    • Active Directory Domain Services (AD DS)
    • Group Policies
  • Windows Clients
    • Windows 11
    • Windows 10
    • Windows 8
    • Windows 7
    • Windows XP
    • MS Office
    • Outlook
  • Virtualization
    • VMWare
    • Hyper-V
    • KVM
  • PowerShell
  • Exchange
  • Cloud
    • Azure
    • Microsoft 365
    • Office 365
  • Linux
    • CentOS
    • RHEL
    • Ubuntu
  • Home
  • About

Windows OS Hub

  • Windows Server
    • Windows Server 2022
    • Windows Server 2019
    • Windows Server 2016
    • Windows Server 2012 R2
    • Windows Server 2008 R2
    • SCCM
  • Active Directory
    • Active Directory Domain Services (AD DS)
    • Group Policies
  • Windows Clients
    • Windows 11
    • Windows 10
    • Windows 8
    • Windows 7
    • Windows XP
    • MS Office
    • Outlook
  • Virtualization
    • VMWare
    • Hyper-V
    • KVM
  • PowerShell
  • Exchange
  • Cloud
    • Azure
    • Microsoft 365
    • Office 365
  • Linux
    • CentOS
    • RHEL
    • Ubuntu

 Windows OS Hub / Windows 11 / Removing Built-in Teams Chat in Windows 11

April 7, 2022 TeamsWindows 11

Removing Built-in Teams Chat in Windows 11

Microsoft has decided to add a built-in Microsoft Teams Chat client to Windows 11, and its icon is shown in the taskbar by default. If you don’t use Microsoft Teams, you can uninstall the app and remove the Chat icon from the taskbar.

Teams Chat Icon on Windows 11 with a work or school account

Contents:
  • How to Remove Microsoft Teams Chat Icon from Taskbar in Windows 11?
  • How to Completely Uninstall Teams in Windows 11?

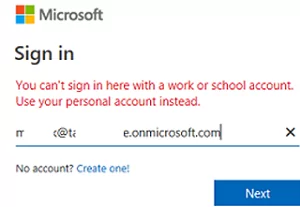
The built-in Teams chat client can only be used with personal Microsoft accounts. To install the corporate MS Teams client (from Microsoft 365 Apps), you need to install another app. When I tried to sign in using my Azure corporate account, I received an error:

You can’t sign in with a work or school account. Use your personal account instead.

teams can't sign-in

How to Remove Microsoft Teams Chat Icon from Taskbar in Windows 11?

If you don’t want to uninstall the Teams Chat client, you can just disable its automatic startup and hide its icon from the taskbar.

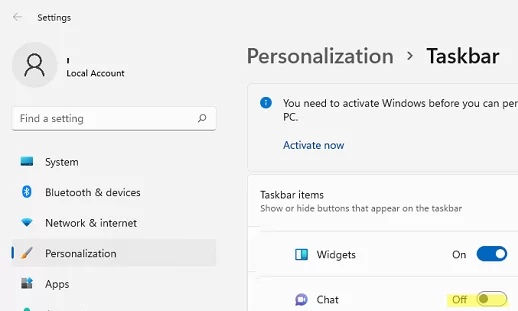
To hide the Teams Chat icon from the taskbar, go to Settings -> Personalization -> Taskbar (you can run the quick access URI command: ms-settings:taskbar) and disable Chat.

disable teams chat in windows 10 taskbar

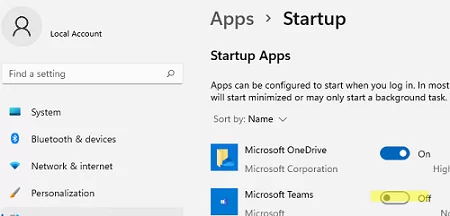
In order to disable Microsoft Teams autostart, go to Settings -> Apps -> Startup (ms-settings:startupapps).

Disable Microsoft Teams startup on Windows 11

Note that it is not enough just to disable Teams autostart in the Settings or Task Manager -> Startup. If you run the Teams client, it will automatically be added to startup.

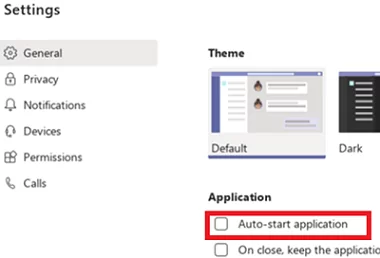
Earlier, we showed how to disable MS Teams automatic startup. It is enough to uncheck the Auto-start application option in the app settings (in Settings -> General -> Application).

disable teams auto-start

When you upgrade to the next Windows 11 build, the Teams Chat may return to the taskbar and autostart. So, you can use other ways to hide the Teams icon from the taskbar.

  • New GPO administrative templates (ADMX) for Windows 11 have got the Configure the Chat icon on the taskbar option (under Computer Configuration -> Administrative Templates -> Windows Component -> Chat). If you set this policy option to Disabled, the Teams icon won’t appear in the taskbar; Disable Teams taskbar icon via GPO
  • You can also hide the Teams Chat icon using the registry: reg add "HKEY_LOCAL_MACHINE\SOFTWARE\Policies\Microsoft\Windows\Windows Chat" /f /v ChatIcon /t REG_DWORD /d 3

How to Completely Uninstall Teams in Windows 11?

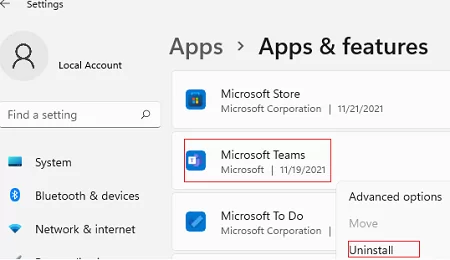
To uninstall the APPX client of Teams Chat for the current user, go to Settings -> Apps -> Apps and features (ms-settings:appsfeatures). Find Microsoft Teams in the list of installed apps and remove it (by clicking Uninstall in the menu).

uninstall built-in microsoft teams client

But this will remove the Teams app for the current user only. If you want to uninstall Teams for all users and remove it from your Windows 11 image (as a Staged app), use PowerShell:

Get-AppxPackage MicrosoftTeams*|Remove-AppxPackage -AllUsers
Get-AppxProvisionedPackage -online | where-object {$_.PackageName -like "*MicrosoftTeams*"} | Remove-AppxProvisionedPackage -online –Verbose

Remove MicrosoftTeams appx provisioned package with PowerShell

Windows 11 Staged apps are located in the C:\Program Files\WindowsApps folder and are installed on the profile of any new user. After running the commands shown above, make sure that the Teams folders have been removed from the disk:

Dir “C:\Program Files\WindowsApps”| where-object {$_.Name -like "*MicrosoftTeams*"}

Learn more about how to uninstall built-in UWP/APPX apps in Windows.

After uninstalling Teams, you can disable its automatic installation:

reg add HKLM\SOFTWARE\Microsoft\Windows\CurrentVersion\Communications /v ConfigureChatAutoInstall /t REG_DWORD /d 0 /f

You can always download the Teams app as an APPX file from Microsoft Store and install it manually.

It is noteworthy that Teams Chat is not built-in into the Windows 11 install image. This APPX is downloaded and installed automatically after the Windows setup is complete. Therefore, you will not be able to remove it from the Windows installation image (install.wim) using this method.

Currently, the only way to prevent automatic Teams Chat installation is to enable the ConfigureChatAutoInstall registry parameter during Windows setup.

You can create the AutoUnattend.xml file and copy it to the root of the Windows 11 installation image/flash drive (like it is described in the article How to Install Windows 11 Without TPM and Secure Boot Checks). Here is a part of the AutoUnattend file to prevent Teams Chat installation:

<RunSynchronousCommand wcm:action="add">
<Order>1</Order>
<Path>reg add HKLM\Software\Microsoft\Windows\CurrentVersion\Communications /v ConfigureChatAutoInstall /t REG_DWORD /d 0 /f</Path>
</RunSynchronousCommand>
3 comments
0
Facebook Twitter Google + Pinterest
previous post
Network Computers are not Showing Up in Windows 10/11
next post
How to Change or Disable Session Timeout in VMware vSphere (ESXi) Client

Related Reading

How to Query and Change Teams User Presence...

October 8, 2023

Installing Language Pack in Windows 10/11 with PowerShell

September 15, 2023

How to View and Change BIOS (UEFI) Settings...

September 13, 2023

How to Create UEFI Bootable USB Drive to...

September 11, 2023

Managing Windows Firewall Rules with PowerShell

August 31, 2023

3 comments

Tariq October 11, 2022 - 7:12 pm

Hi,

When running the following registry edit, getting access denies, even I am logged in as local administrator and running it as Administrator. I tried to create it manually and still gets the same access denied error

reg add HKLM\SOFTWARE\Microsoft\Windows\CurrentVersion\Communications /v ConfigureChatAutoInstall /t REG_DWORD /d 0 /f

Reply
D October 13, 2022 - 12:28 pm

We faced the same problem, only TrustedInstaller can make changes in “Communications” directory in W11. Microsoft support couldn’t help.

Reply
admin October 16, 2022 - 6:00 am

Try to take ownership of registry key from TrustedInstaller

Reply

Leave a Comment Cancel Reply

Categories

  • Active Directory
  • Group Policies
  • Exchange Server
  • Microsoft 365
  • Azure
  • Windows 11
  • Windows 10
  • Windows Server 2022
  • Windows Server 2019
  • Windows Server 2016
  • PowerShell
  • VMWare
  • Hyper-V
  • Linux
  • MS Office

Recent Posts

  • Zabbix: How to Get Data from PowerShell Scripts

    October 27, 2023
  • Tracking Printer Usage with Windows Event Viewer Logs

    October 19, 2023
  • PowerShell: Configure Certificate-Based Authentication for Exchange Online (Azure)

    October 15, 2023
  • Reset Root Password in VMware ESXi

    October 12, 2023
  • How to Query and Change Teams User Presence Status with PowerShell

    October 8, 2023
  • How to Increase Size of Disk Partition in Ubuntu

    October 5, 2023
  • How to Use Ansible to Manage Windows Machines

    September 25, 2023
  • Installing Language Pack in Windows 10/11 with PowerShell

    September 15, 2023
  • Configure Email Forwarding for Mailbox on Exchange Server/Microsoft 365

    September 14, 2023
  • How to View and Change BIOS (UEFI) Settings with PowerShell

    September 13, 2023

Follow us

  • Facebook
  • Twitter
  • Telegram
Popular Posts
  • Blank Sign-in Screen in Office 365 Apps (Outlook, Teams, etc.)
  • Prevent Users from Creating New Groups in Microsoft 365 (Teams/Outlook)
  • Sending an E-mail to a Microsoft Teams Channel
  • Fix: “Something Went Wrong” Error When Installing Teams
  • How to Send a Message to Teams Channel with PowerShell
  • Managing Microsoft Teams with PowerShell
  • How to Disable Microsoft Teams Auto Startup
Footer Logo

@2014 - 2023 - Windows OS Hub. All about operating systems for sysadmins


Back To Top