The broadcast protocols NetBIOS over TCP/IP and LLMNR are used in most modern networks only for compatibility with legacy Windows versions. Both protocols are susceptible to spoofing and MITM attacks. In the Metasploit there are ready-made modules that allow you to easily exploit vulnerabilities in the broadcasting NetBIOS and LLMNR protocols to intercept user credentials in the local network (including NTLMv2 hashes). To improve your network security, you need to disable these protocols on the domain network. Let’s figure out how to disable LLMNR and NetBIOS protocols in Windows 10/Windows Server 2019 manually or through Group Policies.
Link-Local Multicast Name Resolution (LLMNR) Protocol
LLMNR (UDP/5355, Link-Local Multicast Name Resolution) is used in all Windows versions starting from Vista and allows IPv6 and IPv4 clients to resolve the names of neighboring computers without using DNS server due to broadcast requests in the local L2 network segment. This protocol is automatically used if DNS is unavailable (in Windows workgroups this protocol is used for Network Discovery). So if there are DNS servers in the domain, this protocol is not needed.
NetBIOS Over TCP/IP Protocol
NetBIOS over TCP/IP or NBT-NS (UDP/137,138;TCP/139) is a broadcast protocol being a predecessor of LLMNR and used in the local network to publish and search for resources. By default, NetBIOS over TCP/IP support is enabled for all network interfaces in all Windows versions.
On Windows, you can display NetBIOS statistics and current TCP/IP connections over NBT using the nbtstat command. In order to get the computer name by its IP address:
nbtstat -A 192.168.131.190
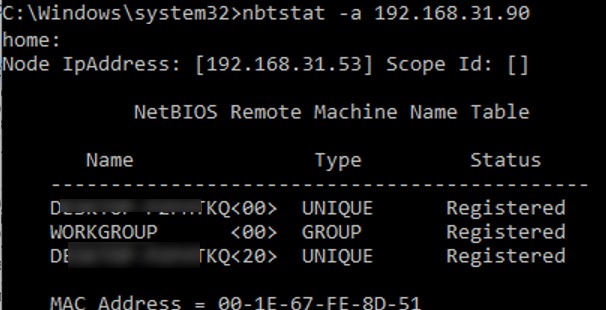
As you can see, the nbtstat found a computer on the local network using the NetBIOS protocol and returned its name.
You can display all records about neighboring computers on the same local network in the NetBIOS cache:
nbtstat -c
NetBIOS and LLMNR protocols allow computers on the local network to find each other if the DNS server is unavailable. Perhaps they are needed in a workgroup environment, but in a domain network both of these protocols can be disabled.
Disabling LLMNR on Windows Using GPO
You can disable the LLMNR protocol on a Windows computer locally via the registry using the following PowerShell commands:
New-Item "HKLM:\SOFTWARE\Policies\Microsoft\Windows NT" -Name DNSClient  -Force
 New-ItemProperty "HKLM:\SOFTWARE\Policies\Microsoft\Windows NT\DNSClient" -Name EnableMultiCast -Value 0 -PropertyType DWORD  -Force
In the domain environment, LLMNR broadcasts can be disabled on computers and servers using Group Policy. To do it:
- Open the
gpmc.msc, create a new GPO or edit an existing one that is applied to all workstations and servers; - Go to Computer Configuration -> Administrative Templates -> Network -> DNS Client;
- Enable Turn off multicast name resolution policy by changing its value to Enabled;
- Wait while the GPO settings on clients are updated, or manually update them using the command:
gpupdate /force
Disabling NetBIOS over TCP/IP on Windows 10/Windows Server 2019
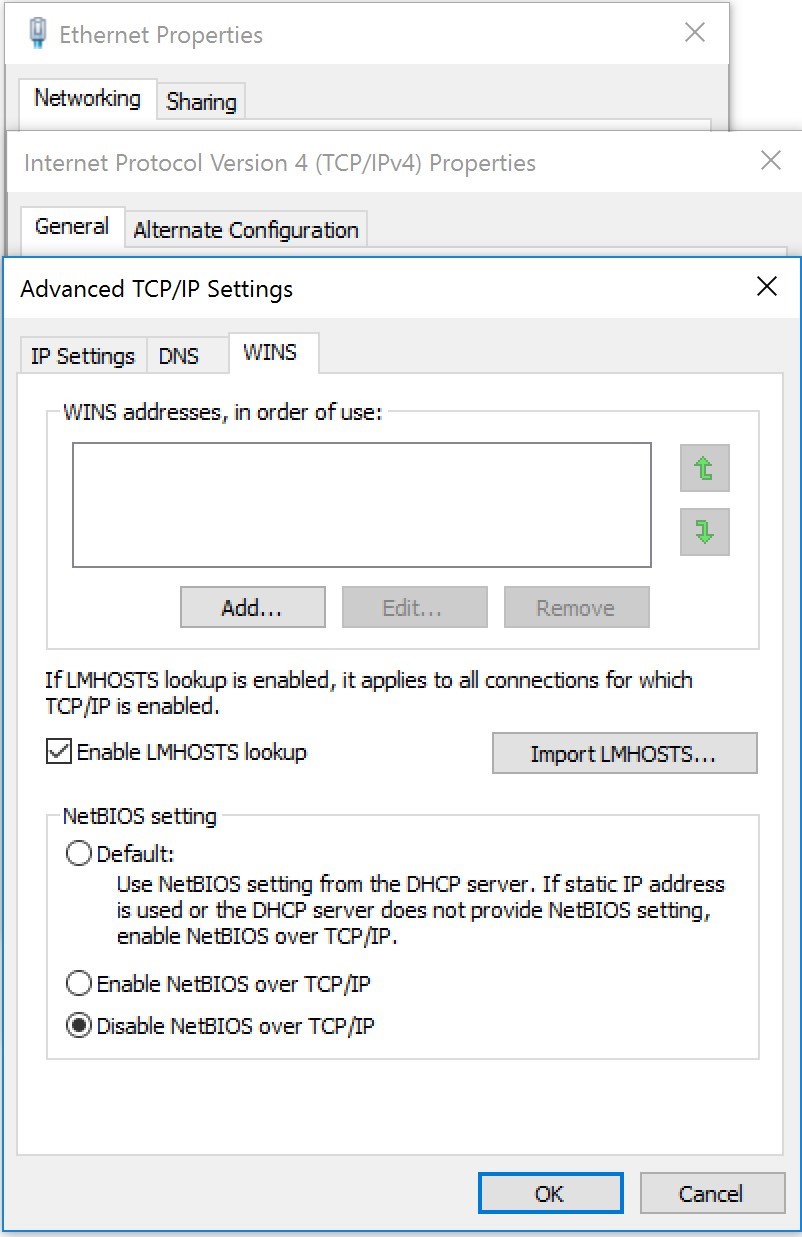
You can manually disable NetBIOS on Windows as follows:
- Open network connection properties
- Select TCP/IPv4 and open its properties
- Click Advanced, then go to WINS tab and select Disable NetBIOS over TCP
- Save the changes.
If you have multiple network adapters (or VLANs) on your computer, you will need to disable NetBIOS in the properties of each of them.
You can check the NetBIOS over TCP/IP status for network adapters from the Windows command prompt:
ipconfig /all |find "NetBIOS"
NetBIOS over Tcpip . . . . . : Disabled
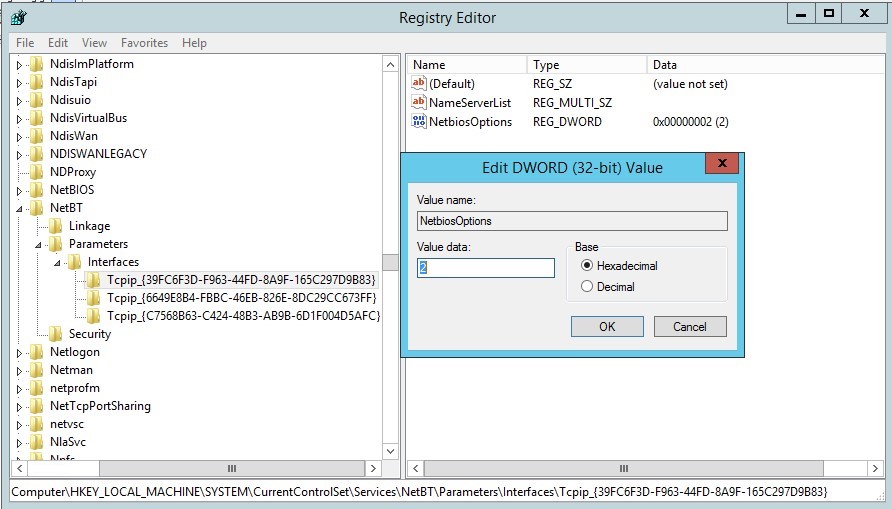
You can disable NetBIOS for the specific network adapter through the registry as well. Each network adapter has a separate registry key under HKEY_LOCAL_MACHINE\SYSTEM\CurrentControlSet\Services\NetBT\Parameters\Interfaces containing its TCPIP_GUID.
To disable NetBIOS for the specific adapter, go to its reg key and change the value of NetbiosOptions parameter to 2 (it is 0 by default).
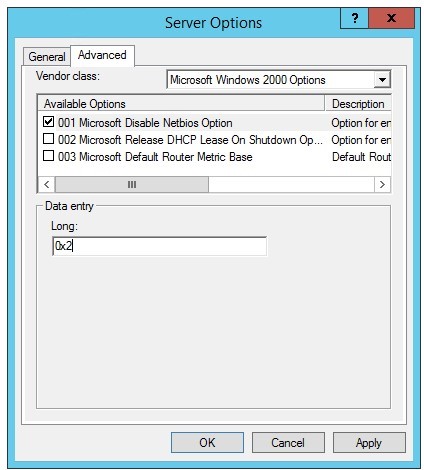
You can disable NetBIOS on the domain clients receiving IP addresses from a Windows DHCP server using a special DHCP option.
- Run the
dhcpmgmt.mscconsole, connect to the DHCP server and select Scope Option zone settings (or server – Server Options); - Go to the Advanced tab and select Microsoft Windows 2000 Options in the Vendor class dropdown list;
- Enable 001 Microsoft Disable Netbios Option and change its value to 0x2.
How to Disable NetBIOS Over TCP/IP via Group Policy?
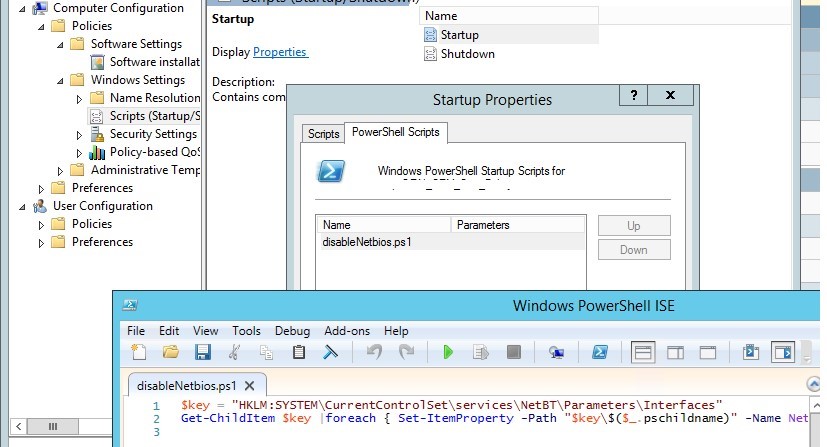
There is no separate GPO option that allows to disable NetBIOS over TCP/IP for all network adapters in Group Policy Editor or the latest version of Administrative Templates for Windows 10/Windows Server 2019. Use the following PowerShell logon script to completely disable NetBIOS for all network adapters:
$regkey = "HKLM:SYSTEM\CurrentControlSet\services\NetBT\Parameters\Interfaces"
 Get-ChildItem $regkey |foreach { Set-ItemProperty -Path "$regkey\$($_.pschildname)" -Name NetbiosOptions -Value 2 -Verbose}
Save this code to disableNetbios.ps1 file, copy it to your GPO directory and run on clients via Computer Configuration -> Policies -> Windows Settings -> Scripts -> Startup- > PowerShell Scripts.
Then open a command prompt and run the following command in order to check that NetBIOS is disabled for your network adapters (except for tunnel interfaces):
wmic nicconfig get caption,index,TcpipNetbiosOptions
13 comments
[…] Disabling NetBIOS: https://support.microsoft.com/en-nz/help/313314/how-to-disable-netbios-over-tcp-ip-by-using-dhcp-server-options https://woshub.com/how-to-disable-netbios-over-tcpip-and-llmnr-using-gpo/ […]
You can actually wildcard the Interfaces for the WINS registry value, turning this into a neat one liner without looping:
set-ItemProperty HKLM:\SYSTEM\CurrentControlSet\services\NetBT\Parameters\Interfaces\tcpip* -Name NetbiosOptions -Value 2
thanks. this helped me.
missed: -Path after set-itemproperty
should work:
set-ItemProperty -Path HKLM:\SYSTEM\CurrentControlSet\services\NetBT\Parameters\Interfaces\tcpip* -Name NetbiosOptions -Value 2
[…] LLMNR (Link-Local Multicast Name Resolution) and NBNS […]
Regarding this section:
“You can disable the LLMNR protocol on a Windows computer locally via the registry using the following PowerShell commands:”
You will probably find this results in the GPO setting coming out as “Not Configured” instead of Enabled.
I don’t know why this is, but I have replicate the failure dozens of times that I then have to fix, and I can only fix by going into GPEdit on the client and change the setting to Enabled.
I’ve tried exporting and importing the key – it’s a 50-50 success rate, thus not worth the effort.
Web crawling has found others have had the same issue, but the answers are always apply a domain GPO, which doesn’t help if you don’t have a domain.
The specified GPO setting only disabled LLMNR broadcasts, but does not disable LLMNR itself.
To do this, you need to enable the setting “Turn off multicast name resolution”, which is also located in Network > DNS Client.
“Disabling LLMNR on Windows Using GPO” –> Why you use “Turn off smart multi-homed name resolution” instead of “Turn off multicast name resolution”. When I read the description of those GPOs the last one seems to be right.
You’re right, thanks!
Is a reboot really required after disabling netbios with powershell?
You can disable/reenable the NIC. But you need to do something for it to reread its config and disable Netbios.
The DHCP options haven’t worked for any OS past XP fyi. The DHCP options can be set, but they are pretty useless unless you suddenly have a legacy client show up.
It worked for me. Make sure you use “Microsoft Windows 2000 Options” in the DHCP options (yes, Windows 2000). My DHCP server is Windows Server 2012 R2 and clients are Windows 10.