Distribution groups (lists) are a special type of recipients in Exchange. A distribution group has an email address but doesn’t have a mailbox. Emails sent to the distribution list are forwarded to the email addresses of all group members (DL recipients). Distribution groups may be used when you want to send an email to multiple recipients without having to enter each email address separately.
In this article, we’ll look at how to create and manage distribution groups in Exchange (the article is relevant for all supported Exchange versions, including Exchange Online, with some modifications). You can use Exchange Admin Center (EAC) or PowerShell console (Exchange Management Shell) to manage distribution groups.
There are three types of distribution groups in Exchange:
- Mail-enabled universal distribution groups are used only for the distribution of emails. In common distribution groups (not the security ones), you may allow users to join or exit groups themselves (without membership approval);
- Mail-enabled universal security groups are used both to send emails and to allow access to resources in the Active Directory domain.Tip. Common security groups in AD are populated manually. There is an article on website that tells how to create dynamic user groups in Active Directory using a PowerShell script.
- Dynamic Distribution Group — members (recipients) are added to such a group automatically based on an LDAP filter.
Static Distribution Groups in Exchange
You can create a distribution list in the Exchange Admin Center (EAC).
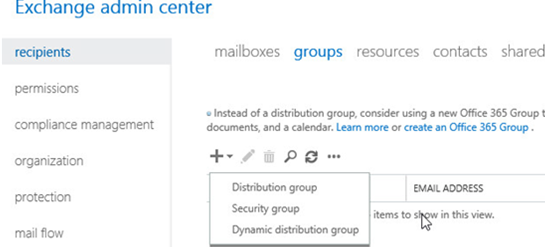
- Open the EAC console and go to Recipients -> Groups;
- Click + and select the Distribution Group;

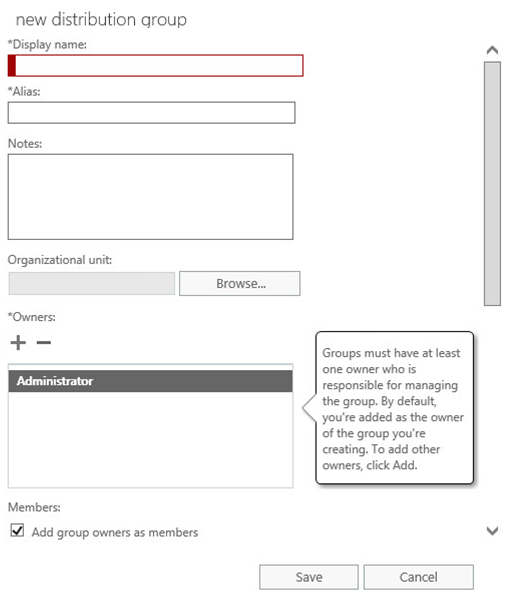
- Fill in the basic attributes of the distribution group:
- Display name is the group name displayed in the address book
- Alias is the group email address (must be less than 64 characters)
- Notes – description of the group
- Organizational unit is an Organizational Unit (OU) a distribution group is created in
- Owners are the group owners (by default, a person who created a group becomes its owner)
- Members – allows to add group members (recipients)
- Choose whether owner approval is required to join the group shows if an owner approval is needed to join a group (the default value is Open: Anyone can join this group without being approved by the group owners, but you can change it to Closed: Members can be added only by the group owners)
- Choose whether the group is open to leave shows if you need an owner approval to leave the group
You can also manage distribution groups from PowerShell (Exchange Management Shell). Let’s learn useful PowerShell commands to manage Exchange distribution lists.
To create a new Exchange distribution group:
New-DistributionGroup -Name “HelpDesk” -SamAccountName “HelpDesk” -OrganizationalUnit “woshub.com/de/munich/groups” -DisplayName "HelpDesk team" -Alias helpdesk
To create an open distribution list:
New-DistributionGroup -Name "ITNews "-Alias itnews –Type Distribution -MemberJoinRestriction open
Set-Group -Identity "WintelTeam" -Universal
or the Set-ADGroup cmdlet from the AD for PowerShell module:
Get-AdGroup "WintelTeam" | Set-ADGroup -GroupScope Universal
By default, you can send emails to an Exchange distribution group only from user email addresses inside your company (to reduce the number of spam mailings). To allow a distribution list to receive external emails, use the following command:
Get-DistributionGroup -identity “HelpDesk”| Set-DistributionGroup -RequireSenderAuthenticationEnabled $False
To disable the email address policy and change the SMTP address of the group:
Set-DistributionGroup -Identity “HelpDesk” -EmailAddressPolicyEnabled $false
 Set-DistributionGroup -Identity “HelpDesk” -PrimarySmtpAddress [email protected]
You can add extra SMTP email addresses to the distribution group:
Set-DistributionGroup HelpDesk -EmailAddresses SMTP:[email protected],SMTP:[email protected]
To add a new user address to the distribution group:
Add-DistributionGroupMember -Identity HelpDesk -Member o.brian
To add a list of users to the distribution group from a text file (each new user full name or email address is specified in a new line in the file):
Get-Content C:\ps\new_helpdesk_dl_users.txt | Add-DistributionGroupMember -Identity HelpDesk
If you want to grant users permission to send on behalf of a distribution group, use the following command:
Set-DistributionGroup HelpDesk -GrantSendOnBehalfTo o.brian, t.muller
To display the list of the distribution group members:
Get-DistributionGroupMember –identity HelpDesk
Or you can export the email addresses of the group members to a CSV file:
Get-DistributionGroupMember –identity HelpDesk | ft name, primarysmtpaddress | Export-CSV c:\PS\HelpDesk_dl_members.csv
To remove a user from the distribution list:
Remove-DistributionGroupMember -identity HelpDesk –member t.muller -confirm:$false
To set the maximum message size that may be sent to the distribution group:
Get-DistributionGroup HelpDesk | Set-DistributionGroup -MaxReceiveSize 3MB
Dynamic Distribution Groups in Exchange
The list of members in Exchange dynamic distribution groups is updated automatically based on the criteria (filters) set. Actually, the filters are LDAP queries. Dynamic distribution groups may be created based on different user attributes in Active Directory. For example, the location, department name, job title, etc. Exchange regularly checks and updates the membership of a dynamic distribution group based on information in Active Directory.
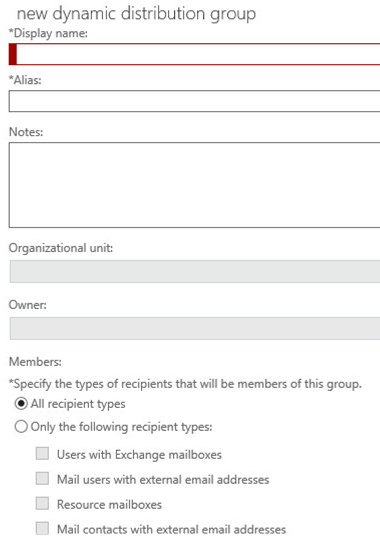
You can create a dynamic distribution group using a simple form in the Exchange Admin Center. However, I prefer using PowerShell to do it.
Create a simple Exchange dynamic distribution group:
New-DynamicDistributionGroup -Name 'IT department' -RecipientContainer 'woshub.com/it/user' -IncludedRecipients 'AllRecipients' -ConditionalDepartment 'IT department' -OrganizationalUnit 'woshub.com/it/groups/exchange' -Alias itdept
- RecipientContainer is a container in AD to get recipients from
- IncludedRecipients is the type of recipients
- ConditionalDepartment filter recipients by the value of the Company attribute of the AD user.
You can create a dynamic group using an LDAP filter in the RecipientFilter attribute as follows:
New-DynamicDistributionGroup -Name RomeSales -RecipientFilter {RecipientType -eq 'UserMailbox' -and Department -like '*sale*' –and CustomAttribute12 -eq 'IT' –and City -eq 'Rome' -and (Title -like '*head*' -or Title -like '*manager*' -or Title -like '*leader*')} -OrganizationalUnit Users
You can view the list of group members in EAC or using PowerShell:
Get-Recipient -RecipientPreviewFilter (Get-DynamicDistributionGroup -Identity 'RomeSales').RecipientFilter | ft name, primarysmtpaddress
To assign moderators of a dynamic distribution list:
Set-DynamicDistributionGroup HelpDesk -ModeratedBy o.brian, t.muller
To allow sending emails to the distribution group without moderation for the specific users:
Set-DynamicDistributionGroup -Identity RomeSales -BypassModerationFromSendersOrMembers t.muller
To enable delivery of external emails (from outside of the Exchange organization) to a dynamic distribution list, use the command:
Get-DynamicDistributionGroup -identity “HelpDesk”| Set-DynamicDistributionGroup -RequireSenderAuthenticationEnabled $False
1 comment
Can I see who is a member of the Dynamic Group in Outlook using PowerShell?
When I created one in Exchange, I can’t see who is a member of the DL.