Windows OS Hub
  • Windows Server
    • Windows Server 2022
    • Windows Server 2019
    • Windows Server 2016
    • Windows Server 2012 R2
    • Windows Server 2008 R2
    • SCCM
  • Active Directory
    • Active Directory Domain Services (AD DS)
    • Group Policies
  • Windows Clients
    • Windows 11
    • Windows 10
    • Windows 8
    • Windows 7
    • Windows XP
    • MS Office
    • Outlook
  • Virtualization
    • VMWare
    • Hyper-V
    • KVM
  • PowerShell
  • Exchange
  • Cloud
    • Azure
    • Microsoft 365
    • Office 365
  • Linux
    • CentOS
    • RHEL
    • Ubuntu
  • Home
  • About

Windows OS Hub

  • Windows Server
    • Windows Server 2022
    • Windows Server 2019
    • Windows Server 2016
    • Windows Server 2012 R2
    • Windows Server 2008 R2
    • SCCM
  • Active Directory
    • Active Directory Domain Services (AD DS)
    • Group Policies
  • Windows Clients
    • Windows 11
    • Windows 10
    • Windows 8
    • Windows 7
    • Windows XP
    • MS Office
    • Outlook
  • Virtualization
    • VMWare
    • Hyper-V
    • KVM
  • PowerShell
  • Exchange
  • Cloud
    • Azure
    • Microsoft 365
    • Office 365
  • Linux
    • CentOS
    • RHEL
    • Ubuntu

 Windows OS Hub / PowerShell / Writing Output to Log Files in PowerShell Script

April 19, 2023 PowerShellWindows 10Windows Server 2019

Writing Output to Log Files in PowerShell Script

You can use simple text log files to control running and track all of the activities in your PowerShell scripts. This is useful when debugging errors or auditing script actions. In this article, we’ll show some ways to use logging in PowerShell scripts by writing output to text log files.

In the simplest case, if you want to write the output of an information message or a PowerShell command result to a text log file, you can use one of the following formats to redirect the PS output to a text file:

Write-Output "Files are successfully created in $env:computername" >> C:\PS\Logs\TestLog.txt
Add-Content -Path C:\PS\Logs\TestLog.txt -Value "Files are successfully created in $env:computername"
"Files are successfully created in $env:computername" | Out-File -FilePath C:\PS\Logs\TestLog.txt –Append

In all cases, the commands add a new line to a txt file with the text you have specified.

If you want to overwrite the log file contents each time, use the Set-Content cmdlet.

Log PowerShell output to a text file

The main drawback of this method is that you cannot figure out when an entry was written to the log (an event occurred). You can add the current timestamp to the log file. It will help to identify the time when the script was run and a specific event occurred.

To make it more convenient, you can create a separate function in your PowerShell script that will write the data it receives to a log file and add the timestamp for each event.

You can create a function as shown below:

$Logfile = "C:\PS\Logs\proc_$env:computername.log"
function WriteLog
{
Param ([string]$LogString)
$Stamp = (Get-Date).toString("yyyy/MM/dd HH:mm:ss")
$LogMessage = "$Stamp $LogString"
Add-content $LogFile -value $LogMessage
}

Then call the WriteLog function if you want to log something.

WriteLog "The script is run"
WriteLog "Calculating…."
Start-Sleep 20
WriteLog "The script is successfully executed"

Now you can see the time of each entry in the log file.

powershell create log file with timestamp

You can replace 
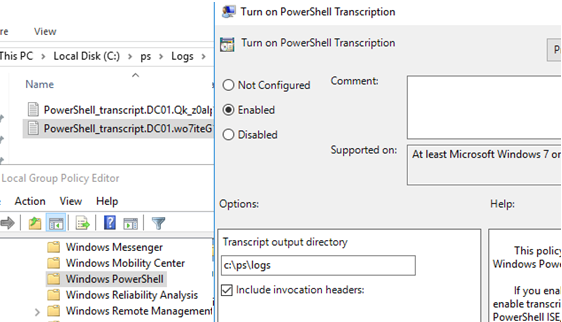
Write-Host calls with LogWrite ones in your script.

PowerShell has a built-in transcript feature to save all commands and outputs shown in the PS console to a text log file.

To log your current PowerShell session, the Start-Transcript cmdlet is used.

After running the command, a message appears showing the file the output of all commands is logged to. By default, the log file is located in the current user profile:

Transcript started, output file is C:\Users\user\Documents\PowerShell_transcript.DESKTOP-P2FHTKQ.+IzDgZiN.20210908163729.txt
You can specify the path to the text file as follows:

Start-Transcript -Append C:\PS\Logs\PSScriptLog.txt

The –Append option indicates that new sessions will be logged to the end of the file (without overwriting it).

Run some PowerShell commands that output the results to the console. For example, let’s display a list of running processes, services, and the AD replication status:

Get-Process| where-object {$_.WorkingSet -GT 500000*1024}|select processname,@{l="Used RAM(MB)"; e={$_.workingset / 1mb}} |sort "Used RAM(MB)" –Descending
Get-Service | Where-Object {$_.status -eq 'Running'}
Get-ADReplicationFailure -Target mun-dc01

Stop logging for the current PowerShell session:

Stop-Transcript

Then open the transcript log file.

PowerShell_transcript log file - record a session to a text file

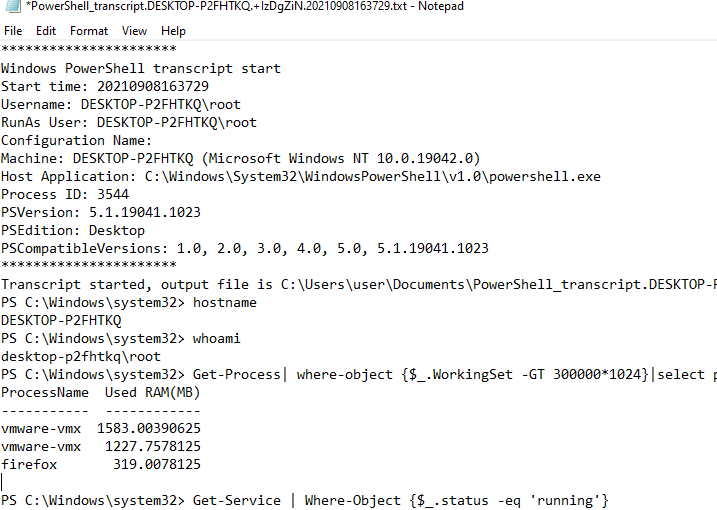
As you can see, the log shows the entire history of the PowerShell commands that were run in the console and all the output.

All errors and warnings are also logged, and it is extremely convenient when debugging complex PowerShell scripts.

You can use Start-Transcript and Stop-Transcript cmdlets in your PowerShell scripts to natively log all actions and outputs.

Using the Group Policy option Turn on PowerShell Transcription (Computer Configuration –> Administrative Templates –> Windows Components –> Windows PowerShell), you can enable automatic logging of all run PowerShell commands and output on a computer. After updating GPO settings on the computer, a separate text log file will be created for each running powershell.exe process and all PS commands and their outputs will be logged.
GPO option: Turn on PowerShell Transcription

2 comments
6
Facebook Twitter Google + Pinterest
previous post
How to Hide Users and Groups from the Global Address List on Exchange/Office 365?
next post
Enable Group Policy Editor (gpedit.msc) on Windows 10/11 Home Edition

Related Reading

Zabbix: How to Get Data from PowerShell Scripts

October 27, 2023

Tracking Printer Usage with Windows Event Viewer Logs

October 19, 2023

PowerShell: Configure Certificate-Based Authentication for Exchange Online (Azure)

October 15, 2023

How to Query and Change Teams User Presence...

October 8, 2023

How to Use Ansible to Manage Windows Machines

September 25, 2023

2 comments

Jeff Lorenzen February 11, 2022 - 4:13 pm

Watch out for the invalid characters on this site. Those darn curly quotes get me every tiime!

Reply
bankey March 16, 2022 - 12:26 am

this will do that trick: just replace the first 0x0027 to the correct character 😉 took me a bit 🙂
-replace $([char]0x0027),$([char]0x0022)

Reply

Leave a Comment Cancel Reply

Categories

  • Active Directory
  • Group Policies
  • Exchange Server
  • Microsoft 365
  • Azure
  • Windows 11
  • Windows 10
  • Windows Server 2022
  • Windows Server 2019
  • Windows Server 2016
  • PowerShell
  • VMWare
  • Hyper-V
  • Linux
  • MS Office

Recent Posts

  • Zabbix: How to Get Data from PowerShell Scripts

    October 27, 2023
  • Tracking Printer Usage with Windows Event Viewer Logs

    October 19, 2023
  • PowerShell: Configure Certificate-Based Authentication for Exchange Online (Azure)

    October 15, 2023
  • Reset Root Password in VMware ESXi

    October 12, 2023
  • How to Query and Change Teams User Presence Status with PowerShell

    October 8, 2023
  • How to Increase Size of Disk Partition in Ubuntu

    October 5, 2023
  • How to Use Ansible to Manage Windows Machines

    September 25, 2023
  • Installing Language Pack in Windows 10/11 with PowerShell

    September 15, 2023
  • Configure Email Forwarding for Mailbox on Exchange Server/Microsoft 365

    September 14, 2023
  • How to View and Change BIOS (UEFI) Settings with PowerShell

    September 13, 2023

Follow us

  • Facebook
  • Twitter
  • Telegram
Popular Posts
  • Configuring Port Forwarding in Windows
  • Manage Windows Updates with PSWindowsUpdate PowerShell Module
  • Start Menu or Taskbar Search Not Working in Windows 10/11
  • Get-ADUser: Find Active Directory User Info with PowerShell
  • Adding Drivers into VMWare ESXi Installation Image
  • How to Hide Installed Programs in Windows 10 and 11
  • Configuring SFTP (SSH FTP) Server on Windows
Footer Logo

@2014 - 2023 - Windows OS Hub. All about operating systems for sysadmins


Back To Top