In this article we‘ll show you how to create a software mirror (RAID1) from two GPT disks with Windows Server 2016/Windows 10 installed for UEFI. We’ll consider a full-featured BCD bootloader configuration that provides correct Windows boot and protects your OS and data in case of any drive failure.
So, I have a simple computer with an UEFI architecture and two identical 50GB disks, but without built-in RAID controller. Our task is to install an OS (Windows Server 2016, Windows 10 or a free Hyper-V server) on the first GPT disk and then create a software mirror (RAID1) from two disks.
Write an installation Windows ISO image on a DVD/USB stick, boot your computer from this device (in the UEFI mode, not the Legacy one) and run the installation of Windows Server 2016.
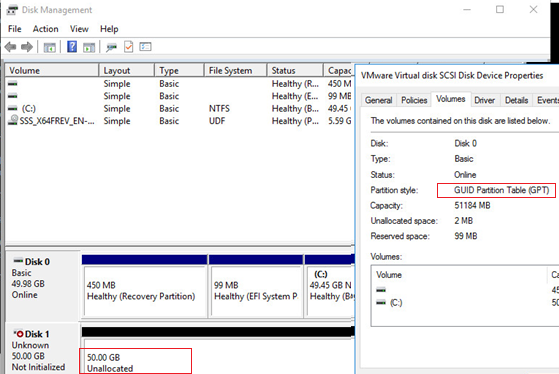
After the installation is complete, open Disk Management snap-in (diskmgmt.msc) to make sure that the first disk is using GPT (Disk Properties -> Volumes -> Partition style –> GUID partition table), and the second one is empty (unallocated).
Preparing GPT Partition Table for a Mirror on Disk 2
Run the command prompt with the administrator privileges and run diskpart. Enter:
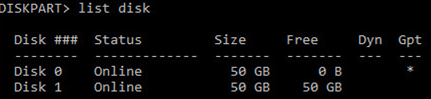
DISKPART>List disk
As you can see, there are two local disks available in the system:
Disk 0– a disk with GPT, Windows is installed onDisk 1– an empty unallocated disk
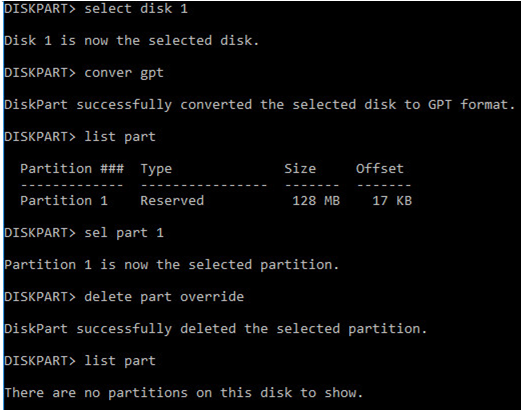
Clean the second disk again just in case and convert it into GPT:
Select disk 1
 clean
 Convert GPT
Display the list of partitions on the second disk:
List part
If there is at least one partition on the Disk 2 (in my example it is Partition 1, with the Reserved label and Size 128 Mb), delete it:
Sel part 1
 Delete partition override
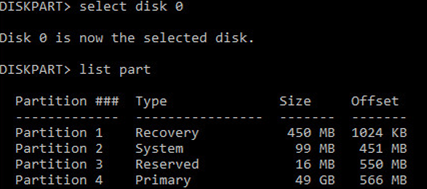
Display the list of partitions on first disk (disk 0). Then you will have to create the same partitions on Disk 1.
Select disk 0
 List part
There are 4 partitions:
- Recovery – 450MB, a recovery partition with WinRE
- System – 99MB, an EFI partition (more about the partition structure on GPT disks)
- Reserved – 16MB, an MSR partition
- Primary – 49GB, a main partition with Windows image
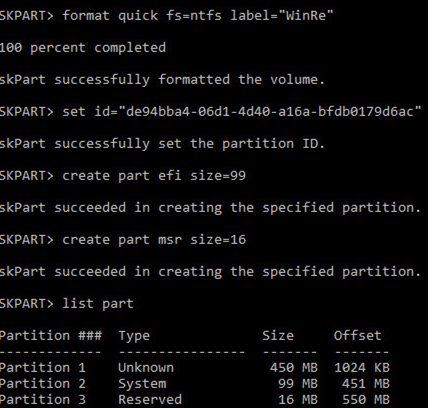
Create the same partitions structure on Disk 1:
Select disk 1
 Create partition primary size=450
 format quick fs=ntfs label=”WinRE”
 set id=”de94bba4-06d1-4d40-a16a-bfd50179d6ac”
 create partition efi size=99
 create partition msr size=16
 list part
How to Convert Disks to Dynamic & Create a Mirrored Disk?
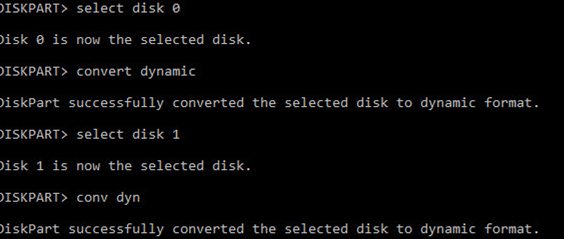
Then convert both disks to dynamic:
Select disk 0
 Convert dynamic
 Select disk 1
 Con dyn
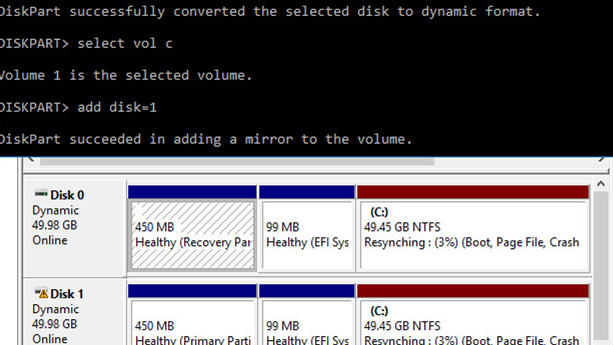
Create a mirror for a system drive (drive letter C:). Select a partition on Disk 0 and create a mirror for it on Disk 1:
Select volume c
 Add disk=1
The following message will appear:
DiskPart succeeded in adding a mirror to the volume
Open Disk Management and make sure that drive C: synchronization has been started (Resynching). Wait till it is over, it may take up to several hours depending on the size of the C: partition.
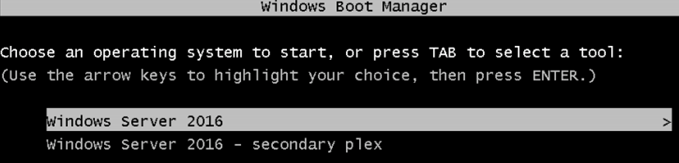
When booting Windows, the Windows Boot Manager menu will appear where you can select what disk to boot from. If you do not select a disk manually, the system will try to boot from the first one in 30 seconds:
- Windows Server 2016
- Windows Server 2016 – secondary plex
However, the problem is that the bootloader configuration is stored only on the first drive, and if you lose it you won’t be able to boot Windows from the second drive without additional actions. In fact, you have protected your data (but not the Windows bootloader) from a failure of the second disk only.
A software Windows RAID cannot be used to create a fully functional EFI partition mirror. Since the OS boot files are located on the EFI partition, if the first disk fails, you won’t be able to boot from the second disk without the manual repairing of your EFI bootloader. It is quite hard for a beginner and takes some time (you may not have it if there is a crowd of angry users around).
Now we’ll show you how to copy the EFI partition to the second disk and change the BCD bootloader configuration to enable booting Windows from both the first and second drives.
How to Create GPT Mirror for EFI Partition?
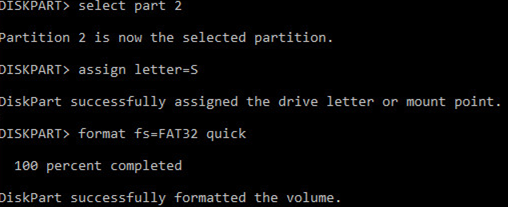
Then you have to prepare the EFI partition on the second disk in the mirror in order your computer can use this partition to boot Windows. Assign the drive letter S: to the EFI partition on Disk 1 and format it in FAT32:
Select disk 1
 Select part 2
 assign letter=S
 format fs=FAT32 quick
Then assign the letter P: to the EFI partition on Disk 0:
select disk 0
 select partition 2
 assign letter=P
 exit
How to Copy EFI partition and BCD Store to a Second Drive?
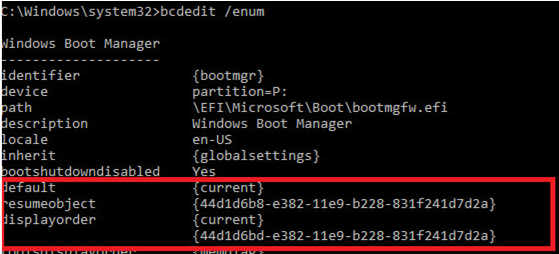
Display the current BCD bootloader configuration using the following command:
bcdedit /enum
When creating a mirror, VDS service has automatically added the BCD entry for the second mirror disk (labeled “Windows Server 2016 – secondary plex”).
In order to allow booting from EFI partition on the second disk if first disk failure, you must change your BCD configuration.
To do it, copy the current Windows Boot Manager configuration:
bcdedit /copy {bootmgr} /d "Windows Boot Manager Cloned"
The entry was successfully copied to {44d1d6bf-xxxxxxxxxxxxxxxx}Then copy the configuration ID and use it in the following command:
bcdedit /set {44d1d6bf-xxxxxxxxxxxxxxxx} device partition=s:
If you have done it correctly, this message will appear:
The operation completed successfully.

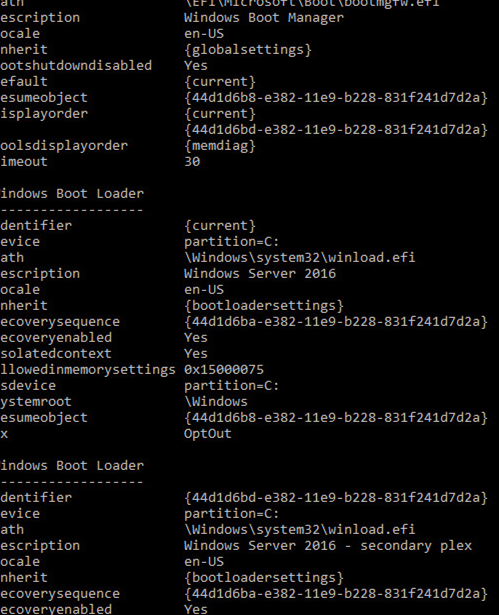
List the current Windows Boot Manager (bcdedit /enum) configuration. Note that the bootloader is now having two options for boot from EFI partitions on different disks (default and resume object).
Then you must copy your BCD store from the EFI partition on Disk 0 to Disk 1:
P:
 bcdedit /export P:\EFI\Microsoft\Boot\BCD2
 robocopy p:\ s:\ /e /r:0

Rename the BCD store on Disk 1:
Rename s:\EFI\Microsoft\Boot\BCD2 BCD
And delete the copy on Disk 0:
Del P:\EFI\Microsoft\Boot\BCD2

If your first disk fails, you need to select the “Windows Boot Manager Cloned” item in the Windows Boot Manager (boot menu) and then “Microsoft Windows Server 2016 — secondary plex” in order to boot your Windows correctly.
If one of the disks fails, you will get the Failed Redundancy message in Disk Management snap in.

In this case, you will have to replace the failed disk, delete the mirror configuration and create a software RAID 1 from the beginning.
12 comments
bcdedit /copy {bootmgr} /d “Windows Boot Manager Cloned”
This command did not work
Fehlermeldung:
Der angegebene Kopierbefehl ist ungültig.
Führen Sie “bcdedit /?” aus, um die Befehlszeilenunterstützung aufzurufen.
Falscher Parameter.
“default and resume object” is “normal boot” option and “resume from hibernate” option
You must use “bcdedit /enum all” to get all possible boot loader configs
Hello,
If one gets an error when doing “add disk=1” (something cryptic about free extents), one can do a single command “extend”, and try “add disk=1” again. Happened on Server 2019.
Thanks for the amazing guide.
To amend my previous comment:
*After* selecting the C volume (sel vol c),
In response to the cryptic error when “add disk=1”, do:
shrink desired=10
extend
So, shrink by 10MB first, then extend
Also, I advise to then run:
retain
This poorly documented thing does *something* to the volume, which saves you from “bcdboot” and “bcdedit” errors, if you need to run these.
“retain” seems to solve the following:
bcdboot:
“BFSVC Error: Failed to set element application device. Status = [c000000bb]” (yes, this can happen even with the volumes squeaky clean)
“BFSVC: BCD Error: Failed to convert data for element”
“failed to populate bcd store”
bcdedit /set {default} device partition=C: (cryptic error about unsupported operation)
Lastly, if you have several EFI partitions, like in this mirror case, you might get the following when using bcdedit:
“The boot configuration data store could not be opened” “the requested system device cannot be identified”
The solution is: Assign a drive letter to the desired EFI partition, as explained above, and then:
bcdedit /sysstore driveletter_p:_s:_or_whatever
Please save yourself my 2 days 🙂
Thanks for the great article. This was exactly what I needed.
Cool, thank you for your HowTo! It works with Win2019 also (no problems/errors when doing 100% step by step). Test with missing Drive0 in a VM and test with missing Drive1 successfully.
But there is no different between the first output of “bcdedit /enum” and the second one, or?
Thank you, your guide was easy to follow and worked great on Server 2019! A client’s Supermicro AS-5019D-FTN4 didn’t come with native NVME RAID capabilities, so this satisfied the RAID1 requirement perfectly.
Win Server 2022: “The disk could not be converted to dynamic because security is enabled” (partition security)
No idea where to change partition security.
Windows is crap. Bill Gates is still crap. F**k Windows in all of its flavors. Something simple like raid1, which is trivial in Linux, takes a f**king rocket propulsion manual to do in Windows. F**k Windows in all possible ways.
Your tutorial is great, Thanks!!!
But I have a question, why you didn’t copy WinRe from original to clone then where did you get the set id=”de94bba4-06d1-4d40-a16a-bfd50179d6ac” after creating partition WinRE? Thanks
https://learn.microsoft.com/en-us/windows-hardware/manufacture/desktop/configure-uefigpt-based-hard-drive-partitions?view=windows-11
This partition must use the Type ID: DE94BBA4-06D1-4D40-A16A-BFD50179D6AC.
Thank you for the great step by step process for this.
One hiccup I ran into was when I ran the bcdedit robocopy line, the BCD and BCD.LOG files didn’t copy due to being busy with another process. Do I need to manually stop that process so those two files can copy, or do I not need to worry about it. Will it affect the updating or mirror of the drives/volumes? Thanks