Storage Spaces Direct (S2D) is a new distributed data storage technology that appeared in Windows Server 2016. Due to Storage Spaces Direct, you can turn local drives of several servers into a fault-tolerant, scalable storage protected from failure of both separate disks and entire servers. The cost of this software storage is much less than that of a SAN or NAS due to simplified scaling (up to 16 servers and 400 drives) and the opportunity to use different drives (including SSDs and NVMes) enables significant performance.
What Is Storage Spaces Direct (S2D)
S2D is the further development of Storage Spaces technology and allows to merge the local drives of the Hyper-V cluster nodes into Storage Pools. You can create virtual volumes (disks) on these drives and use them as common Cluster Shared Volume (CSV) to store Hyper-V virtual machines files and SOFS file shares. If you need to expand the storage size, just add a new server or drive to S2D. In general, Storage Spaces Direct is the answer of Microsoft to VMware vSAN.
Storage Spaces Direct Requirements
S2D supports the following storage device types:
- Common HDDs (SAS);
- SATA / SAS SSDs;
- NVMe (Non-Volatile Memory Express) are SSDs connected through a faster PCI Express bus instead of the classic SATA/SAS interface.
Later different types of disks can be combined in various arrays (by speed or size). For example, it is reasonable to locate the cache and application transaction logs on faster NVMe SSDs, and it is better to use slower and less expensive disks to store large files that do not require high performance to access them, etc.
In order S2D to work, you have to create a failover cluster with the following requirements to its nodes.
Requirements to S2D cluster nodes:
- Windows Server 2016 Datacenter edition;
- The following components must be installed on the servers: Hyper-V, File Services roles and Failover Clustering feature.Note. Don’t forget to disable SMB 1.0:
Remove-WindowsFeature –Name FS-SMB1 -Verbose –Restart - At least two servers in a cluster (ideally, at least 4 hosts to ensure high fault tolerance);
- In addition to the system drive, there must be at least one physical disk in each node. All disks that you are going to add to the Storage Spaces Direct must be unformatted (i.e. not partitioned and containing no partition table).
Suppose that you have created a failover cluster of two servers running Windows Server 2016 (you can create it even in a workgroup).
Prior to enabling Storage Spaces Direct, make sure that your disks can be joined into this pool.
Get-PhysicalDisk –CanPool $True | Sort Model

How to Enable Storage Spaces Direct
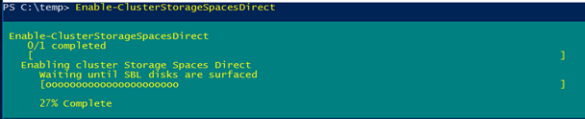
Activate S2D using the following cmdlet:
Enable-ClusterStorageSpacesDirect
The cmdlet is being processed long enough (about 10 minutes), all available disks and their performance will be analyzed and a cluster pool will automatically be created. Also, two tiers are created automatically: Performance and Capacity, having different failover types: mirror and parity, respectively.
3 types of providing fault tolerance of the data storage are supported:
- Mirrored (3) – the data are synchronously replicated between 3 (or 2 in minimal configuration) nodes. High reading speed is reached due to distributing the operation between all servers.
- Parity (2) – the data with parity information are distributed among different disks. Data storage is more efficient since you don’t need to store several copies of the same data.
- Tiered (1) – a combination of both above mentioned methods.
Get-Disk | select Number, FriendlyName, OperationalStatus, Size, PartitionStyle, BusType | sort Number | ft -AutoSize
It is true – in all cases it is RAID. The solution is to update drivers or firmware of the controllers (if you have HP servers, install the latest HPE Support Pack). Check the BusType again. (now it’s changed to SAS).

Also, there is a little trick that allows to change the bus type to SATA for the specific type of controller:
HKEY_LOCAL_MACHINE\SYSTEM\CurrentControlSet\Services\arcsas\Parameters
 "BusType"=dword:0000000b (instead of 00000008)
-CacheState Disabled parameter.Open the Failover Cluster Manager and make sure that Cluster Pool 1 has appeared in the Storage section.

After selecting the pool, you can see what disks it consists of.

If necessary, the pool name may be changed:
Set-StoragePool –FriendlyName “Cluster Pool 1” –NewFriendlyName “S2D”
If you have to create a volume from the specific disks, you can use this command. First, select all LUN 3 disks and collect them into the pool.
$HDDs = Get-PhysicalDisk | ? PhysicalLocation -like "*LUN 3"
 New-StoragePool -StorageSubSystemFriendlyName *Cluster* -FriendlyName S2DPool -ProvisioningTypeDefault Fixed -PhysicalDisk $HDDs
Display the list of disks in the pool:
Get-StoragePool -FriendlyName S2D | Get-PhysicalDisk | ft PhysicalLocation

Add a new disk to the pool:
$HDDs = Get-PhysicalDisk | ? PhysicalLocation -like "*LUN 4"
 Add-PhysicalDisk -PhysicalDisks $HDDs -StoragePoolFriendlyName S2D
Disks marked as S2D are not displayed in the Disk Management console any more, and it is OK.

If you have different types of drives you can use storage tiering (optional). A mirror-type tier of SSDs is created as follows:
New-StorageTier -StoragePoolFriendlyName S2D -FriendlyName "Mirror_Tier" -MediaType SSD -ResiliencySettingName Mirror
A parity tier of common HDDs:
New-StorageTier -StoragePoolFriendlyName S2D -FriendlyName "Parity_Tier" -MediaType HDD -ResiliencySettingName Parity
Now you can create a CSV (Cluster Shared Volume):
New-Volume –StoragePoolFriendlyName S2D –FriendlyName CSV001 –PhysicalDiskRedudancy 2 -FileSystem CSVFS_ReFS -Size 200GB
You can display the list of volumes and their redundancy types like this:
Get-VirtualDisk | ft FriendlyName, ResiliencySettingName, PhysicalDiskRedundancy

A new CSV will appear in the Disk Management.
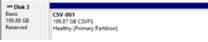
This volume can be used to hos Hyper-V virtual machines or a Scale-out File Server shares.
So, using Storage Spaces Direct of several servers with local disks, you can easily create a software network storage. Due to S2D, fault tolerance of both any pair of disks or servers (4+ node cluster) is provided. S2D cluster automatically starts the process of data reallocating between the rest devices if any faults of disks or servers are detected. In the test environment you can make sure that when you disconnect any two disks, the storage is still available, and VMs on it are running. How to replace a failed drive in the S2D storage I will describe in the next article.
8 comments
Hi,
I am trying to setup S2D on Virtual environment. I am using 3 node cluster with node majority.
Each node have 4 disks. Every time I tried to enable S2D, it fails after 1 hour 1 min with error.
Enable-ClusterS2D : Operation did not complete in time while ‘Waiting until SBL disks are surfaced’. Run cluster
validation, including the Storage Spaces Direct tests, to verify the configuration
Enable-ClusterS2D : Failed to run CIM method EnableStorageSpacesDirect on the
root/MSCLUSTER/MSCluster_StorageSpacesDirect CIM object. The CIM method returned the following error code: 1460
Have a come across such situation? any fix available for this.
Yes, we have the same problem on 2-node cluster with FileSharing Witness. Installed on 2x HPE DL360 Gen10, running Windows 2016 Datacenter with all Security Fixes. Cluster verification OK (no errors). But Enable-ClusterS2D script timeout after 1 hour, 1 minute with error id 1460. I could not find any fix too.
Have you tried to update the firmware on the drives?
In my case, the s2d cluster is no initializated due to the fact that WindowsServer2016 was installed in the Legacy mode. After reinstalling the OS in the native UEFI mode, the problem disappeared.
Hello,
OS was installed directly in the UEFI mode. Last Service Pack for Proliants was installed too (firmware, drivers etc.). Still no luck. Now I am waiting for the second HBA controller. Disk drives for S2D will be connected to H240 in HBA mode instead the SmartArray P816i-a. Then I’ll try a clean install on this hardware config as last chance. 🙂
It seems that S2D isn’t available for us. 🙁 Even with disks connected to HBA240 in HBA mode we don’t succeed. We have to spend huge money to 2x HPE Nimble Storage (we need HA SAN storage).
Windows 2016/2019 S2D to ESXi 6.7.0
Assume I have 4 servers with Windows clusters(s2d enabled).
Can we present the storage from Windows s2d through ISCSI to ESXi 6.7.0 servers?
Is this possible and recommended one ?
Yes, you can do that.
I had that error too when trying to enable S2D using HPE DL380’s, 2 x Gen8, 1 x Gen9 and 1 x Gen10. In the end, I had wipe them and use Server 2019 then I was able to enable it. Seems Server 2022 didn’t like the hardware.