In this article, we’ll walk you through a step-by-step guide on how to install and configure Always On Availability Groups on SQL Server running on Windows Server 2019, discuss failover scenarios, and some other related topics.
Always On Availability Groups provide high availability in MIcrosoft SQL Server. Always On appeared in MSSQL 2012 release.
Features of Always On Availability Groups in SQL Server
What can you use SQL Server availability groups for?
- MS SQL high availability and automatic failover;
- Load balancing of SELECT queries between nodes (secondary replicas may be readable);
- Backup from secondary replicas;
- Data redundancy. Each replica keeps copies of the availability group database.
Always On is based on Windows Server Failover Cluster (WSFC). WSFC monitors availability group nodes and provides automatic failover. Starting from MS SQL Server 2017, Always On may be used without WSFC and in Linux hosts as well. When building a Linux-based cluster, you can use Pacemaker instead of WSFC.
Always On is available in the Standard edition, but it has some restrictions:
- It is limited to 2 replicas (primary and secondary);
- The secondary replica cannot be used to read data;
- The secondary replica cannot be used to backup MS SQL;
- Only 1 database per availability group is supported.
There are no restrictions in the Enterprise edition.
Let’s consider the terms.
- Always On Availability Group is a set of replicas and databases;
- Replica is an SQL Server instance in the availability group. A replica may be primary or secondary. Each replica may contain one or more databases.
Always On is based on WSFC. Each availability group node must be a member of a Windows failover cluster. Each SQL Server instance can have multiple availability groups. Each availability group may have up to 8 secondary replicas.
If a primary replica fails, the cluster will vote for a new primary replica, and Always On will make one of the secondary replicas a primary one. Since users connect to the Listener (a special cluster IP address and the corresponding DNS name) when working with Always On, it will become possible to run write queries again. The Listener is also responsible for balancing SELECT queries between secondary replicas.
Configure Windows Failover Cluster for Always On Availability Group
First of all, we must configure a failover cluster on all nodes used by Always On.
Here is my configuration:
- 2 virtual machines running Windows Server 2019
- 2 SQL Server 2019 Enterprise instances
- Node hostnames are testnode1 and testnode2. The SQL Server instance names are node1 and node2.
Add the Failover Clustering role using the Server Manager or install it through PowerShell:
Install-WindowsFeature –Name Failover-Clustering –IncludeManagementTools
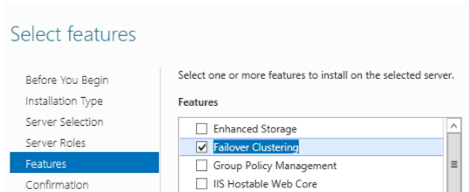
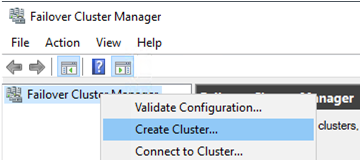
The installation is automatic, and you don’t need to configure anything yet. Run the Failover Cluster Manager snap-in (FailoverClusters.SnapInHelper.msc) and create a new cluster.
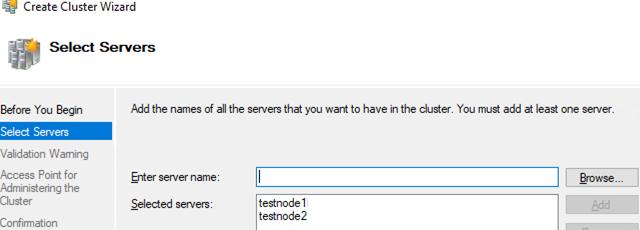
Add the names of the hosts that you want to join to your cluster.
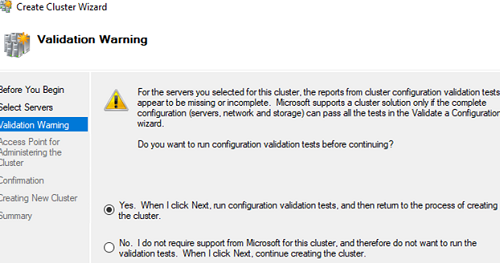
Then the wizard offers to take some tests. To do it, select the first item.
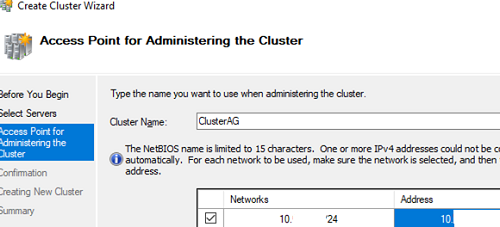
Specify the cluster name, select a network, and a cluster IP address. The cluster name will appear in DNS automatically; you don’t need to create a DNS record manually. In my case, the cluster name is ClusterAG.
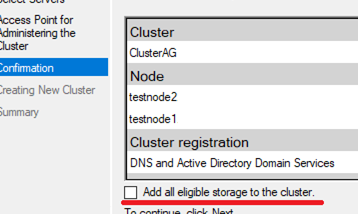
Uncheck the options Add all eligible storage to the cluster since we can add disks later.
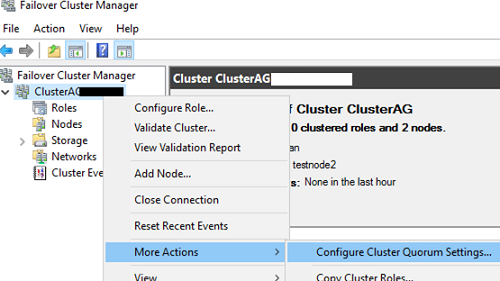
There are only two nodes in the cluster, so you must configure Cluster Quorum. The Cluster Quorum is a casting vote. For example, if one of the cluster nodes becomes unavailable, the cluster must detect, which nodes are actually online and can see each other. The Cluster Quorum provides cluster consistency (Cluster -> More Actions -> Configure Cluster Quorum Settings).
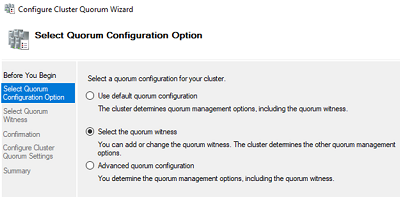
Select the quorum witness option.
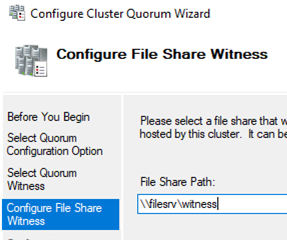
Then select the witness type: a file share witness.

Specify a UNC path to the shared folder. Create the directory yourself. It must be present on a server outside your failover cluster.
When you configure your cluster, you may see the following error:
There was an error configuring the file share witness. Unable to save property changes for File Share Witness. The system cannot find the file specified.
It is likely that a user account, under which the cluster is running, doesn’t have NTFS permissions to access the shared folder. By default, the cluster is running under a local user account. You can grant privileges on the folder to all cluster computers or change the account for the cluster service and grant it the relevant privileges.
The basic Windows Failover Cluster configuration is over.
Configuring Always On Availability Group on MS SQL Server
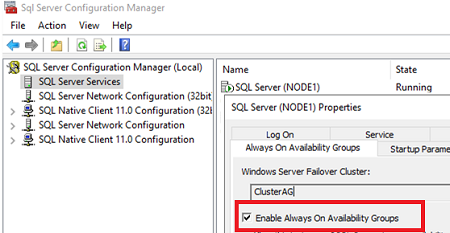
After the typical SQL Server instance installation, you can enable and configure Always On Availability Groups. Enable them in the instance properties of SQL Server Configuration Manager. As you can see in the screenshot, SQL Server has already detected that it belongs to a WSFC cluster. Check Enable Always On Availability Groups and restart the MSSQL instance service. Do the same for the second instance.
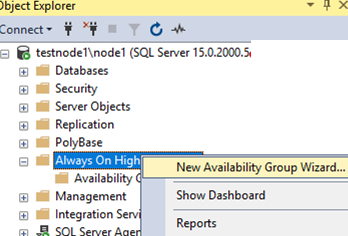
Run SQL Server Management Studio, connect to your host, click Always On High Availability, and run New Availability Group Wizard.
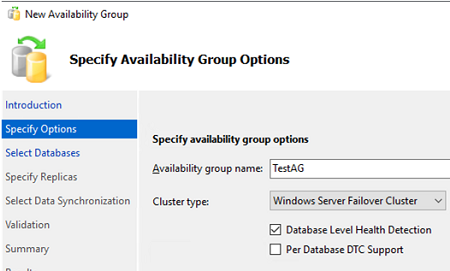
Specify a name for your Always On availability group and select Database Level Health Detection. Using this option, Always On will be able to detect when a database is unhealthy.
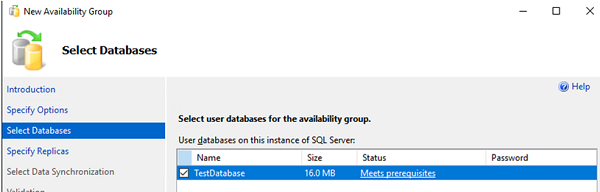
Select SQL Server databases to add to your Always On availability group.
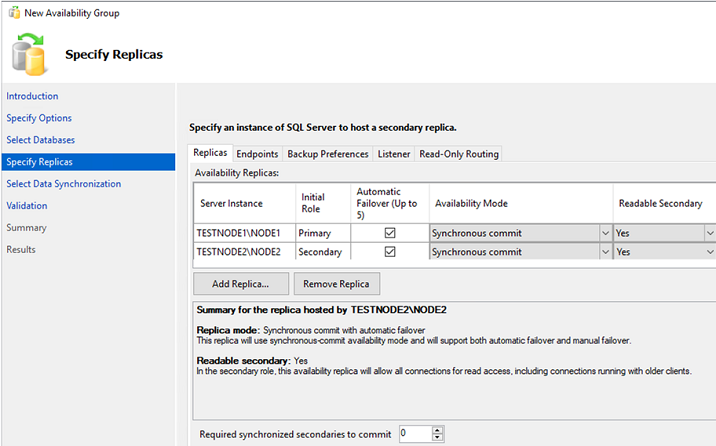
Click Add Replica and connect the second SQL server. Thus you can add up to 8 servers.
- Initial Role is a replica role by the time a group has been created. It can be either Primary or Secondary;
- Automatic Failover – if a database becomes unavailable, Always On will move the primary role to another replica. Check this item;
- Availability Mode allows selecting Synchronous Commit or Asynchronous Commit. If you select a synchronous mode, the transactions coming to the primary replica will be sent to all other secondary replicas with the synchronous mode. The Primary replica finishes the transaction only after other replicas have written it on the disk. Thus, data loss is eliminated if the primary replica fails. In the asynchronous mode, the primary replica writes changes immediately without waiting for the response of other replicas.
- Readable Secondary is a parameter that allows to run SELECT queries against the secondary replicas. If the value is yes, clients will be able to get read-only access even if connecting without
ApplicationIntent=readonly. - Required synchronized secondaries to commit is the number of synchronized secondary replicas to finish the transaction. Set it depending on the number of replicas, I will set it to 1.
Do not edit anything in the Endpoint tab.
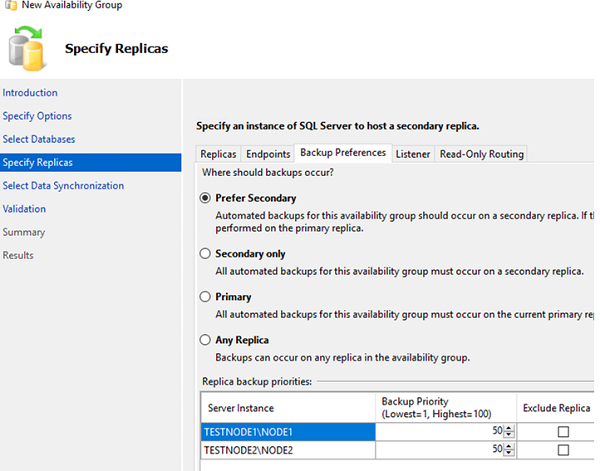
In the Backup Preferences tab, you can select where the backups will be made from. Leave the default settings here: Prefer Secondary.
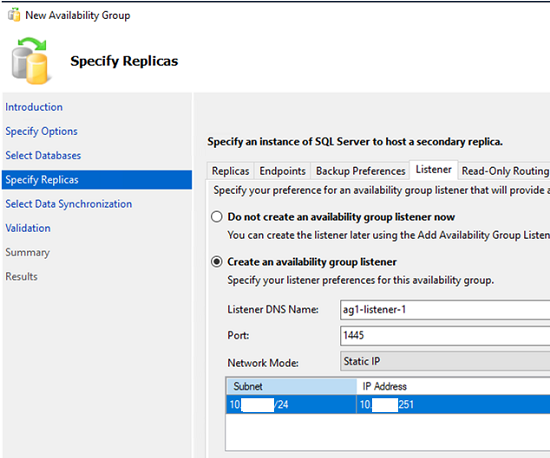
Specify the name, port, and IP address of the availability group listener.
Leave the Read-Only Routing settings unchanged.
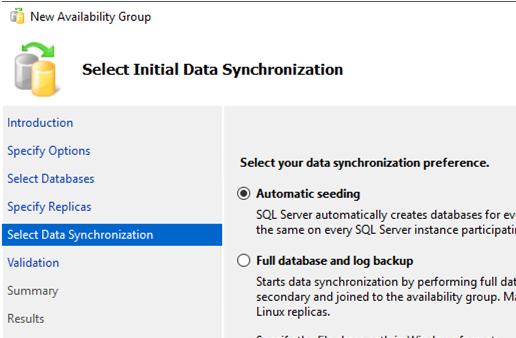
Select the replica synchronization type. I leave the first item (Automatic seeding) checked.
Then your settings must be validated. If there are no errors, click Finish to apply the changes.
In my case, all tests have been successful, but in the Results step after the installation, the wizard showed an error of creating the availability group listener. The error EVENTID 1194 appeared in the cluster event logs:
Cluster network name resource failed to create its associated computer object in the domain.
It means that the cluster doesn’t have enough permissions to create a listener. The documentation states that it is enough to grant a privilege to create computer-type objects to the object of your cluster. It is easier to do it using privilege delegation in AD (or a quick, but the insecure variant is to temporary add the CLUSTERAG$ object to the Domain Admins group).
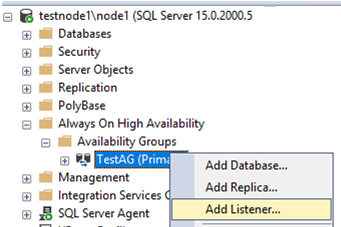
Since I have created the availability group, but not the listener, I added it manually. Open the context menu for your availability group and click Add Listener.
Specify the IP address, port, and DNS name of the listener.
Make sure that the Listener has appeared in the Availability Group Listeners section of your Always On group.
Thus, you have completed the basic configuration of an Always On availability group.
SQL Server Always On: Operability Check & Failover
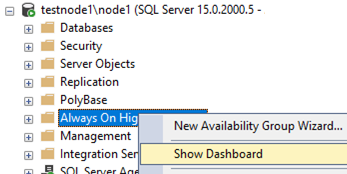
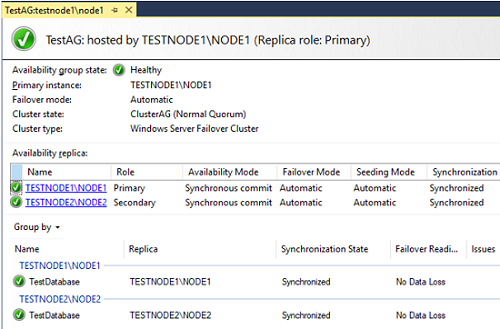
Let’s take a look at the Availability Group Dashboard (Show Dashboard).
It is OK, the group has been created and is working.
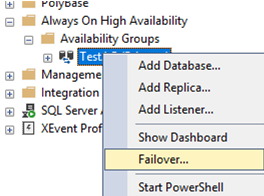
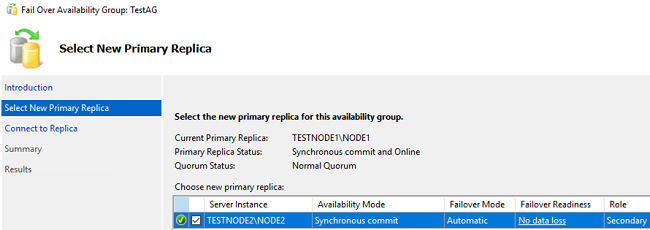
Let’s try to make node2 a primary instance manually. Right-click the availability group and select Failover.
Note the value in Failover Readiness. No data loss means that no data will be lost.
Connect to node2.
Click Finish.
Make sure that node2 has become the primary replica (Primary Instance) in the availability group.
Make sure that the listener is working correctly. Specify the listener DNS name and port separated by a comma in the SSMS: ag1-listener-1,1445

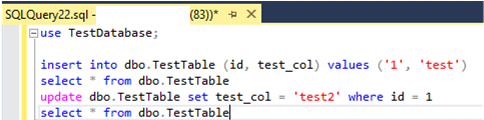
Run simple insert, select and update SQL queries to your database.
Then check the automatic failover of the primary replica. Just kill the sqlservr.exe process on TESTNODE2.
Check the availability group state on the remaining node: TESTNODE1\NODE1.
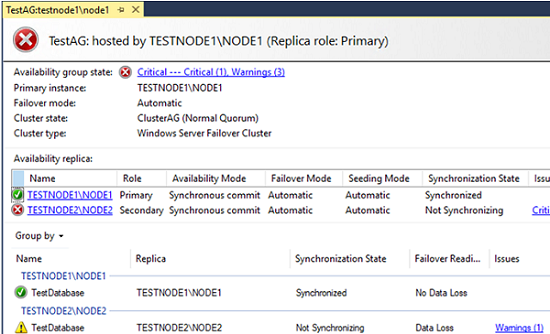
The cluster has automatically changed the testnode1\node1 status to primary since testnode2\node2 became unavailable.
Check the listener state as clients will use it to connect.
In my case, I connected to the listener successfully, but when trying to access the database, I got this error:
Unable to access database 'TestDatabase' because it lacks a quorum of nodes for high availability. Try the operation again later.
The error appeared due to the Required synchronized secondaries to commit option. Since we set its value to 1 when configuring it, Always On doesn’t allow it to connect to the database, because we have only one primary replica left.
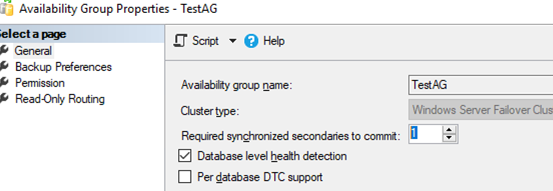
Set the value to 0 and try to run the query again.
Testnode1 kept the Primary instance status, while testnode2 became a secondary one. The data we changed on testnode1 when testnode2 was powered off synchronized successfully after the computer had been turned on.
So, we have made sure that everything works correctly and the data will be available for read/write in case of a critical failure.
You can easily configure Always On availability groups. If you want to build an SQL Server-based failover solution, the availability groups will manage it well.