Ansible is a popular configuration management solution that allows you to manage multiple servers remotely. It’s a commonly used tool for software configuration and deployment automation. Unlike Chef or Puppet, Ansible doesn’t require agents to be installed on managed hosts, which is its main advantage. All you need to install on management hosts is Python and an SSH server. This article covers the principal steps for installing and configuring an Ansible server on Linux, as well as how to use Ansible to manage other Linux hosts.
Installing Ansible on Linux
Ansible requires SSH and Python to be installed on the managed and managed hosts. Ansible itself only needs to be installed on the control (master) server. Since the OpenSSH server is usually installed by default on all Linux distros, all that remains is to install Python 3+ and Ansible itself.
Here are the commands for Ubuntu/Debian:
Install Python:
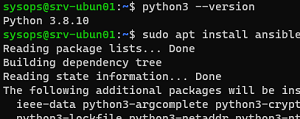
$ sudo apt install python3
Checking the version:
$ python3 --version
Python 3.8.10
Install Ansible:
$ sudo apt install ansible
$ ansible --version
ansible 2.9.6
$ dnf install epel-release
 $ dnf makecache
 $ dnf install python3
 $ dnf install ansible
Getting Started with Ansible on Linux
The installation creates the directory /etc/ansible with the following configuration files:
/etc/ansible/hosts– this is where you can specify a list of hosts to be managed via Ansible;/etc/ansible/ansible.cfg— Ansible configuration file.
You can create several different host groups in the /etc/ansible/hosts file. For example, for all your hosts with Nginx, with MariaDB databases, etc. For this example, we will only create one group named servers_all.
$ sudo nano /etc/ansible/hosts
[servers_all]
srvubunt1 ansible_host=192.168.14.144 ansible_user=sysops
srvubunt2 ansible_host=192.168.14.142 ansible_user=sysops
srv-db01 ansible_host=192.168.14.151 ansible_user=sysops
You can specify hosts by their DNS name or IP addresses. The ansible_user specifies the account that will be used for the SSH connection.

[servers]
srvubunt1 ansible_host=192.168.14.144
srvubunt2 ansible_host=192.168.14.142
[servers_all:vars]
ansible_port=22
ansible_user=sysops
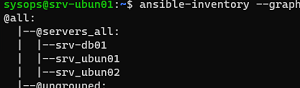
To view the tree structure of the inventory file, run:
$ ansible-inventory --graph
"host_key_checking = false"
You can now use the built-in ping module to test the connection. The module checks:
- host availability;
- SSH credentials;
- the ability to run Ansible modules on hosts using Python.
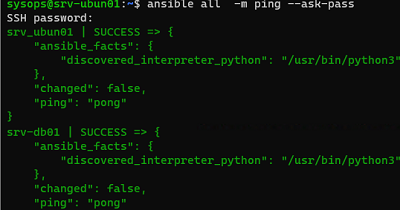
Now, let’s check the availability of all hosts in the inventory file:
$ ansible all -m ping --ask-pass
All of the hosts are available.
$ sudo apt install sshpass
Otherwise, you will get the following error when trying to use the --ask-pass parameter:
to use the 'ssh' connection type with passwords, you must install the sshpass program.
In the previous example, you must enter the user’s password each time you connect to remote hosts. To avoid prompting for a password when running Ansible commands and playbooks, you need to configure the SSH key-based authentication.
Generate RSA keys on the Ansible management host:
$ ssh-keygen -t rsa
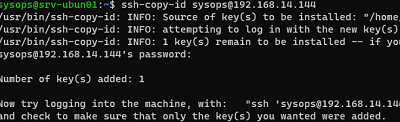
Now you need to copy the key file to each node using ssh-copy-id:
$ ssh-copy-id [email protected]
# nano /etc/ssh/sshd_config
PubkeyAuthentication yes
AuthorizedKeysFile .ssh/authorized_keys
# service sshd restart
Now you can use Ansible to run remote commands without entering a password. Let’s check the uptime of all servers in the servers_all group:
$ ansible servers_all -a 'uptime'

Let’s look at some examples of interactive command execution on hosts in the inventory file.
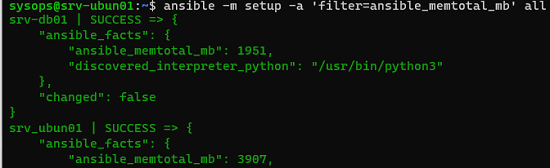
First, we’ll run an inventory procedure to check the state of the hosts. In this example, we only need information about the hosts’s RAM:
$ ansible -m setup -a 'filter=ansible_memtotal_mb' all
Now we use the shell module to check the uptime of all the hosts:
$ ansible -m shell -a 'uptime' all
Working with Ansible Playbooks
You can either send commands to the managed hosts through the console (ad-hoc) or by using a special YAML playbook file. In the playbook, you can describe the desired state of the system. Ansible checks that the managed host configuration matches the description in the playbook.
Let’s have a look at an example of a simple playbook to install the Midnight Commander (mc) file manager on the hosts.
Create a directory for playbooks:
$ sudo mkdir -p /etc/ansible/playbooks
Create a YML file:
$ sudo nano /etc/ansible/playbooks/mc-deploy.yml
- hosts: servers_all
  become: yes
  become_method: sudo
  tasks:

    - name: update
      apt: update_cache=yes

    - name: Install mc
      apt: name=mc state=latest
If your managed hosts are running an rpm-based version of Linux, replace the last line with yum: name=mc state=latest .
Now you can run the playbook against the hosts in a group:
$ ansible-playbook /etc/ansible/playbooks/mc-deploy.yml --ask-become-pass
If you want to disable the password when using sudo in Ubuntu, you have to run the following command on managed hosts::
$ echo "sysops ALL=(ALL) NOPASSWD:ALL" | sudo tee /etc/sudoers.d/sysops
Once that’s done, you can run the playbook without the –ask-become-pass parameter.

Next, you can check the return values of the playbook to see on which servers it ran successfully.
You can use Ansible Tower (a paid solution from RedHat) and Ansible AWX (free) if you need a graphical shell. You can use Ansible to manage not only Linux servers but also Windows hosts (requires configured WinRM). The specifics of Windows management with Ansible will be discussed in the next article