In this article, we will show how to configure SSH authentication in Windows using RSA or EdDSA keys. Let’s see how to generate public and private key pair on Windows and configure an OpenSSH server on Windows 10/11 or Windows Server 2019/2022 for key-based authentication (without passwords).
SSH key-based authentication is widely used in the Linux world, but in Windows, it has appeared quite recently. The idea is that the client’s public key is added to the SSH server, and when a client tries to connect to it, the server checks if the client has the corresponding private key. This way a remote user can authenticate in Windows without entering a password.
Generating an SSH Key Pair on Windows
You must generate two SSH keys (public and private) on the client computer that you will use to connect to the remote Windows host running OpenSSH. A private key is stored on a client side (keep the key safe and don’t share it with anyone!), and a public key is added to the authorized_keys file on the SSH server. To generate RSA keys on a Windows client, you must install the OpenSSH client.
On Windows 10/11 and Windows Server 2019/2022, the OpenSSH client is installed as an optional Windows feature using PowerShell:
Add-WindowsCapability -Online -Name OpenSSH.Client~~~~0.0.1.0
Open a standard (non-elevated) PowerShell session and generate a pair of ED25519 keys using the command:
ssh-keygen -t ed25519
You will be prompted to provide a password to protect the private key. If you specify the password, you will have to enter it each time you use this key for SSH authentication. I did not enter a passphrase (not recommended).
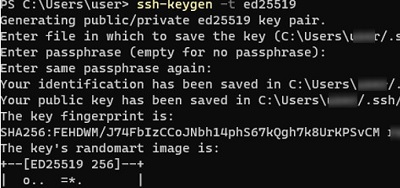
Generating public/private ed25519 key pair.
Enter file in which to save the key (C:\Users\myuser/.ssh/id_ed25519):
Enter passphrase (empty for no passphrase):
Enter same passphrase again:
Your identification has been saved in C:\Users\myuser/.ssh/id_ed25519.
Your public key has been saved in C:\Users\myuser/.ssh/id_ed25519.pub.
The key fingerprint is: SHA256:xxxxxxxx myuser@computername
The key's randomart image is:
+--[ED25519 256]--+
+----[SHA256]-----+
Ssh-keygen will create the .ssh directory in the profile of a current Windows user (%USERPROFILE%\.ssh) and generate 2 files:
id_ed25519– private key (if you generated an RSA key, the file will be namedid_rsa)id_ed25519.pub– public key (a similar RSA key is calledid_rsa.pub

After the SSH keys are generated, you can add your private key to the SSH Agent service, which allows you to conveniently manage private keys and use them for authentication.
The SSH Agent service can store your private keys and provide them in the security context of the current user. Run the ssh-agent service and configure it to start automatically using the PowerShell service management commands:
set-service ssh-agent StartupType ‘Automatic’
 Start-Service ssh-agent
Add your private key to the ssh-agent database:
ssh-add "C:\Users\youruser\.ssh\id_ed25519"
Identity added: C:\Users\youruser\.ssh\id_ed25519 (youruser@computername)

Or as follows:
ssh-add.exe $ENV:UserProfile\.ssh\id_rsa
OpenSSH: Configuring Key-Based Authentication with Public Key on Windows
Now you need to copy your SSH public key to the SSH server. The SSH server in this example is a remote Windows 11 machine that has the OpenSSH service installed and configured.
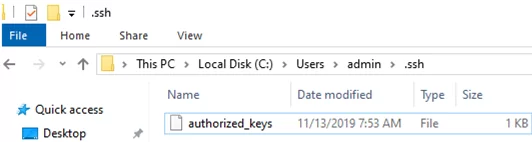
Copy the id_ed25519.pub file to the .ssh directory in the profile of the user you will use to connect to the SSH server. For example, I have an user1 account on my remote Windows 11 device, so I need to copy the key to C:\Users\user1\.ssh\authorized_keys.
You can copy the public key to the SSH server from the client using SCP:
scp C:\Users\youruser\.ssh\id_rsa.pub [email protected]:c:\users\admin\.ssh\authorized_keys
Public key authentication is disabled by default in the OpenSSH server on Windows. You can check this in the sshd_config. The easiest way to get a list of allowed authentication methods in OpenSSH is to use the following PowerShell command (Select-String is used as an analog of grep in PowerShell):
cat "C:\ProgramData\ssh\sshd_config"| Select-String "Authentication"
#PubkeyAuthentication yes
#HostbasedAuthentication no
#HostbasedAuthentication
PasswordAuthentication yes
#GSSAPIAuthentication no
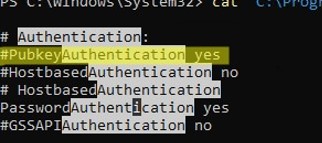
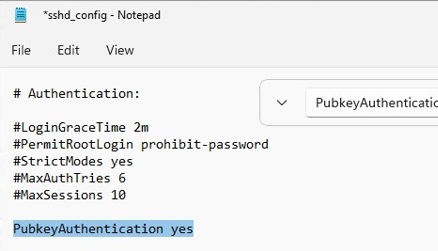
In this example, the PubkeyAuthentication line is commented out, which means that this authentication method is disabled. Open the sshd_config file with notepad and uncomment the line:
Notepad C:\ProgramData\ssh\sshd_config
PubkeyAuthentication yes
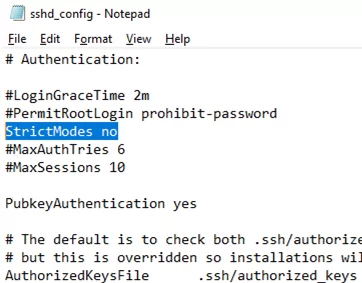
Also, you will have to disable the StrictModes option in the sshd_config configuration file. By default, this mode is enabled and prevents SSH key-based authentication if private and public keys are not properly protected. Uncomment the line #StrictModes yes and change it to StrictModes no
Now you can connect to your Windows SSH server without a password. If you have not set a password (passphrase) for the private key, you will automatically connect to your remote Windows host.
To connect to a remote host using a native SSH client, use the following command:
ssh (username)@(SSH server name or IP address)
For example:
It means that you want to connect to a remote SSH server with the IP address 192.168.1.15 under the user1 account. SSH Agent service will automatically try to use your private key to authenticate on a remote host.
- If you do not want to use the ssh-agent service to manage SSH keys, you can specify the path to the private key file to be used for the SSH authentication:
ssh [email protected] -i "C:\Users\youuser\.ssh\id_ed25519" - To connect SSH host using a user account from an Active Directory domain, use the following format:
ssh jsm[email protected]@192.168.1.15 -i <private_key_absolute_path>

When connecting for the first time, you need to add the fingerprint of the SSH server key to the trusted list. Type yes -> Enter.
The authenticity of host '192.168.1.15 (192.168.1.15)' can't be established.
ECDSA key fingerprint is SHA256:xxxxxxx.
Are you sure you want to continue connecting (yes/no/[fingerprint])? yes
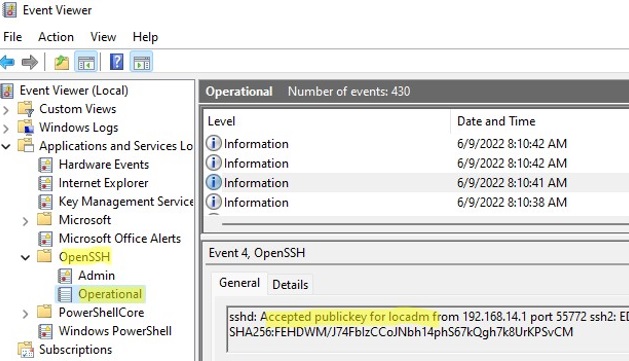
ETW logging is used in Windows OpenSSH to store SSH logs instead of plain text files. You can check the SSH key-based authentication logs in the Windows Event Viewer (Application and Services Logs -> OpenSSH -> Operational).
If the SSH connection with the private key is successful, the following event will appear in the OpenSSH log:
EventID 4
sshd: Accepted publickey for locadm from 192.168.15.20 port 55772 ssh2: ED25519 SHA256:xxxxxxx
If you were not able to connect to your SSH server using your private key and you are still prompted to enter a password, it is likely that the user account you are trying to connect to is a member of the local Windows administrators group (the group SID is S-1-5-32-544). We will discuss it later.

Logging Windows with SSH Key Under Administrative User
OpenSSH uses special key-based authentication settings for admin user accounts on Windows.
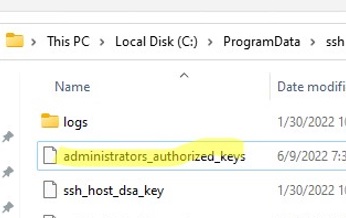
You need to use the C:\ProgramData\ssh\administrators_authorized_keys file instead of the authorized_keys key in the user profile. Add your public SSH key to this text file (for security reasons, only the Administrators and SYSTEM groups should have permission to read this file).
You can change the NTFS permissions on a file with:
- The icacls tool:
icacls.exe "C:\ProgramData\ssh\administrators_authorized_keys" /inheritance:r /grant "Administrators:F" /grant "SYSTEM:F" - or using the Get-Acl and Set-Acl PowerShell cmdlets:
get-acl "$env:programdata\ssh\ssh_host_rsa_key" | set-acl "$env:programdata\ssh\administrators_authorized_keys"

After that, SSH key authentication works even if the StrictModes is disabled.
#Match Group administrators
# AuthorizedKeysFile __PROGRAMDATA__/ssh/administrators_authorized_keys

Additionally, you can disable SSH password login in the sshd_config:
PasswordAuthentication no
Don’t forget to restart the sshd service after making the changes in the sshd_config.
restart-service sshd
If you set PasswordAuthentication no, and configure SSH key authentication incorrectly, then an error will appear when connecting via ssh:
[email protected]: Permission denied (publickey,keyboard-interactive).
![]()
DenyGroups Administrators
So, you have configured SSH authentication in Windows using a key pair. Now you can use this authentication method to securely access remote servers, automatically forward ports in the SSH tunnel, run scripts, and perform other automation tasks.
4 comments
Thank you – very complete guide.
Thank you soo much. it helped a lot.
I am trying to connect via ssh to a machine. and i get
permission denied public key
server log contains:
Failed to open file:C:/ProgramData/ssh/administrators_authorized_keys error:2
debug1: Could not open authorized keys ‘__PROGRAMDATA__/ssh/administrators_authorized_keys’: No such file or directory
Thanks for this, although I did try the administrators_authorized_keys route, but still failed, once commented out in the sshd_config worked a treat, thanks.