In all Windows operating systems, the default port assigned to RDP (Remote Desktop Protocol) is TCP 3389. After you enable RDP in Windows, the TermService (Remote Desktop Services) starts listening on port 3389. In this article, we’ll show you how to change the default RDP port number on the desktop editions of Windows (7/8/10/11) and on Windows Server using the Registry Editor and PowerShell.
You can change the default RDP port number in Windows from 3389 to any other. This is most often used when you need to hide your RDP/RDS host from port scanners that look for Windows hosts on the network with an open RDP port TCP/3389.
Changing the RDP port will reduce the chances of exploiting RDP vulnerabilities (the last critical vulnerability in RDP BlueKeep is described in CVE-2019-0708), reduce the number of RDP brute force attacks (don’t forget to regularly analyze RDP connection logs), SYN, and other types of attacks when NLA is disabled. Most often, the RDP port is changed on computers with a direct connection to the Internet (VPS/ VDS), or in networks where the edge router forwards port 3389/RDP to a Windows host in your LAN.
When choosing a non-standard RDP port, please note that it is not recommended to use ports in the range 1-1023 (known ports). Use a dynamic port in the RPC port range (49152 to 65535), or any port in the range 1024 to 49151 that is not in use by another service or application.
How to Change the Remote Desktop Port on Windows?
In our example, we will change the port number on which the Remote Desktop service is listening to 1350. To do this:
- Open the Registry Editor (
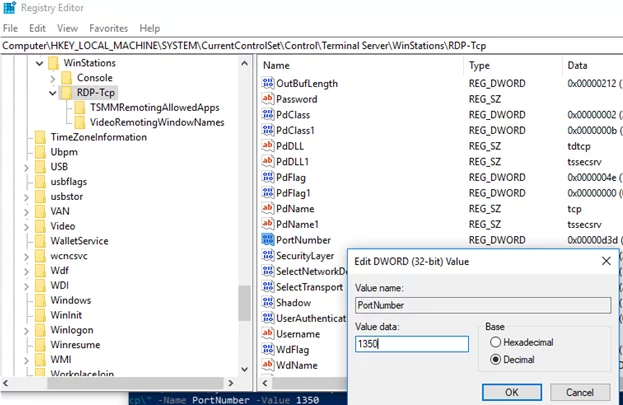
regedit.exe) and go to the registry key HKEY_LOCAL_MACHINE\System\CurrentControlSet\Control\Terminal Server\WinStations\RDP-Tcp; - Find the DWORD parameter with the name PortNumber. This parameter shows the port, on which the Remote Desktop service is listening. The default is 3389 (decimal);
- Change the value of this parameter. I have changed the RDP port to 1350 (Decimal);
 You can change the registry parameter using PowerShell:
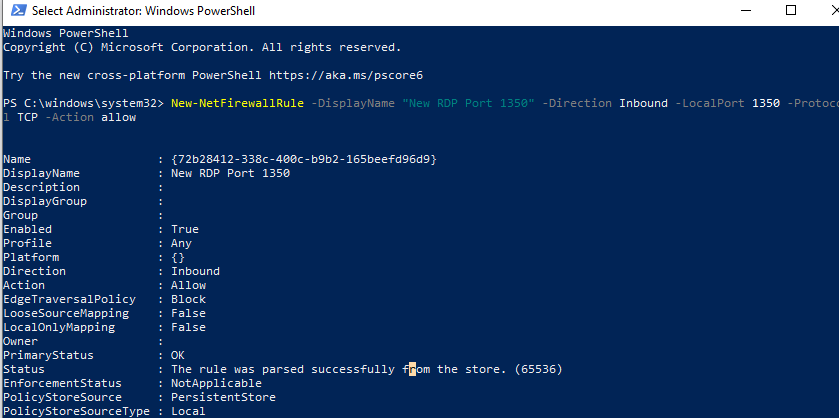
Set-ItemProperty -Path "HKLM:\System\CurrentControlSet\Control\Terminal Server\WinStations\RDP-Tcp\" -Name PortNumber -Value 1350 - If Windows Firewall is enabled on your computer, you will have to create a new rule that allows inbound connection to your new RDP port. If you are reconfiguring a remote Windows host via RDP, make sure you create allow rules in the firewall before restarting TermService, otherwise, you will lose access to the server;
- You can create an allowing inbound rule for your new TCP/UDP RDP port manually in the Windows Defender Firewall console (
firewall.cpl) or using PowerShell cmdlets from the NetSecurity module:New-NetFirewallRule -DisplayName "NewRDPPort-TCP-In" -Direction Inbound -LocalPort 1350 -Protocol TCP -Action allow
New-NetFirewallRule -DisplayName "NewRDPPort-UDP-In" -Direction Inbound -LocalPort 1350 -Protocol UDP -Action allow - Reboot your computer or restart your Remote Desktop service with this command:
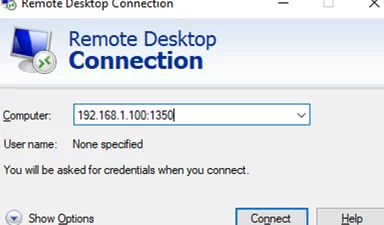
net stop termservice & net start termservice - To connect to this Windows host via Remote Desktop, you have to specify the new RDP connection port in your mstsc.exe client using the colon as follows:
RDPComputerName:1350or by IP address:192.168.1.10:1350or from the command prompt:mstsc.exe /v 192.168.1.10:1350
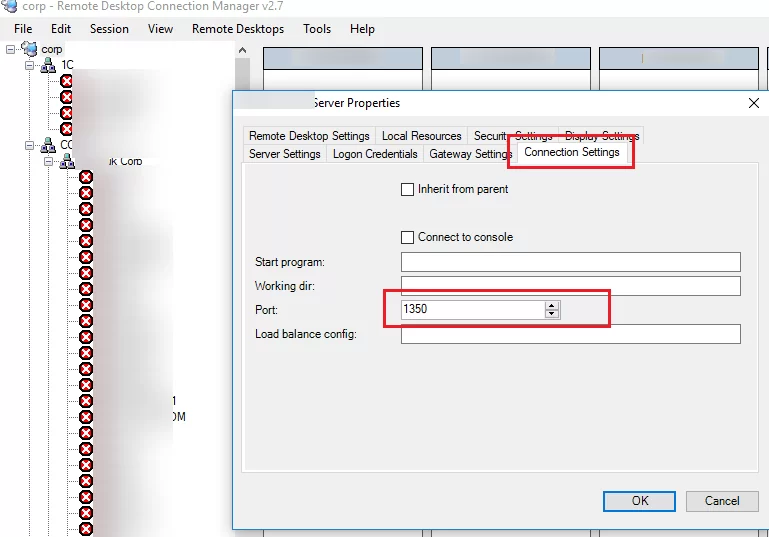
If you are using RDCMan to manage multiple RDP connections, you can specify the RDP port you have configured in the Connection Settings tab. - Then you will successfully connect to the remote desktop of a computer using the new RDP port. You can use the
netstat –na | Find “LIST”command to make sure that your Remote Desktop Service is listening on a new port.


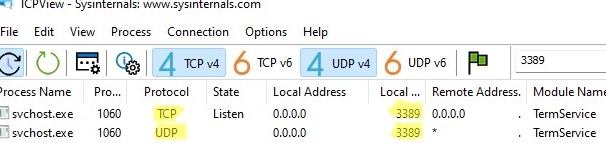
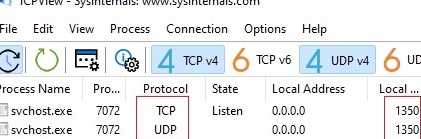
Note that the UDP RDP port number also automatically changed to 1350 (you can check this with the TCPView tool).
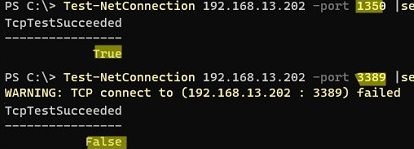
Use the Test-NetConnection command to check that the default RDP port 3389 is now closed (TcpTestSucceeded: False):
Test-NetConnection 192.168.3.102 -port 3389 |select TcpTestSucceeded
Now you need to use the new port 1350 for the RDP connection.
If you want to change the RDP port number on domain computers, you can use the Group Policy features. Create a new GPO that will deploy the PortNumber registry parameter with the new RDP port number to domain computers.
Change RDP Listening Port Number with PowerShell
A complete PowerShell script to change the RDP port number, create the firewall rule, and restart the Remote Desktop service might look like this:
Write-host "Specify the number of your new RDP port: " -ForegroundColor Yellow -NoNewline;$RDPPort = Read-Host
 Set-ItemProperty -Path "HKLM:\SYSTEM\CurrentControlSet\Control\Terminal Server\WinStations\RDP-TCP\" -Name PortNumber -Value $RDPPort
 New-NetFirewallRule -DisplayName "NewRDPPort-TCP-In-$RDPPort" -Direction Inbound –LocalPort $RDPPort -Protocol TCP -Action Allow
 New-NetFirewallRule -DisplayName "NewRDPPort-UDP-In-$RDPPort" -Direction Inbound –LocalPort $RDPPort -Protocol UDP -Action Allow
 Restart-Service termservice -force
 Write-host "The number of the RDP port has been changed to $RDPPort " -ForegroundColor Magenta
You can change the RDP port number on a remote computer. To do this, you need to enable WinRM on the remote computer, and then you can use the Invoke-Command cmdlet to connect to the computer:
Invoke-Command -ComputerName wksname112 -ScriptBlock {Set-ItemProperty -Path "HKLM:\SYSTEM\CurrentControlSet\Control\Terminal Server\WinStations\RDP-TCP\" -Name PortNumber -Value 1350}
If you need to change the RDP number remotely on multiple computers in your AD domain (in the specific OU), use the following script (you can get a list of computers in the OU using the Get-ADComputer cmdlet):
Write-host "Specify the number of your new RDP port: " -ForegroundColor Yellow -NoNewline;$RDPPort = Read-Host
 $PCs = Get-ADComputer -Filter * -SearchBase "CN=IT,CN=Computers,CN=NY,DC=woshub,DC=com"
 Foreach ($PC in $PCs) {
 Invoke-Command -ComputerName $PC.Name -ScriptBlock {
 param ($RDPPort)
 Set-ItemProperty -Path "HKLM:\SYSTEM\CurrentControlSet\Control\Terminal Server\WinStations\RDP-TCP\" -Name PortNumber -Value $RDPPort
 New-NetFirewallRule -DisplayName "NewRDPPort-TCP-In-$RDPPort" -Direction Inbound –LocalPort $RDPPort -Protocol TCP -Action Allow
 New-NetFirewallRule -DisplayName "NewRDPPort-UDP-In-$RDPPort" -Direction Inbound –LocalPort $RDPPort -Protocol TCP -Action Allow
 Restart-Service termservice -force
 }
This guide for changing the default RDP port is suitable for any Windows version starting from Windows XP (Windows Server 2003) and up to modern Windows 10, Windows 11, and Windows Server 2022 builds.