If you want to monitor the state of your VMWare ESXi servers in your monitoring system, you must configure SNMP agent on your hosts. In this article we’ll show how to enable and configure SNMP in VMWare ESXi 6.7 (the guide is applicable for ESXi 5.5 and newer).
In ESXi, there is a built-in SNMP agent that can send and receive SNMP requests and traps. You can enable and configure an SNMP agent on ESXi hosts in several ways: using vCLI, PowerCLI (but not through the vSphere client GUI).
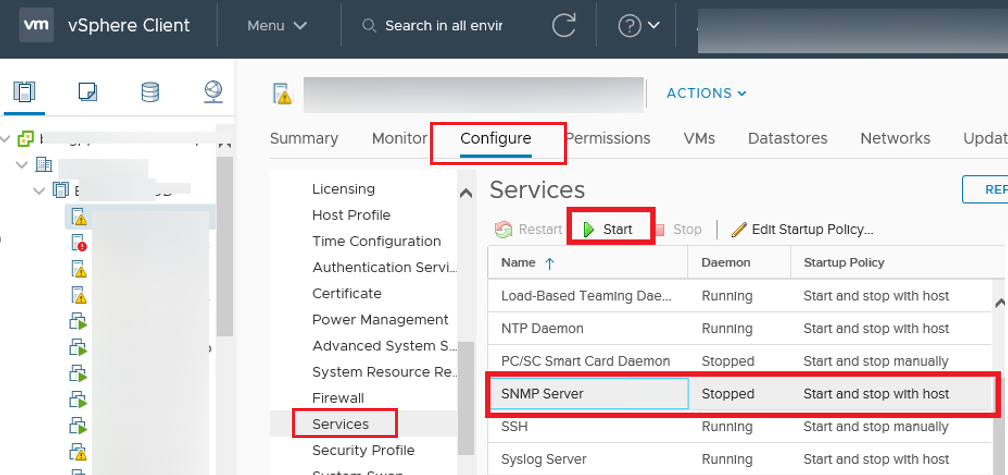
SNMP Server in VMWare ESXi
From the vSphere web interface, you can only make sure that the “SNMP server” service is running, change its startup settings or stop/start the service. Go to your ESXi host -> Configure -> Services -> SNMP Server. The service is stopped by default. Start it.
Enable SSH access on the ESXi host and connect to it using any ssh client (I’m using Windows 10 built-in SSH client).
To check the current SNMP settings, run this command:
esxcli system snmp get
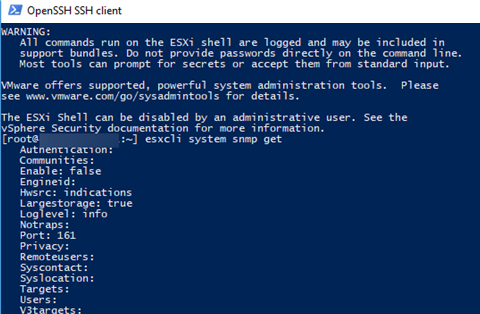
SNMP is not configured: all parameters are empty, and the agent is disabled.
Authentication:
Communities:
Enable: false
Engineid:
Hwsrc: indications
Largestorage: true
Loglevel: info
Notraps:
Port: 161
Privacy:
Remoteusers:
Syscontact:
Syslocation:
Targets:
Users:
V3targets:
Configuring SNMP Agent Parameters in ESXi
Specify the monitoring server IP address (SNMP target), port (by default, 161 UDP) and SNMP community name (usually, public):
esxcli system snmp set --targets=192.168.99.99@161/public
Or you can set the community name as follows:
esxcli system snmp set --communities YOUR_COMMUNITY_STRING
Additionally, you can specify the location:
esxcli system snmp set --syslocation "Allee 16, Mun, DE"
Contact information:
esxcli system snmp set --syscontact [email protected]
Then enable SNMP service on the ESXi host:
esxcli system snmp set --enable true
To test the SNMP configuration:
esxcli system snmp test

To apply the settings, restart the SNMP agent using this command:
/etc/init.d/snmpd restart

esxcli system snmp set –r
To disable SNMP:
esxcli system snmp set --disable true
ESXi Firewall Configuration for SNMP Traffic
You can allow SNMP traffic in your ESXi host firewall in two ways. To allow SMNP requests from any device on the network:
esxcli network firewall ruleset set --ruleset-id snmp --allowed-all true
 esxcli network firewall ruleset set --ruleset-id snmp --enabled true
Or you can allow inbound traffic from an IP address of your monitoring server or an IP subnet where your SNMP servers are located:
esxcli network firewall ruleset set --ruleset-id snmp --allowed-all false
 esxcli network firewall ruleset allowedip add --ruleset-id snmp --ip-address 192.168.100.0/24
 esxcli network firewall ruleset set --ruleset-id snmp --enabled true
Now you can monitor your VMWare ESXi hosts over SNMP.
Change SNMP Settings on ESXi Host Using PowerCLI
If you want to quickly configure SNMP parameters on multiple ESXi hosts, you can use this PowerCLI script:
$ESXi = 'mun-esxi01'
 $Community = 'Public'
 $Target = '192.168.99.99'
 $Port = '161'
#Connection to an ESXi host
 Connect-VIServer -Server $sESXiHost
 #Clearing the current SNMP settings
 Get-VMHostSnmp | Set-VMHostSnmp -ReadonlyCommunity @()
 #Configure SNMP parameters
 Get-VMHostSnmp | Set-VMHostSnmp -Enabled:$true -AddTarget -TargetCommunity $Community -TargetHost $Target -TargetPort $Port -ReadOnlyCommunity $Community
 #Display the current SNMP parameters
 $Cmd= Get-EsxCli -VMHost $ESXiHost
 $Cmd.System.Snmp.Get()
If you have an advanced VMWare Enterprise Plus license, you can configure SNMP parameters on your ESXi hosts using Host Profiles (Management -> Host Profiles -> your Profile -> SNMP Agent Configuration).
VMWare ESXi SNMPv3 Configuration
We have discussed how to enable and configure an SNMP agent v1 and v2 on ESXi hosts above. Starting from ESXi 5.1, a more modern protocol version is used: SNMP v3. Use the following commands to configure more secure SNMPv3.
Set authentication and encryption protocols:
esxcli system snmp set -a MD5 -x AES128
Generate hashes for the authentication and encryption passwords (replace authpass and privhash with your password):
esxcli system snmp hash --auth-hash authpass --priv-hash privhash --raw-secret
Using the hashes (authhash and privhash), add a user:
esxcli system snmp set -e yes -C [email protected] -u snmpuser/authhash/privhash/priv
Then specify the SNMP target address:
esxcli system snmp set –v3targets 192.168.99.99@161/user/priv/trap
You can remotely check the SNMP configuration using the Linux snmpwalk tool:
snmpwalk -v3 -u snmpuser -l AuthPriv -a SHA -A P@ssw0rd1 -x AES-X P@ssword2 192.168.1.120
2 comments
Thank you so much! It works perfectly at WhatsUpGold
Best regards
Muchas
gracias