VMware vSphere PowerCLI is a set of PowerShell modules to manage VMware infrastructure from the command prompt. You can use PowerCLI to get a state of virtual machines, datastores, networks, or users, manage different settings, create new objects, and use PowerShell in automation tasks for ESXi, vCenter Server, vSphere, vSAN, and other VMware products.
Currently, VMware is developing a PowerCLI version for PowerShell Core (7.0+) only. This PowerShell version is cross-platform and may be used in Windows, Linux, or macOS. Only security fixes are released for earlier PowerCLI modules for Windows PowerShell 5.x. It is recommended to use an updated PowerShell Core version.
How to Install VMware PowerCLI Module on Windows?
You can install the VMware PowerCLI in Windows online or offline.
To install PowerCLI from the PowerShell Gallery online, run the command below:
Install-Module -Name VMware.PowerCLI
If you want to install the module for the current user only:
Install-Module VMware.PowerCLI -Scope CurrentUser
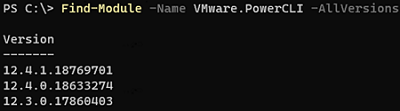
Find-Module -Name VMware.PowerCLI -AllVersions|select version
 Install-Module -Name VMware.PowerCLI -RequiredVersion 12.4.0.17860403
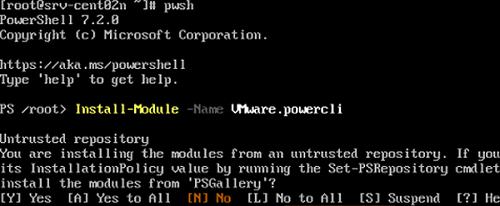
During the installation, you will be prompted to update your NuGet provider. Also, confirm the installation from an untrusted PowerShell Gallery repository. You can make it a trusted one using the Set_PSRepository cmdlet.
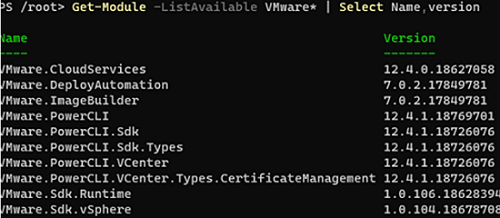
Check that the PowerCLI modules have been installed and display their versions:
Get-Module -ListAvailable VMware* | Select Name,version
To update your PowerCLI module version, just run the command:
Update-Module -Name VMware.PowerCLI
choco search vmware
and install it:
choco install vmware-powercli-psmodule
The PowerCLI module is not available in winget yet.
If you want to install PowerCLI on an isolated computer (disconnected environment), you can use an offline installer.
- Download a ZIP file with the PowerCLI module https://code.vmware.com/web/tool/vmware-powercli (the size of the ZIP archive with the current VMware-PowerCLI 12.4.1 is about 80 MB);
- Unzip the archive to the directory with PowerShell modules on the computer (you can get a list of the PoSh module directories using
$env:PSModulePath). UsuallyC:\Program Files\WindowsPowerShell\Modulesis used. - Unblock the files downloaded from the Internet:
cd “c:\Program Files\WindowsPowerShell\Modules”
Get-ChildItem * -Recurse | Unblock-File - Open the PowerShell console and make sure that the PowerCLI module is available now:
Get-Module -Name VMware.PowerCLI –ListAvailable
To import the PowerCLI module to the current PowerShell ISE or Visual Studio Code session, run the following command:
Import-Module VMware.VimAutomation.Core
You may see this error message when loading the module:
Import-Module: File C:\Program Files\WindowsPowerShell\Modules\VMware.VimAutomation.Sdk\12.4.0.18627054\VMware.VimAutomation.Sdk.psm1 cannot be loaded because running scripts is disabled on this system.
Then you have to configure the PowerShell script execution policy. To allow using the module in the current session:
Set-ExecutionPolicy Unrestricted -Scope Process
You can use a PowerCLI module installed on a remote computer. To do it, import it remotely using PSRemoting:
$session = New-PSSession -ComputerName mun-svr01
Import the PowerCLI module to your computer:
Import-Module -PSsession $session -Name VMware.VimAutomation.Core
Don’t forget to close the session when you’re done:
Remove-PSSession $session
Installing PowerCLI Module on Linux
You can install and use PowerCLI both in Windows and Linux. First, install PowerShell Core on your Linux host. Then run the following commands in the console to install VMware PowerCLI:
pwsh
 Install-Module -Name VMware.PowerCLI
Import the module to your session:
Import-Module VMware.PowerCLI
Basic PowerCLI Commands to Manage VMware vSphere and VMs
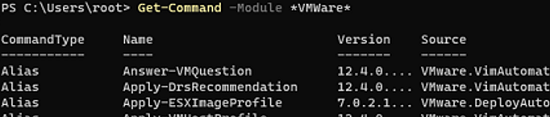
You can get a list of cmdlets in PowerCLI modules as follows (over 2200 commands are available):
Get-Command –Module *vmware*
To disable VMware Customer Experience Improvement Program (CEIP) notification:
Set-PowerCLIConfiguration -Scope AllUsers -ParticipateInCeip $false
To connect to vCenter Server or an ESXi host:
Connect-VIServer <vCenter_or_ESXi_FQDN>
Connect-VIServer Error: Invalid server certificate. Use Set-PowerCLIConfiguration to set the value for the InvalidCertificateAction option to Prompt if you'd like to connect once or to add a permanent exception for this server.
Additional Information: Could not establish trust relationship for the SSL/TLS secure channel with authority.
To ignore self-signed certificates:
Set-PowerCLIConfiguration -Scope AllUsers -InvalidCertificateAction Warn
To display a list of virtual machines registered on your ESXi (or vCenter) server:
Get–VM
To show powered off VMs only:
Get-VM | Where {$_.Powerstate -ne “PoweredOn”} | Select Name, VMHost, NumCPU, MemoryMB, Version|Format-Table

To start a virtual machine:
Start-VM -VM MUNTestVM1
To restart a VM correctly (using VMware tools agent):
Restart-VMGuest -VM MunTestVM1 -Confirm:$False
To shut down a VM:
Shutdown-VMGuest -VM MunTestVM1 -Confirm:$False
To display a list of snapshots for a VM:
Get-VM -VM MunTestVM1 | Get-Snapshot| Format-List
To move a running VM to another host using VMotion, the Move-VM command is used. For example, you want to move all VMs from mun-esxi1 to mun-esxi2:
Get-VMHost mun-esxi1|Get-Vm| Move-VM –Destination (Get-VMHost mun-esxi2)
To create a new virtual machine, use the New-VM cmdlet:
New-VM –Name MunTestVM1 -VMHost mun-esxi1 –ResourcePool Production –DiskGB 20 –DiskStorageFormat Thin –Datastore MUN_MSA2000_Prod1
Use the Set-VM cmdlet in order to change virtual machine settings.
Using PowerCLI cmdlets, you can interact with a guest operating system of your virtual machines. To do it, VMware Tools must be installed in the VM. You can update VMware Tools as shown below:
Get-VMGuest MunTestVM1 | Update-Tools
Using Invoke-VMS, you can run a script or program in a guest Windows OS:
$script = '"%programfiles%\Common Files\Microsoft Shared\MSInfo\msinfo32.exe" /report "%tmp%\inforeport"'
 Invoke-VMScript -ScriptText $script -VM MunTestVM1 -HostCredential $hostCred -GuestCredential $VMCred -ScriptType Bat
To copy a file to all VMs, run this command:
Get-VM | Copy-VMGuestFile -Source C:\PS\get-size.ps1 -Destination C:\PS\ - LocalToGuest -GuestUser administrator -GuestPassword P@ssdr0w2
The module contains cmdlets to manage clusters, datacenters, datastores, and ESXi hosts:
Get-VMHost
 Get-Datacenter
 Get-Cluster
 Get-Datastore
 Get-VirtualPortGroup
To display a list of ESXi hosts in a cluster:
Get-Cluster munprod1 | Get-VMHost | sort name
Put a specific ESXi host into maintenance mode:
Set-VMhost -VMHost mun-esxi1 -State Maintenance
To connect an iSCSI LUN to an ESXi host and create a VMFS datastore on it:
Get-ScsiLun -VmHost mun-esxi1 | ft
New-Datastore -Name 'mun_iscsi_datastore' -VMHost mun-esxi1 -Path naa.6000xxxxxxxxxxxxxxxx -Vmfs
PowerCLI Example Scripts
There are some examples of using PowerCLI to get information about VMware infrastructure items and to automate some actions on the website. You can use the examples from the following articles to write your own PowerCLI scripts:
- Checking Free Disk Space on VMFS Datastores
- Map VMware Virtual Disks (VMDK Files) and Windows Drive Volumes
- How to Find VMware VMs by IP or MAC Address?
- Configure SNMP on VMware ESXi Hosts
- How to Force Restart a Stuck VMware VM?
- Injecting Drivers into the ESXi Installation Image
- VMware VM Consolidation Needed Status Alarm
- Upgrading VM Hardware Version
vSphere PowerCLI is a powerful tool to manage and automate your VMware infrastructure. PowerCLI includes more than 2000 cmdlets to manage cloud and on-premises VMware infrastructure (vSphere,vSAN, vRealize Operations Manager, vCloud Director, Site Recovery Manager, Horizon, NSX-T, VMware Cloud Services, VMware Cloud on AWS, etc.).
2 comments
is there a way to install linux version of powershell to esxi?
Never heard of it. In my opinion you shouldn’t do this