The DNS servers and suffixes configured for VPN connections are used in Windows 10 to resolve names using DNS in the Force Tunneling mode (“Use default gateway on remote network” option enabled) if your VPN connection is active. In this case, you cannot resolve DNS names in your local network or have Internet access using your internal LAN.
At the same time, you can ping any resources on your LAN (try to ping your gateway, neighboring computer or printer IP address). They are available only by IP addresses, but not by their host names. The fact is that Windows 10 is trying to resolve host names in your local network through the DNS servers specified in the VPN connection settings.
I found some recommendations on disabling IPv6 protocol for your local (LAN) interface and it would help if you want to use the Force-Tunneling mode.
If you are using Split Tunneling (the “Use default gateway on remote network” option is unchecked) for your VPN connection, you can access the Internet from your local network, but you cannot resolve DNS addresses in the remote VPN network (IPv6 disabling does not help here).
You must understand that Windows sends a DNS query from the network interface, which has the highest priority (lower value of the interface metric). For example, your VPN connection works in the the Split Tunneling mode (you want to access Internet from your LAN and your corporate resources over VPN).
Check the values of all network interface metrics from PowerShell:
Get-NetIPInterface | Sort-Object Interfacemetric
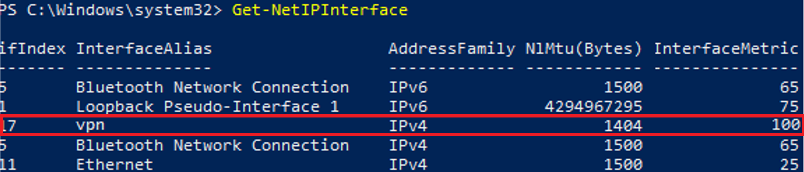
The screenshot above shows that the local Ethernet connection has a lower metric (25) than the VPN interface (100). So the DNS traffic goes through the interface with the lower metric value. It means that your DNS requests are sent to your local DNS servers instead of the DNS servers for VPN connection. In this configuration, you cannot resolve names in the connected external VPN network.
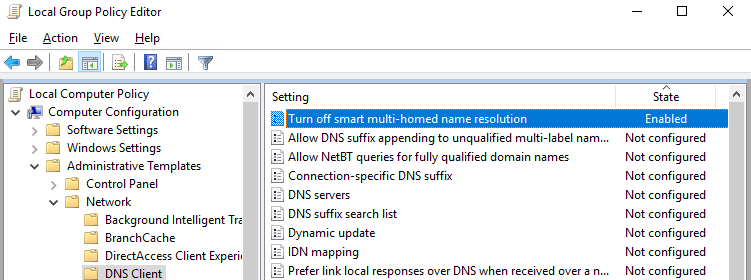
In addition, a new feature of the DNS client for Windows 8.1 and Windows 10 should be mentioned here. Smart Multi-Homed Name Resolution (SMHNR) was added in these OS versions to get faster response to DNS requests. By default, SMHNR sends simultaneous DNS requests to all DNS servers known to the system and uses the response it received first (LLMNR and NetBT queries are also sent). It is not secure since the external DNS servers (specified for your VPN connection) can potentially see your DNS traffic (the leak of your DNS requests). You can disable the SMHNR in Windows 10 via the GPO: Computer Configuration -> Administrative Templates -> Network -> DNS Client-> Turn off smart multi-homed name resolution = Enabled.
Or you can disable SMHNR using the following commands (in Windows 8.1):
Set-ItemProperty -Path "HKLM:\Software\Policies\Microsoft\Windows NT\DNSClient" -Name DisableSmartNameResolution -Value 1 -Type DWord
 Set-ItemProperty -Path "HKLM:\SYSTEM\CurrentControlSet\Services\Dnscache\Parameters" -Name DisableParallelAandAAAA -Value 1 -Type DWord
In Windows 10 Creators Update (1709) and newer, DNS requests are sent to all known DNS servers one-by-one (not in parallel). You can increase the priority of a particular DNS if you make its metrics lower.
So changing the interface metric allows you to send DNS requests over the connection (LAN or VPN) where name resolution is the most priority for you.
Thus, the lower is the value of the interface metric, the higher is the priority of the connection. Windows assigns metrics of IPv4 interfaces automatically depending on their speed and type. For example, a LAN connection with the speed > 200 Mbit/s has the metric value equal to 10, and a Wi-Fi connection with the speed of 50-80 Mbit/s has the value of 50 (see the table https://support.microsoft.com/en-us/help/299540/an-explanation-of-the-automatic-metric-feature-for-ipv4-routes).
You can change the interface metric from the Windows GUI, PowerShell or using the netsh command.
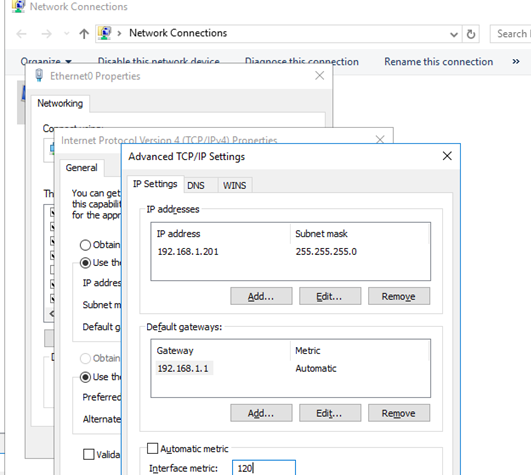
For example, you want your DNS requests to be sent over your VPN connection. You have to increase the metrics of your LAN connections so that their values exceed 100 (in my example).
Go to the Control Panel -> Network & Internet -> Network Connections, open the properties of your Ethernet connection, select TCP/IPv4 properties and go to the Advanced TCP/IP Settings tab. Uncheck the Automatic metric option and change the interface metric to 120.
You can do the same using the following PowerShell command (use the index of your LAN interface that you can get with the Get-NetIPInterface cmdlet):
Set-NetIPInterface -InterfaceIndex 11 -InterfaceMetric 120
Or using netsh (specify the name of your LAN connection):
netsh int ip set interface interface="Ethernet0" metric=120
In the same way you can decrease the metric value in the properties of your VPN connection.

Also you can change the settings of your VPN connection by changing the mode to Split Tunneling and specifying a DNS suffix for connection using PowerShell:
Get-VpnConnection
 Set-VpnConnection -Name "VPN_work" -SplitTunneling $True
 Set-VpnConnection -Name "VPN_work" -DnsSuffix yourdomainname.com
6 comments
This deserves some love. Thanks for the help and the highly detailed explanation! This was driving me nuts!
It’s nice to hear that 🙂
Good stuff, have you noticed that you can also do something like below when adding the split tunnel routes.
Add-Vpnconnectionroute -Connectionname $ConnectionName -AllUserConnection -DestinationPrefix $Destination -RouteMetric 20
Worked in Win10 1904 but no longer in 2004. no error messages or anything but just no longer applies the metrics…
[…] Windows OS Hub – DNS Resolution via VPN Not Working on Windows 10 […]
“So changing the interface metric allows you to send DNS requests over the connection (LAN or VPN) where name resolution is the most priority for you.”. Now it’s not really true if SMHNR is on (Windows 10 – 2004). If SMHNR is enabled, system send request over all interfaces. System doesn’t use the response it received first. System uses the DNS response depends on interface metric.
Good work! Just what I was looking for to send DNS lookups up the VPN connection on a Windows 11 PC where you can’t seem to get to the Advanced TCP/IP settings GUI anymore. Worked it into a PowerShell script:
$ifIndex = Get-NetIPInterface | where-object { $_.InterfaceAlias -EQ $ConnectionName } | Select -Expand ifIndex
Set-NetIPInterface -InterfaceIndex $ifIndex -InterfaceMetric 10