Windows OS Hub
  • Windows Server
    • Windows Server 2022
    • Windows Server 2019
    • Windows Server 2016
    • Windows Server 2012 R2
    • Windows Server 2008 R2
    • SCCM
  • Active Directory
    • Active Directory Domain Services (AD DS)
    • Group Policies
  • Windows Clients
    • Windows 11
    • Windows 10
    • Windows 8
    • Windows 7
    • Windows XP
    • MS Office
    • Outlook
  • Virtualization
    • VMWare
    • Hyper-V
    • KVM
  • PowerShell
  • Exchange
  • Cloud
    • Azure
    • Microsoft 365
    • Office 365
  • Linux
    • CentOS
    • RHEL
    • Ubuntu
  • Home
  • About

Windows OS Hub

  • Windows Server
    • Windows Server 2022
    • Windows Server 2019
    • Windows Server 2016
    • Windows Server 2012 R2
    • Windows Server 2008 R2
    • SCCM
  • Active Directory
    • Active Directory Domain Services (AD DS)
    • Group Policies
  • Windows Clients
    • Windows 11
    • Windows 10
    • Windows 8
    • Windows 7
    • Windows XP
    • MS Office
    • Outlook
  • Virtualization
    • VMWare
    • Hyper-V
    • KVM
  • PowerShell
  • Exchange
  • Cloud
    • Azure
    • Microsoft 365
    • Office 365
  • Linux
    • CentOS
    • RHEL
    • Ubuntu

 Windows OS Hub / Windows 10 / How to Delete OEM Recovery Partition in Windows

June 8, 2023 Windows 10Windows 11

How to Delete OEM Recovery Partition in Windows

Branded computers/laptops that come with Windows pre-installed usually have a hidden hardware manufacturer OEM recovery partition.  This partition usually contains a manufacturer’s Windows reference image, which can be used to restore the system to factory settings (rollback/refresh), as well as a number of manufacturer’s system and diagnostic tools. The size of such an OEM recovery partition can be tens of GBs. To free up more space on the drive, advanced Windows users can delete this partition.

Contents:
  • How to Safely Remove OEM Partition on Windows Using Diskpart?
  • Remove Drive Letter for OEM Recovery Partition on Windows

How to Safely Remove OEM Partition on Windows Using Diskpart?

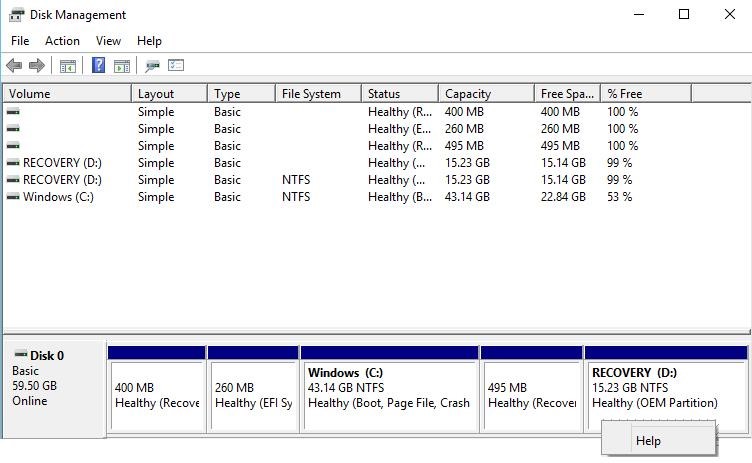
Open the Disk Management Console (diskmgmt.msc). In our example, the drive has a 15GB recovery partition with the volume label Recovery and the type Healty OEM Partition. If you right-click on the OEM Recovery partition in Disk Management, you will see that there is no menu items (and no option to remove the partition).

oem recovery partition in disk managment console

In our example, the disk has an additional recovery partition containing WinRE (Windows Recovery Environment).  The winre.wim image on this partition allows you to boot Windows in recovery mode.

Check which partition contains the Windows Recovery Environment image. Run the command:

reagentc /info

reagentc: find winre recovery partition number

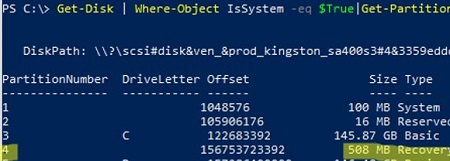
In our example, this is partition 4 on drive 0. (\\?\GLOBALROOT\device\harddisk0\partition4\Recovery\WindowsRE).

Use the built-in PowerShell Disk Management module to list the partition on the system drive:

Get-Disk | Where-Object IsSystem -eq $True|Get-Partition

powershell: list partition labels and sizes on a system drive

In this example, you don’t need to move the recovery WIM image because it’s on a separate small 500MB recovery partition.

If the winre.wim image is on an OEM partition, we recommend you move the WinRE to the OS (Windows) partition.

Now list the Windows bootloader configuration:

bcdedit

bcdedit: get Windows bootloader cinfiguration and partition used

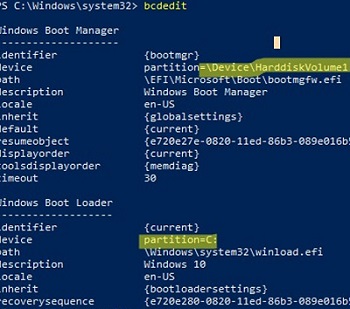
Ensure that the configuration of the Windows boot manager and the Windows bootloader does not contain any references to your OEM partition.

If you accidentally delete the Windows bootloader partition, you’ll see An Operating System Wasn’t Found error when you boot your computer. I will leave links to instructions on how to restore the Windows bootloader here, just in case:

  • How to repair Windows Boot Manager, BCD, and MBR on BIOS-firmware computers?
  • Repairing the EFI boot loader on a UEFI-based computer

Microsoft has intentionally restricted the functionality of the Disk Management graphical snap-in to work with the system, protected, hidden, and OEM recovery partitions. To manage such partitions, you must use third-party tools or the built-in diskpart command. In this example, we’ll show you how to remove the manufacturer’s OEM recovery partition from a drive using diskpart.

Important! If you delete OEM/EISA recovery partitions, you will not be able to roll back the operating system to its factory state. But that doesn’t stop you from doing a clean install of Windows if you need to. Some hardware manufacturers provide official instructions that describe how to move or delete OEM partitions (I have seen such a guide for a Lenovo ThinkPad, which involves reconfiguring the BIOS/UEFI). On computers with UEFI firmware, you should not delete the EFI system partition (ESP) that contains the Windows bootloader (how to recover deleted EFI partition).

Open a command prompt as an administrator, and then run the following command:

diskpart

List the hard drives on the computer:

DISKPART> list disk
Disk ###  Status         Size     Free     Dyn  Gpt
--------  -------------  -------  -------  ---  ---
Disk 0    Online          59 GB      5120 KB

Tip. If you don’t see the disk you need, scan the storage devices again using the rescan command.

Select the disk containing the OEM partition:

DISKPART> select disk 0

Disk 0 is now the selected disk.

Tip. You must specify the correct disk number here. On a computer with a single HDD / SSD, you will usually need to select the drive with index 0.

List of partitions on the selected disk:

DISKPART> list partition

Partition ###  Type              Size     Offset
-------------  ----------------  -------  -------
Partition 1    Recovery          400 MB  1024 KB
Partition 2    System (EFI)      260 MB   401 MB
Partition 3    Reserved          128 MB   661 MB
Partition 4    Primary            43 GB   789 MB
Partition 5    Recovery          495 MB    43 GB
Partition 6    Primary            15 GB    44 GB

Then select the partition you want to delete:

DISKPART> select partition 6

Partition 6 is now the selected partition.

Tip. Enter the number of the partition you want to remove. You must be careful when selecting partitions to avoid accidentally deleting the data or system partitions.

Try to remove the partition:

DISKPART> delete partition

The following error appears:

Virtual Disk Service error:
Cannot delete a protected partition without the force protection parameter set.

diskpart error : Cannot delete a protected partition

Diskpart cannot delete this partition. List  detailed information about the selected partition and its attributes:

DISKPART> detail partition

Partition 6
Type : 27
Hidden: Yes
Active: Yes

As you can see, the type of partition is 27, while a common Windows NTFS partition with the standard MBR partition table uses type 07 (a hidden partition has code 17).

You may try to change the partition type as follows:

DISKPART>setid id=07

However, the easiest way to immediately delete a partition is to use the special override flag. This allows you to remove a partition of any type:

DISKPART> delete partition override

DiskPart successfully deleted the selected partition.

Tip. You won’t be able to delete a system or boot partition, or any other partition containing the active swap file or memory crash dump.

Now you may close the diskpart session using the command:

exit

In this way, any OEM partition can be deleted. After deleting a partition, you can use the free unallocated space to expand other partitions or create a new one with Disk Management snap-in.

Remove Drive Letter for OEM Recovery Partition on Windows

A separate extra recovery partition (Healthy, OEM Partition) may appear on the disk with an assigned drive letter when upgrading a Windows 10 build. Only the Recovery and System Volume Information folders are on the new OEM partition.

However, this volume has insufficient free space, less than 9%. As a result, Windows 10 will start showing a constant Storage Sense notification that this disk is full and needs to be cleaned.

Run the command:

reagentc /info

It is not recommended to remove this partition if it contains an image of the WinRE environment. You can move the WinRE image from the partition and delete it if the partition is large and you want to delete it to free up space. If small, you can simply remove the drive letter from the partition using the diskpart:

diskpart
list volume
select volume <volume_number>
remove letter=<drive_letter>
exit

It is even easier to remove the mount point using the command:
mountvol E: /D
This hides the recovery partition from the user.

Or you can move the WinRE image to the C drive:
reagentc /disable
reagentc /setreimage /path C:\Windows\System32\Recovery
reagentc /enable

This will move your WInRE image to the C:\Recovery folder, and the hidden partition can be deleted.

1 comment
2
Facebook Twitter Google + Pinterest
previous post
0x80244010 Exceeded Max Server Round Trips: Windows Update Error
next post
Updating PowerShell Version on Windows

Related Reading

Zabbix: How to Get Data from PowerShell Scripts

October 27, 2023

Tracking Printer Usage with Windows Event Viewer Logs

October 19, 2023

How to Use Ansible to Manage Windows Machines

September 25, 2023

Installing Language Pack in Windows 10/11 with PowerShell

September 15, 2023

How to View and Change BIOS (UEFI) Settings...

September 13, 2023

1 comment

George December 12, 2017 - 2:28 pm

Isn’t this dangerous though?

Reply

Leave a Comment Cancel Reply

Categories

  • Active Directory
  • Group Policies
  • Exchange Server
  • Microsoft 365
  • Azure
  • Windows 11
  • Windows 10
  • Windows Server 2022
  • Windows Server 2019
  • Windows Server 2016
  • PowerShell
  • VMWare
  • Hyper-V
  • Linux
  • MS Office

Recent Posts

  • Zabbix: How to Get Data from PowerShell Scripts

    October 27, 2023
  • Tracking Printer Usage with Windows Event Viewer Logs

    October 19, 2023
  • PowerShell: Configure Certificate-Based Authentication for Exchange Online (Azure)

    October 15, 2023
  • Reset Root Password in VMware ESXi

    October 12, 2023
  • How to Query and Change Teams User Presence Status with PowerShell

    October 8, 2023
  • How to Increase Size of Disk Partition in Ubuntu

    October 5, 2023
  • How to Use Ansible to Manage Windows Machines

    September 25, 2023
  • Installing Language Pack in Windows 10/11 with PowerShell

    September 15, 2023
  • Configure Email Forwarding for Mailbox on Exchange Server/Microsoft 365

    September 14, 2023
  • How to View and Change BIOS (UEFI) Settings with PowerShell

    September 13, 2023

Follow us

  • Facebook
  • Twitter
  • Telegram
Popular Posts
  • How to Allow Multiple RDP Sessions on Windows 10 and 11
  • How to Repair EFI/GPT Bootloader on Windows 10 or 11
  • How to Restore Deleted EFI System Partition in Windows
  • Network Computers are not Showing Up in Windows 10/11
  • How to Run Program without Admin Privileges and Bypass UAC Prompt
  • Fix: BSOD Error 0x0000007B (INACCESSABLE_BOOT_DEVICE) on Windows
  • Fixing ‘The Network Path Was Not Found’ 0x80070035 Error Code on Windows
Footer Logo

@2014 - 2023 - Windows OS Hub. All about operating systems for sysadmins


Back To Top