Error 0x0000007B (INACCESSABLE_BOOT_DEVICE) at computer startup indicates that Windows cannot access the boot drive because a required driver is missing or the disk is corrupt.
An administrator may encounter the 0x0000007B error in the following cases
- When you restore Windows from a backup to another physical computer or to a Hyper-V, VMware, or VirtualBox virtual machine (or in bare metal recovery scenarios to other hardware);
- During P2V or V2V migrations;
- After moving (cloning) Windows to a new hard drive or computer;
- If you are using a Windows image to migrate a physical machine (for example, using disk2vhd) and deploying a new virtual machine from that VHD image;
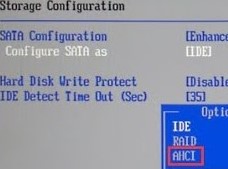
- After switching the SATA controller mode in BIOS from AHCI to IDE/RAID or vice versa (in this case, simply open the BIOS settings and restore the original SATA settings);

- When replacing a motherboard and/or hard disk controller;
- After the BIOS/UEFI firmware has been updated or the settings changed.
Stop Error 0x0000007B After Converting Physical Host to Virtual Machine
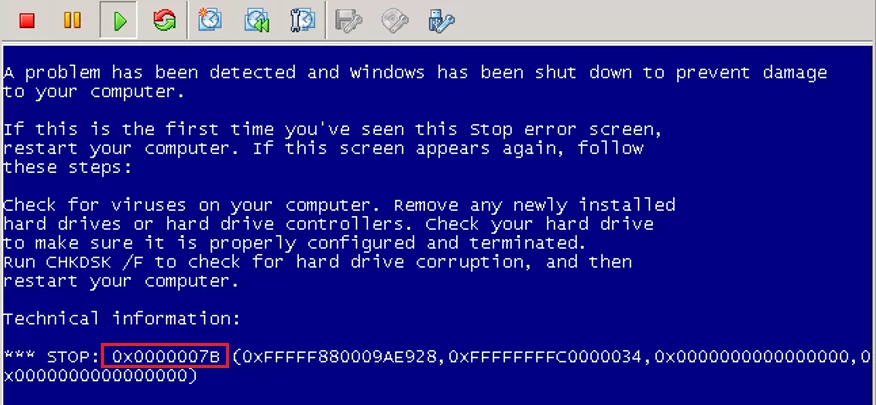
Most commonly, I encountered the error 0x7b after converting a physical computer running Windows Server 2008 R2 or Windows 7 to a virtual machine using VMware vCenter Converter. After the conversion is complete, Windows won’t boot on the new VM and a BSOD (Blue Screen of Death) with a stop code will appear on the screen:
STOP: 0x0000007B (0xFFFFF880009A9928, 0xFFFFFFFFC0000034, 0x0000000000000000, 0x0000000000000000).
The INACCESSABLE_BOOT_DEVICE error in this case is caused by the fact that the hard disk controller of the new server (computer or virtual machine) is different from the original hardware. For example, most hypervisors by default use a SCSI or SAS controller to connect virtual hard disks, which is disabled in Windows by default. The lsi_sas.sys driver is installed, but the service it runs is disabled. As a result, the operating system won’t be able to load the required controller driver, and Windows will stop booting with a BSOD.
In debug mode, you can see that Windows boot stops at the CLASSPNP.SYS driver loading stage.

To fix the 0x0000007B error, you need to boot from any Windows installation media or a boot disk (for example, MsDaRT). If you have booted your computer from the install media, you will need to press Shift + F10 on the first screen of the installation wizard (then you select a language and keyboard layout). The command prompt window will appear and you will need to run the command:
Regedit.exe
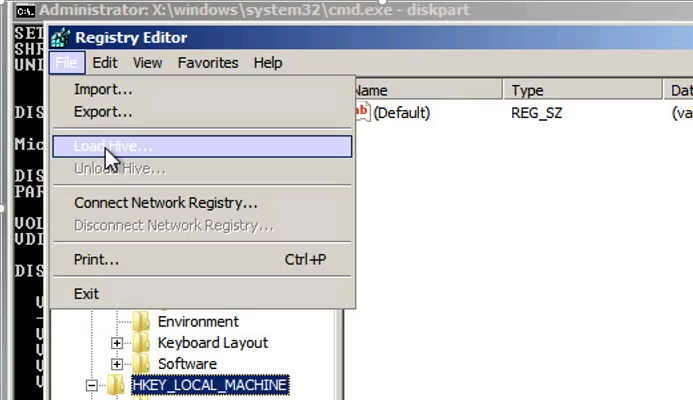
Navigate to the HKEY_LOCAL_MACHINE registry hive and select File -> Load Hive in the Registry Editor window. Select the \Windows\System32\config\SYSTEM file on the local server drive (don’t confuse it with the WinPE drive). This file stores the system part of your Windows registry.
These steps will mount your SYSTEM registry hive from your hard drive into Registry Editor. Enter a temporary name for the new registry hive (for example, use the name local_hkey).
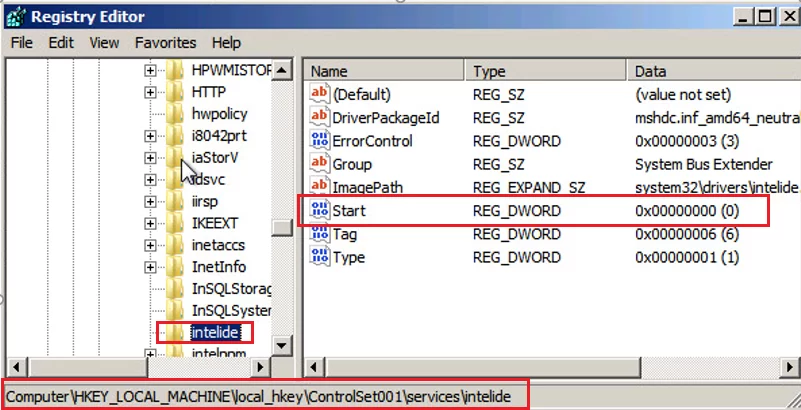
Go to the HKEY_LOCAL_MACHINE\local_hkey\ControlSet001\services\ registry key in the hive that you have mounted.
Find these registry keys:
- Atapi;
- Intelide;
- LSI_SAS.
Find the REG_DWORD parameter called Start and change it to 0 (0x0000000000) in each of these keys.
If you had set your SATA controller mode to AHCI before this error occurred, you should also set Start = 0 in the msahci section.
To save the changes in the local registry file on the disk, select your registry key HKEY_LOCAL_MACHINE\local_hkey and click Unload Hive from the menu.
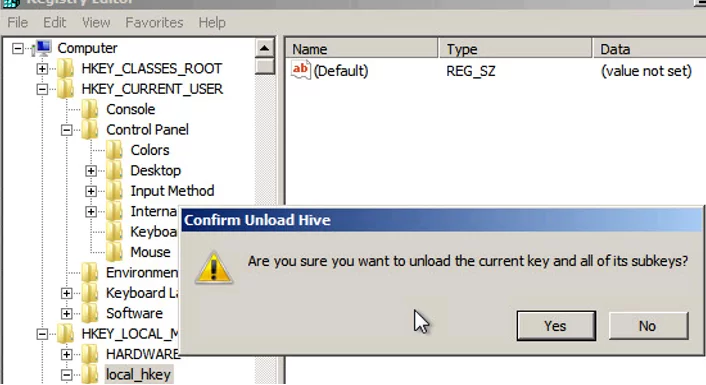
Now you can restart your server. Windows should boot normally. It will automatically search for and install drivers for your new disk controller.
If after making these changes your Windows still does not boot with the same INACCESSABLE_BOOT_DEVICE error, it means you are using some other type of disk controller.
Try to change the value of the Start parameter in the HKEY_LOCAL_MACHINE\local_hkey\ControlSet001\services key according to the table below.
| Windows Service Name | VMWare or Hype-V Virtual Machine | Physical PC Running Windows x64 with Native SATA Adapter | Physical PC with RAID Controller |
| aliide | 3 | 3 | 3 |
| amdide | 3 | 3 | 3 |
| atapi | 0 | 0 | 0 |
| cmdide | 3 | 3 | 3 |
| iastorv | 3 | 3 | 3 |
| intelide | 0 | 3 | 3 |
| msahci | 3 | 0 | 0 |
| pciide | 3 | 0 | 3 |
| viaide | 3 | 3 | 3 |
| LSI_SAS | 0 | 3 | 3 |
How to Manually Install the Driver When an INACCESSABLE_BOOT_DEVICE Error Occurs?
You can manually install the drivers into your offline Windows image. For example, after performing a P2V host migration, you can install the VMware SCSI Disk Controller or the VirtIO driver (for KVM virtualization) to an offline Windows image. To do this, copy the necessary drivers to a bootable USB flash drive, boot from it, and open a command prompt.
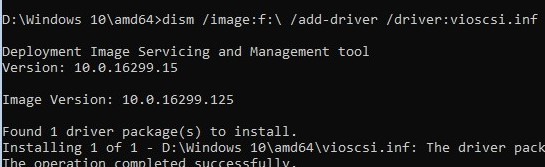
To install the driver to an offline Windows image (in this example it is on the F: drive), run the command
dism /image:f:\ /add-driver /driver:vioscsi.inf
Some organizations have configured Group Policies that restrict installing third-party drivers on Windows. For example, with the following options under Computer Configuration -> Administrative Templates -> System -> Device Installation -> Device Installation Restrictions:
- Prevent installation of devices that match any of these device IDs
- Prevent installation of devices using drivers that match these device setup classes
- Prevent installation of removable devices
- Prevent installation of devices not described by other policy settings.

Windows cannot install the controller driver automatically if these policies are enabled.
In this case, you will need:
- Boot your computer from the boot media and load the
\Windows\System32\config\SYSTEMregistry hive from the local drive (as described above); - Then navigate to the following registry key
HKEY_LOCAL_MACHINE\local_hkey\System\ControlSet001\Control\PnP - Change the DisableCDDB and DontStartRawDevices registry values to
0 - Unload the registry hive and restart your computer.
52 comments
Thanks for the guide, it’s very helpful.
In some cases, 0x0000007b is caused by a Group Policy setting. A fix can be found here:
https://superuser.com/questions/1023131/virtualbox-windows-raw-disk-guest-blue-screen-error-0x0000007b-at-boot/1432826#1432826
The best solution I found… Thank you.
God bless you…really.
It worked like a charm for me.
Thanks again
Andrea
Thanks man, Very cool solution.
It was worked for me too. You are a lifesaver.
Migrating a VM from Xenserver to Vmware, significant hardware change.
Worked like a charm after many hours researching.
Thanks!!!
Thank you so much for this worked perfectly for a P2V disaster recovery emergency.
Also confirmed it fixes P2V in Hyper-V environment.
You are awesome, I can’t thank you enough, 7 sleepless nights ended by your awesome post.
Thank you
Many Thanks. Really solve my problem.
Rarely do I comment on these posts, this one saved me on a server that has been taken P2V (Xenserver), V2V (Xen to HyperV), and now V2V (crashing HyperV to VMware)…I think the LSI_SAS setting was there from XENSERVER. Thanks!
Hi. I get this exact error, but these steps don’t work for me. Using a WSB and restoring from an HP DL380 to a Hyper V environment. Your table at the bottom doesn’t list Hyper V, only VMWare – would the setting sbe the same? I have tried them and still the BSOD. Any thoughts? Many thanks.
Wow can’t believe this worked! Thanks so much!!
Wow…Thank you so much. I am very grateful. Thank you once again! Excellent article, superb website.
Thank you so much, that table saved my life! I attached a Xenserver VM disk to VMware, putting LSI_SAS to 0 fixed my BSOD.
Wow! Wonderful! Works like a charm for Hyper-V as well.
Congrats!!!
YES – it worked for HYPER-V (@DOUG: for some reasons, I had to do it twice.. first found all start for atapi, intelide and lsi_sas as 0, then tried VMWARE settings, then checked again and set atapi, intelide and lsi_sas to 0).
THANK YOU.
Hi Guido. I still couldn’t get it to work, so I gave up and restored it to physical, then backed up with Veeam, then restored to virtual ….long-winded, but it got me where I needed!
I really thought that this would be a hard one, but the solution was rather easy 🙂
Thank you very much!
Didn’t boot with a CD, just mounted vhdx file and they followed the regedit instructions. Outstanding! Worked like a charm!
Thanks !! It really saved me 😉
Thank you so much! Really good article, helped me a lot.
Thx you, works for Windows 2008 R2 physical server restore on Hyper-V 2016.
Dude….DUUUUUUDE! You just saved my skin…was trying to P2V two aging Windows Server 2008 installations and one of the two failed to boot.
You regedit-fix did the trick, THANK YOU!
Thank you so much.
I would like to kiss your belly button!
Thanks a lot!
Are you married? No? Wanna be?!
Thank you very much! Rsrsrs
I come here whenever I am stuck with taking servers as vm specially for server 2008 r2
I have BSOD after using VMWARE CONVERTER 6 from Windows 2008R2 running on Oracle Virtual Box moving toESXi 6.5 HP Customized Image. Applying VMWARE Column settings for Services hive works.
After boot i’ve removed VMGuest Additions for Virtual Box and installed VMWARE tools
Thanks
TLB
Thank you! After several tries (hours of tries), thinking that there was a issue with the boot configuration, that solution worked!!
Thanks a lot 🙂
You simply _ROCK_! No doubt 🙂
Thank you for above writing: they solved my issue 🙂
Thanks.
Thank you!
This is the secret sauce for a CloneZilla image to Windows 7 Pro VM on VMWare Workstation.
Hello thanks a Million … (Migrating Windows 2008 64bits from XCP-ng 8.01 to VMWare ESXi 6.5 U3)
I’m almost give up of migrating xenserver windows server 2008 (AD) to vmware esxi 6.5 … I’ve done a script to change registry in order to remove xen keys and worked for all other windows server … but not for windows 2008 server …
I’ve done some extra procedure during boot in order to get a normal boot … I’ve done F8 during windows starting and choose “boot from last known good configuration”
Here you are the script to change registry to eliminate xen keys and I’ve included your tips to change driver keys too …
Before backup and recover a Bare Metal of windows 2008 into VMware ESXi … I’ve copied this script to Desktop of
Windows server 2008 as remove.xen.keys.bat:
After booting media to recover windows, go to cmd prompt and execute remove.xen.keys.bat:
reg load HKLM\temphive d:\windows\system32\config\SYSTEM
# reg query HKEY_LOCAL_MACHINE\temphive\CurrentControlSet\Services
reg delete HKEY_LOCAL_MACHINE\temphive\CurrentControlSet\Services\XEN /f
reg delete HKEY_LOCAL_MACHINE\temphive\CurrentControlSet\Services\xenagent /f
reg delete HKEY_LOCAL_MACHINE\temphive\CurrentControlSet\Services\xenbus /f
reg delete HKEY_LOCAL_MACHINE\temphive\CurrentControlSet\Services\xenbus_monitor /f
reg delete HKEY_LOCAL_MACHINE\temphive\CurrentControlSet\Services\xendisk /f
reg delete HKEY_LOCAL_MACHINE\temphive\CurrentControlSet\Services\xenfilt /f
reg delete HKEY_LOCAL_MACHINE\temphive\CurrentControlSet\Services\xeniface /f
reg delete HKEY_LOCAL_MACHINE\temphive\CurrentControlSet\Services\XenInstall /f
reg delete HKEY_LOCAL_MACHINE\temphive\CurrentControlSet\Services\xennet /f
reg delete HKEY_LOCAL_MACHINE\temphive\CurrentControlSet\Services\XenSvc /f
reg delete HKEY_LOCAL_MACHINE\temphive\CurrentControlSet\Services\xenvbd /f
reg delete HKEY_LOCAL_MACHINE\temphive\CurrentControlSet\Services\xenvif /f
# reg query HKEY_LOCAL_MACHINE\temphive\ControlSet001\Services
reg delete HKEY_LOCAL_MACHINE\temphive\ControlSet001\Services\XEN /f
reg delete HKEY_LOCAL_MACHINE\temphive\ControlSet001\Services\xenagent /f
reg delete HKEY_LOCAL_MACHINE\temphive\ControlSet001\Services\xenbus /f
reg delete HKEY_LOCAL_MACHINE\temphive\ControlSet001\Services\xenbus_monitor /f
reg delete HKEY_LOCAL_MACHINE\temphive\ControlSet001\Services\xendisk /f
reg delete HKEY_LOCAL_MACHINE\temphive\ControlSet001\Services\xenfilt /f
reg delete HKEY_LOCAL_MACHINE\temphive\ControlSet001\Services\xeniface /f
reg delete HKEY_LOCAL_MACHINE\temphive\ControlSet001\Services\XenInstall /f
reg delete HKEY_LOCAL_MACHINE\temphive\ControlSet001\Services\xennet /f
reg delete HKEY_LOCAL_MACHINE\temphive\ControlSet001\Services\XenSvc /f
reg delete HKEY_LOCAL_MACHINE\temphive\ControlSet001\Services\xenvbd /f
reg delete HKEY_LOCAL_MACHINE\temphive\ControlSet001\Services\xenvif /f
# reg query HKEY_LOCAL_MACHINE\temphive\ControlSet002\Services
reg delete HKEY_LOCAL_MACHINE\temphive\ControlSet002\Services\XEN /f
reg delete HKEY_LOCAL_MACHINE\temphive\ControlSet002\Services\xenagent /f
reg delete HKEY_LOCAL_MACHINE\temphive\ControlSet002\Services\XENBUS /f
reg delete HKEY_LOCAL_MACHINE\temphive\ControlSet002\Services\xenbus_monitor /f
reg delete HKEY_LOCAL_MACHINE\temphive\ControlSet002\Services\xendisk /f
reg delete HKEY_LOCAL_MACHINE\temphive\ControlSet002\Services\xenfilt /f
reg delete HKEY_LOCAL_MACHINE\temphive\ControlSet002\Services\xeniface /f
reg delete HKEY_LOCAL_MACHINE\temphive\ControlSet002\Services\XenInstall /f
reg delete HKEY_LOCAL_MACHINE\temphive\ControlSet002\Services\xennet /f
reg delete HKEY_LOCAL_MACHINE\temphive\ControlSet002\Services\XenSvc /f
reg delete HKEY_LOCAL_MACHINE\temphive\ControlSet002\Services\xenvbd /f
reg delete HKEY_LOCAL_MACHINE\temphive\ControlSet002\Services\xenvif /f
reg delete HKEY_LOCAL_MACHINE\temphive\ControlSet001\Services\XenSvc /f
reg delete HKEY_LOCAL_MACHINE\temphive\ControlSet001\Services\xenvbd /f
reg delete HKEY_LOCAL_MACHINE\temphive\ControlSet001\Services\xenvif /f
reg delete HKEY_LOCAL_MACHINE\temphive\CurrentControlSet\Control\Class\{4d36e97d-e325-11ce-bfc1-08002be10318} /v UpperFilters /f
reg delete HKEY_LOCAL_MACHINE\temphive\ControlSet001\Control\Class\{4d36e97d-e325-11ce-bfc1-08002be10318} /v UpperFilters /f
reg delete HKEY_LOCAL_MACHINE\temphive\ControlSet002\Control\Class\{4d36e97d-e325-11ce-bfc1-08002be10318} /v UpperFilters /f
reg delete HKEY_LOCAL_MACHINE\temphive\CurrentControlSet\Control\Class\{4d36e96a-e325-11ce-bfc1-08002be10318} /v UpperFilters /f
reg delete HKEY_LOCAL_MACHINE\temphive\ControlSet001\Control\Class\{4d36e96a-e325-11ce-bfc1-08002be10318} /v UpperFilters /f
reg delete HKEY_LOCAL_MACHINE\temphive\ControlSet002\Control\Class\{4d36e96a-e325-11ce-bfc1-08002be10318} /v UpperFilters /f
reg add HKEY_LOCAL_MACHINE\temphive\ControlSet001\Services\ATAPI /v Start /t REG_DWORD /d 0 /f
reg add HKEY_LOCAL_MACHINE\temphive\ControlSet001\Services\intelide /v Start /t REG_DWORD /d 0 /f
reg add HKEY_LOCAL_MACHINE\temphive\ControlSet001\Services\LSI_SAS /v Start /t REG_DWORD /d 0 /f
reg add HKEY_LOCAL_MACHINE\temphive\ControlSet001\Services\msahci /v Start /t REG_DWORD /d 0 /f
reg add HKEY_LOCAL_MACHINE\temphive\ControlSet002\Services\ATAPI /v Start /t REG_DWORD /d 0 /f
reg add HKEY_LOCAL_MACHINE\temphive\ControlSet002\Services\intelide /v Start /t REG_DWORD /d 0 /f
reg add HKEY_LOCAL_MACHINE\temphive\ControlSet002\Services\LSI_SAS /v Start /t REG_DWORD /d 0 /f
reg add HKEY_LOCAL_MACHINE\temphive\ControlSet002\Services\msahci /v Start /t REG_DWORD /d 0 /f
reg unload HKLM\temphive
Your script fixed my issue, but manually following the table didn’t. Not sure what the issue was. But thanks!!
Am I the only one that this didn’t work for? 😭😭
You are a angel sent from heaven. Thank you so much for creating this article. Saved me so much time.
Thank you very much. I solved P2V boot problem with these steps.
Thank you very much!
Solved a Windows 7 P2V VMWare Standalone Converter boot problem with these steps.
Hey Man!, This works like a charm!
Thak you so much!
Thank you so much for this! I have spent hours and hours trying to sort this out. While I found
I was able to resolve the issue Doug was facing with a Proliant server. In short there are additional services which must be started not listed in this post. I followed Stanislaw’s recommendation and enabled all services with the group “SCSI Mini…” by converting “Start” value from 3 to 0. This was still not enough. However when I enabled all services in the group “SYSTEM BUS EXTENDER” as well I was finally able to boot the VM. Hope this helps others.
In short if you enable every single service it should work.
Thanks!!! It’s works perfect after the registry changes. You are the best!!!
After swapping PERC 6i to a H700 on a Dell R610 server, followed your instructions. Everything went well. Thankyou.
As this swap was planned, and after your Fix, I began to wonder if:
1) With the PERC 6i still installed – carry out the Registry changes you describe.
2) Shutdown server and swap out the PERC to the H700
3) reboot, and all is good
For those planning a swap – would this work, as it is much simpler. ???
Hey Guys, I’m having an issue with our last 2003SP2 32bit server im trying to virtualize.
This is currently sitting on an HP G4 server with Smart array 6400
I’ve tried many tricks recommended by vmware injecting the symmpi.sys drives and importing the reg entries from a working 2003 vm
I verified that symmpi.sys start is set to =0 but im still getting the 0x7b bsod on the virtual
the original 2003 server is still up but VSS completely jacked and cannot run vmconverter standalone or disk2vhd
Any tips to getting this 2003 server to boot in vmware?
WHO ARE YOU?!?! You just saved my life
Your are a SUPERSTAR! Thanks a million. I went from dejected to happy because of your time and effort to make this article. Hat tip!
Excellent article, precise recommendations, superb results! It worked like a charm, and I have learned things (local_hkey) which I’ve never dreamed were possible! Thanks a lot!
It allowed me to boot and run a physical disk with Windows 2008 Server (32 bit) installed on it, on top of a Hyper-V VM in a Windows 2019 Server. Perfect. Thanks again!
It’s works Perfect. Thanks a lot for your help.I have learned (local_hkey) capability. Thanks a lot!
After hours of search and try this worked out for me as well. thanks a lot!!
thanks
Thanks! This helps me to restore a clonezilla image to VMware when I encountered a 0X000000E boot error
_https://toggen.com.au/it-tips/from-clonezilla-image-to-vmware-workstation-a-journey/
GOD .. worked 100%
Thank you
I’ve spent hours trying to solve this problem and you’re the only one to give a working solution.
Thank you so much!!!!!