Windows OS Hub
  • Windows Server
    • Windows Server 2022
    • Windows Server 2019
    • Windows Server 2016
    • Windows Server 2012 R2
    • Windows Server 2008 R2
    • SCCM
  • Active Directory
    • Active Directory Domain Services (AD DS)
    • Group Policies
  • Windows Clients
    • Windows 11
    • Windows 10
    • Windows 8
    • Windows 7
    • Windows XP
    • MS Office
    • Outlook
  • Virtualization
    • VMWare
    • Hyper-V
    • KVM
  • PowerShell
  • Exchange
  • Cloud
    • Azure
    • Microsoft 365
    • Office 365
  • Linux
    • CentOS
    • RHEL
    • Ubuntu
  • Home
  • About

Windows OS Hub

  • Windows Server
    • Windows Server 2022
    • Windows Server 2019
    • Windows Server 2016
    • Windows Server 2012 R2
    • Windows Server 2008 R2
    • SCCM
  • Active Directory
    • Active Directory Domain Services (AD DS)
    • Group Policies
  • Windows Clients
    • Windows 11
    • Windows 10
    • Windows 8
    • Windows 7
    • Windows XP
    • MS Office
    • Outlook
  • Virtualization
    • VMWare
    • Hyper-V
    • KVM
  • PowerShell
  • Exchange
  • Cloud
    • Azure
    • Microsoft 365
    • Office 365
  • Linux
    • CentOS
    • RHEL
    • Ubuntu

 Windows OS Hub / Windows 10 / Enable and Configure Offline Files on Windows 10

June 7, 2022 Windows 10Windows Server 2016Windows Server 2019

Enable and Configure Offline Files on Windows 10

Offline Files feature in Windows 10 allows you to make certain shared network folders and files available offline even if your computer is not connected to the corporate network. In this article, we will show how to enable and configure Offline Files on Windows 10 and Windows Server 2019 manually and using GPO.

Offline Files have been available in Windows for a long time. A user only needs to enable Offline Files on the computer and check the “Always available offline” option for some files or folders in a shared folder. Then Windows saves the specified files to the local cache on the disk and periodically updates them in the background (every 2 hours by default, but you can set how often your Offline Files are synchronized using the Configure Background Sync option in GPO).

There is a modern and more secure feature for accessing your file resources outside the corporate network in offline mode – Work Folders on Windows Server 2019/2016.

Contents:
  • How to Enable Offline Files on Windows 10?
  • Configuring Offline Files for a Shared Folder on Windows Server
  • How to Configure Offline Files Using Group Policy?

How to Enable Offline Files on Windows 10?

In Windows 10, you can enable Offline Files through the classic Control Panel.

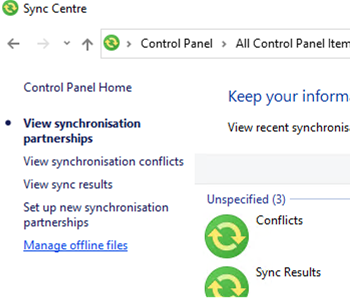
  1. Open the Sync Center; windows 10 offline files in sync center
  2. Select Manage Offline Files on the left; Manage Offline Files on Windows 10
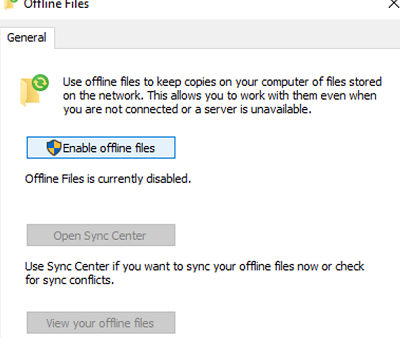
  3. Click Enable Offline Files; Enable offline files on Windows 10
  4. Restart your computer.

Then a user can just right-click a file or a folder in the shared network folder and select the Always available offline th option.

Shared folder - always available offline

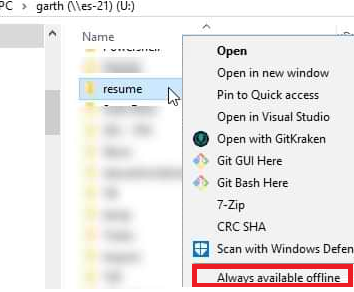
Windows will start copying the specified files to the local cache of Offline Files. By default, the cache size of Offline Files in Windows is 25% of the total disk size (depending on your Windows version).

offline file synchronization on windows 10

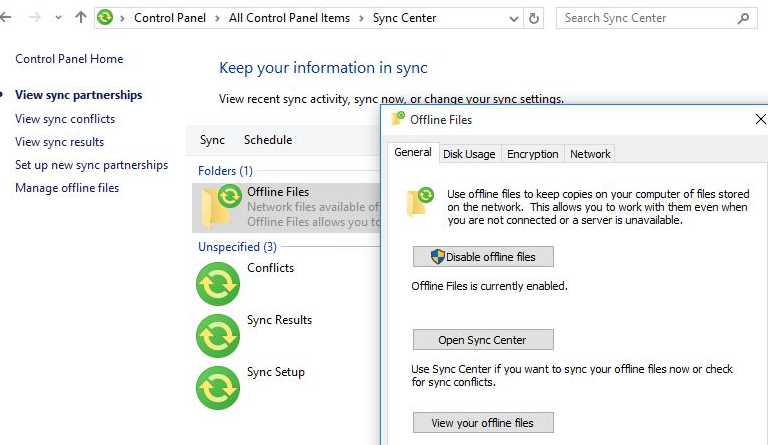
Then if a source file server is not available or the network connection speed is slower than the threshold value, the files will be available offline in the Sync Center.

All changes made to Offline Files will be synchronized with the server next time when a computer connects to the network.

Offline Files are stored in the C:\Windows\CSC folder on a client computer and are not directly accessible through File Explorer.

Configuring Offline Files for a Shared Folder on Windows Server

To allow a user to make files available offline, Offline Files support must be enabled in the shared folder settings.

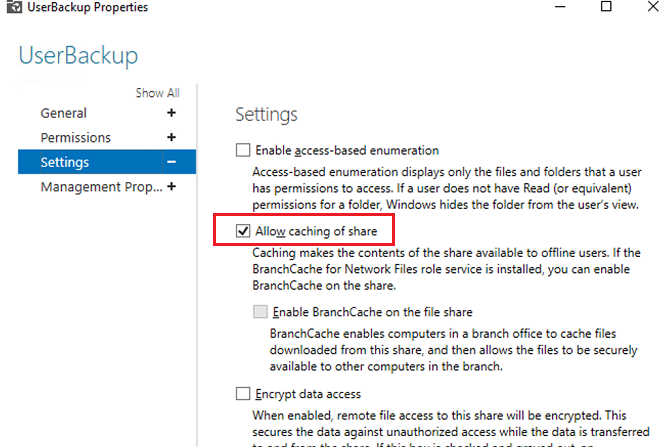
On Windows Server 2019, open Server Manager and check the option Allow caching of share in the settings of your shared folder.

Windows Server - share properties - allow caching of share

You can enable manual caching mode for your network shared folder using PowerShell (in this mode users can manually select files and folders to make them available offline):

Set-SMBShare -Name Docs -CachingMode Manual

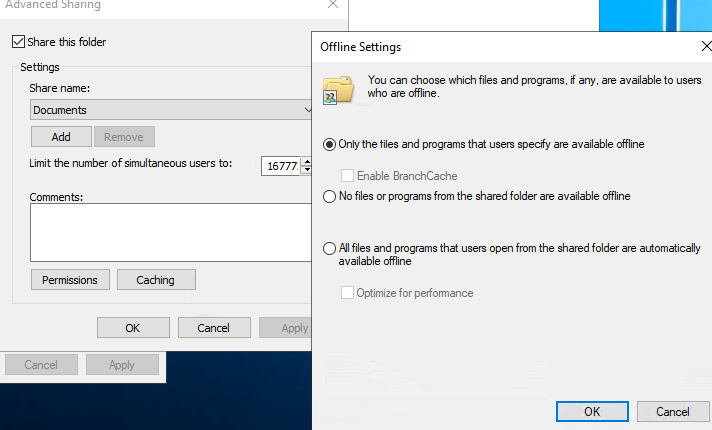
If a network share is located on a computer running desktop Windows edition, select Caching -> Only the files and programs that users specify are available offline in the settings of the shared folder.

windows 10 - allow or disable files to be available offline

How to Configure Offline Files Using Group Policy?

If you want to enable Offline Files on all computers in your Active Directory domain, you may deploy the following registry settings through a GPO:

  • HKEY_LOCAL_MACHINE\SYSTEM\CurrentControlSet\Services\CSC – Start = 1 (type DWORD)
  • HKEY_LOCAL_MACHINE\SYSTEM\CurrentControlSet\Services\CscService
    –Start = 2 (type DWORD)
  • HKLM\Software\Policies\Microsoft\Windows\NetCache –Enabled=1 (type DWORD)

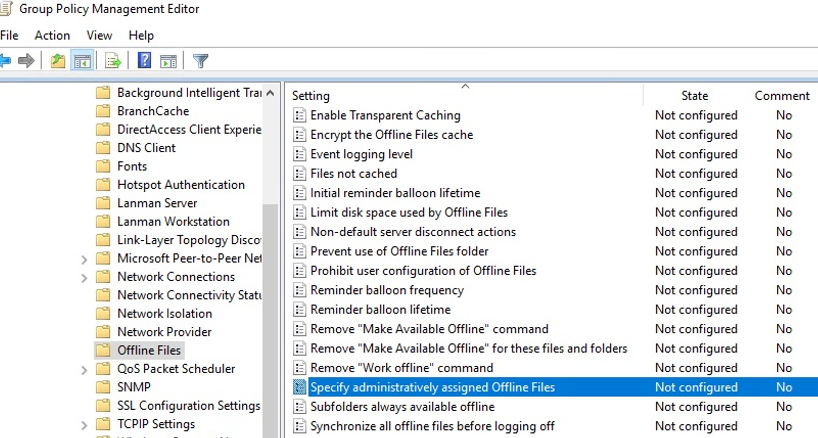
Or you can use the Allow or Disallow use of the Offline Files policy from the Computer Configuration -> Policies -> Administrative Templates -> Network -> Offline Files section of GPO. You can configure other Offline Files options here:

  • Configure Background Sync — to enable background synchronization and set synchronization intervals;
  • Limit disk space used by Offline Files / Default Cache size – to limit the size of Offline Files cache on the disk;
  • Specify administratively assigned Offline File is the list of shared folders to be synchronized on user computers and available offline (you can specify UNC paths to any network share or a personal user folder \\hostname1\Users$\%username%)

Configure Offline Files with GPO

When analyzing Offline Files issues in Windows, it is worth checking synchronization events in the Windows Event log. Enable Offline Files synchronization log:

wevtutil sl Microsoft-Windows-OfflineFiles/SyncLog /e:true /q

Then you can get a list of successfully synchronized files for the last 24 hours using the PowerShell command below:

get-winevent -oldest -filterhashtable @{ logname = "Microsoft-Windows-OfflineFiles/SyncLog"; starttime = (get-date).adddays(-1); id = 2005 } | select-object TimeCreated, @{ name = "Path"; expression = { ([xml]$_.toxml()).Event.UserData.SyncSuccessInfo.Path } }

To clear the Offline Files cache, change the FormatDatabase registry parameter and restart your computer:

reg add HKEY_LOCAL_MACHINE\SYSTEM\CurrentControlSet\Services\Csc\Parameters /v FormatDatabase /t REG_DWORD /d 1 /f
shutdown –f –r –t 0

0 comment
2
Facebook Twitter Google + Pinterest
previous post
How To Install and Configure DHCP Server on Windows Server 2019/2016?
next post
How to Convert (Upgrade) Windows Server 2019/2016 Evaluation to Full Version?

Related Reading

Zabbix: How to Get Data from PowerShell Scripts

October 27, 2023

Tracking Printer Usage with Windows Event Viewer Logs

October 19, 2023

How to Use Ansible to Manage Windows Machines

September 25, 2023

Installing Language Pack in Windows 10/11 with PowerShell

September 15, 2023

How to View and Change BIOS (UEFI) Settings...

September 13, 2023

Leave a Comment Cancel Reply

Categories

  • Active Directory
  • Group Policies
  • Exchange Server
  • Microsoft 365
  • Azure
  • Windows 11
  • Windows 10
  • Windows Server 2022
  • Windows Server 2019
  • Windows Server 2016
  • PowerShell
  • VMWare
  • Hyper-V
  • Linux
  • MS Office

Recent Posts

  • Zabbix: How to Get Data from PowerShell Scripts

    October 27, 2023
  • Tracking Printer Usage with Windows Event Viewer Logs

    October 19, 2023
  • PowerShell: Configure Certificate-Based Authentication for Exchange Online (Azure)

    October 15, 2023
  • Reset Root Password in VMware ESXi

    October 12, 2023
  • How to Query and Change Teams User Presence Status with PowerShell

    October 8, 2023
  • How to Increase Size of Disk Partition in Ubuntu

    October 5, 2023
  • How to Use Ansible to Manage Windows Machines

    September 25, 2023
  • Installing Language Pack in Windows 10/11 with PowerShell

    September 15, 2023
  • Configure Email Forwarding for Mailbox on Exchange Server/Microsoft 365

    September 14, 2023
  • How to View and Change BIOS (UEFI) Settings with PowerShell

    September 13, 2023

Follow us

  • Facebook
  • Twitter
  • Telegram
Popular Posts
  • How to Repair EFI/GPT Bootloader on Windows 10 or 11
  • How to Restore Deleted EFI System Partition in Windows
  • Network Computers are not Showing Up in Windows 10/11
  • Updating List of Trusted Root Certificates in Windows
  • How to Create a Wi-Fi Hotspot on your Windows PC
  • How to Sign an Unsigned Device Driver in Windows
  • How to Download APPX File from Microsoft Store for Offline Installation?
Footer Logo

@2014 - 2023 - Windows OS Hub. All about operating systems for sysadmins


Back To Top