Windows OS Hub
  • Windows Server
    • Windows Server 2022
    • Windows Server 2019
    • Windows Server 2016
    • Windows Server 2012 R2
    • Windows Server 2008 R2
    • SCCM
  • Active Directory
    • Active Directory Domain Services (AD DS)
    • Group Policies
  • Windows Clients
    • Windows 11
    • Windows 10
    • Windows 8
    • Windows 7
    • Windows XP
    • MS Office
    • Outlook
  • Virtualization
    • VMWare
    • Hyper-V
    • KVM
  • PowerShell
  • Exchange
  • Cloud
    • Azure
    • Microsoft 365
    • Office 365
  • Linux
    • CentOS
    • RHEL
    • Ubuntu
  • Home
  • About

Windows OS Hub

  • Windows Server
    • Windows Server 2022
    • Windows Server 2019
    • Windows Server 2016
    • Windows Server 2012 R2
    • Windows Server 2008 R2
    • SCCM
  • Active Directory
    • Active Directory Domain Services (AD DS)
    • Group Policies
  • Windows Clients
    • Windows 11
    • Windows 10
    • Windows 8
    • Windows 7
    • Windows XP
    • MS Office
    • Outlook
  • Virtualization
    • VMWare
    • Hyper-V
    • KVM
  • PowerShell
  • Exchange
  • Cloud
    • Azure
    • Microsoft 365
    • Office 365
  • Linux
    • CentOS
    • RHEL
    • Ubuntu

 Windows OS Hub / Windows 10 / Windows 10: No Internet Connection After Connecting to VPN Server

April 19, 2023 PowerShellWindows 10

Windows 10: No Internet Connection After Connecting to VPN Server

When connecting from home to a corporate VPN server (AlwaysOnVPN, Windows Server RRAS or OpenVPN server), users complain that they don’t have Internet access on their computer with an active VPN connection. In this article we will discuss why you cannot access the Internet on Windows 10 while connected to a VPN and how to fix this problem.

When creating a new VPN connection in Windows (all version), the option Use default gateway on remote network is enabled by default. It means that all traffic from your computer is sent through a VPN tunnel. If remote clients are allowed to access only local corporate resources and the Internet access is restricted on the VPN server, a remote user won’t be able access external websites and other Internet resources from their computer. After disconnecting from VPN, all user traffic will go through a common network and the Internet access will appear.

A mode, when some traffic (access to corporate resources) is sent through a VPN tunnel and the rest of traffic (Internet access) goes through a local network connection, is called split tunneling.

In Windows 10, you can enable split tunneling (disable Internet traffic routing through a VPN tunnel) in three ways:

  • In the TCP/IP VPN connection settings
  • In rasphone.pbk file
  • Using Set-VpnConnection cmdlet with the SplitTunneling parameter in PowerShell

The easiest way is to change TCP/IP settings of your VPN connection through the Control Panel.

  1. Open the list of network connections in the Control Panel (Control Panel\Network and Internet\Network Connections) and go to the properties of your VPN connection;
  2. Open the Networking tab, select Internet Protocol Version 4 (TCP/IPv4) and click Properties;
  3. Click Advanced;
  4. Make sure that Use default gateway on remote network option is checked in the IP Settings tab.
    windows 10 - Use default gateway on remote network for VPN connection

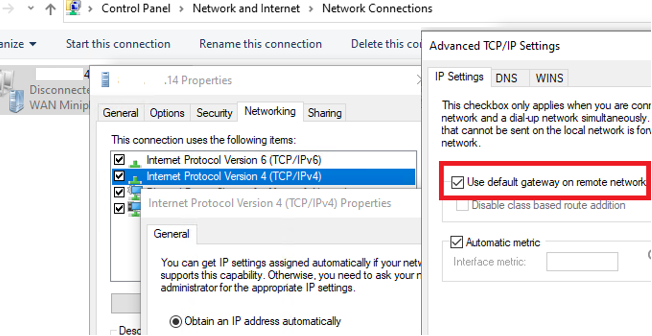
After you uncheck the “Use default gateway on remote network” option and reconnect to your VPN gateway, you will have access Internet on your computer through your ISP connection . However, in some Windows 10 builds the option is not available on some reasons (there are different problems: you cannot edit the field, the setting is not saved, or the setting form is not opened when you click TCP/IPv4 properties), so you may have to use other ways to solve the problem.

The file rasphone.pbk is located in the folder C:\ProgramData\Microsoft\Network\Connections\pbk\ (if you created a VPN connection for all users of a computer) or in the user profile directory C:\Users\username\AppData\Roaming\Microsoft\Network\Connections\Pbk (if the VPN connection is available for your user only).

Open rasphone.pbk in any text editor (even notepad.exe will do). The settings of all configured VPN connections are stored in this file. Find the IpPrioritizeRemote parameter. By default, its value is 1. Change it to 0, save rasphone.pbk and restart your VPN connection.

You can use rasphone.pbk to deploy a properly configured VPN connection to users’ computers.

rasphone.pbk connection file -set IpPrioritizeRemote parameter

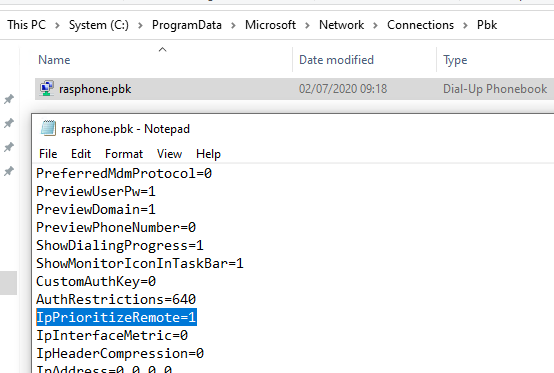
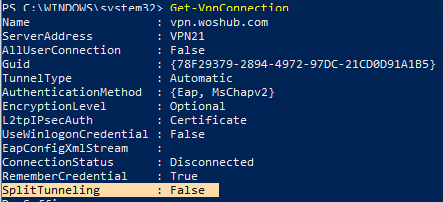
Also you can configure VPN split tunneling via PowerShell. Display the list of all available VPN connections:

Get-VpnConnection

Make sure that SplitTunneling for the connection is disabled (SplitTunneling: False).

Get-VpnConnection - set SplitTunneling

To enable SplitTunneling, specify the name of your VPN connection:

Set-VpnConnection –name vpn.woshub.com -SplitTunneling $true

Reconnect to your VPN server and make sure that you have Internet access on your computer and have access to the corporate resources behind the VPN gateway. Enabling SplitTunneling does the same thing as when you uncheck the “Use default gateway on remote network” option in the TCP/IPv4 settings of your VPN connection. (If you run the command shown above, this option is unchecked).

Another typical issue with an active VPN connection is a problem with the DNS name resolving. The name of the resources in your LAN stop being resolved, since by default the DNS servers specified in the VPN connection settings are used. The problem is described here: “Unable to resolve local DNS records when connected with VPN”.

0 comment
6
Facebook Twitter Google + Pinterest
previous post
How to Enable and Configure User Disk Quotas in Windows?
next post
USB Device Passthrough (Redirect) to Hyper-V Virtual Machine

Related Reading

Zabbix: How to Get Data from PowerShell Scripts

October 27, 2023

Tracking Printer Usage with Windows Event Viewer Logs

October 19, 2023

PowerShell: Configure Certificate-Based Authentication for Exchange Online (Azure)

October 15, 2023

How to Query and Change Teams User Presence...

October 8, 2023

How to Use Ansible to Manage Windows Machines

September 25, 2023

Leave a Comment Cancel Reply

Categories

  • Active Directory
  • Group Policies
  • Exchange Server
  • Microsoft 365
  • Azure
  • Windows 11
  • Windows 10
  • Windows Server 2022
  • Windows Server 2019
  • Windows Server 2016
  • PowerShell
  • VMWare
  • Hyper-V
  • Linux
  • MS Office

Recent Posts

  • Zabbix: How to Get Data from PowerShell Scripts

    October 27, 2023
  • Tracking Printer Usage with Windows Event Viewer Logs

    October 19, 2023
  • PowerShell: Configure Certificate-Based Authentication for Exchange Online (Azure)

    October 15, 2023
  • Reset Root Password in VMware ESXi

    October 12, 2023
  • How to Query and Change Teams User Presence Status with PowerShell

    October 8, 2023
  • How to Increase Size of Disk Partition in Ubuntu

    October 5, 2023
  • How to Use Ansible to Manage Windows Machines

    September 25, 2023
  • Installing Language Pack in Windows 10/11 with PowerShell

    September 15, 2023
  • Configure Email Forwarding for Mailbox on Exchange Server/Microsoft 365

    September 14, 2023
  • How to View and Change BIOS (UEFI) Settings with PowerShell

    September 13, 2023

Follow us

  • Facebook
  • Twitter
  • Telegram
Popular Posts
  • Manage Windows Updates with PSWindowsUpdate PowerShell Module
  • Configuring Port Forwarding in Windows
  • Start Menu or Taskbar Search Not Working in Windows 10/11
  • Get-ADUser: Find Active Directory User Info with PowerShell
  • How to Hide Installed Programs in Windows 10 and 11
  • Configuring SFTP (SSH FTP) Server on Windows
  • Adding Drivers into VMWare ESXi Installation Image
Footer Logo

@2014 - 2023 - Windows OS Hub. All about operating systems for sysadmins


Back To Top