One of the significant disadvantages of Hyper-V over other hypervisors (for example, VMWare ESXi or Proxmox) is the lack of a feature of redirecting USB devices from the host to virtual machines. Since version Hyper-V 2012 R2, there have been a number of changes regarding USB Passthrough options, but this functionality is still inferior to those of competitors. In this article, we will discuss the specifics of USB redirection in Hyper-V.
An Overview of Hyper-V USB Passthrough
USB passthrough refers to the ability to redirect a USB device from the host hypervisor (or over the network from another server/device) to a virtual machine. Using a USB passthrough, you can redirect a USB stick, token, USB dongle, modem, or any other device connected to the physical host’s USB port to the virtual machine.
The bad news is that Hyper-V doesn’t support full-featured USB passthrough. You cannot redirect an arbitrary USB device from a physical host to a virtual machine (VMWare is much better with this – see the article USB passthrough in VMWare ESXi). There are several built-in options for using an external USB device in a Hyper-V VM, but they all have significant limitations. Currently, you can use the following ways to redirect a USB device to Hyper-V virtual machine.
- Redirecting USB drives from Hyper-V host;
- Enhanced Session Mode on Hyper-V Console;
- USB Redirection via RDP;
- Using software/hardware solution for USB redirecting over the network (USB over IP).
usbip.sourceforge.net (the server part is implemented on Linux, the client can be installed on Windows).Accessing a USB Hard Drive from a Hyper-V Virtual Machine
You can fairly easily redirect a host-attached USB drive directly inside any running Hyper-V virtual machine. Let’s see how to give a Hyper-V virtual machine direct access to the host’s USB drive.
- This guide only works for USB drives that are detected by the system as fixed. You can’t redirect to VM this way USB flash drives, smart cards and other removable devices (although there is a little trick to make Windows see a removable device as a fixed hard drive).
- For these drives, you cannot create a snapshot/checkpoint.
- Connect an external USB drive to the Hyper-V host (this can be any host with Windows and the Hyper-V role installed, or Free Microsoft Hyper-V Server). The drive will appear in a system and a drive letter will be assigned to it (if a drive letter has not been assigned, check the article);
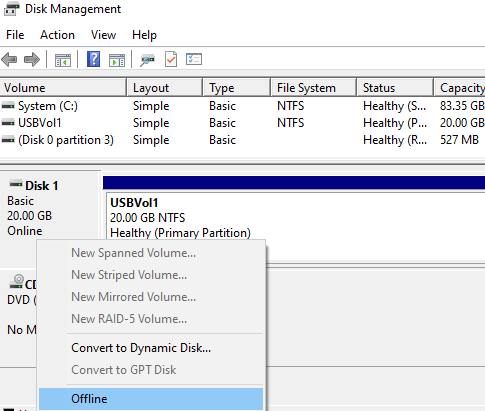
- Open the Disk Management (
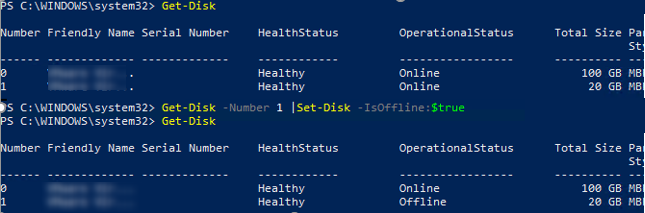
diskmgmt.msc) console, right-click the drive (in our example, the ID of the 20 GB USB drive is Disk 1) and select Offline. If you are using Windows Server Core or Hyper-V Server, which don’t have some of the graphical mmc snap-ins, you can manage your local disks using Disk Management PowerShell module. The following commands can list the physical disks on the host and take the specified disk offline:
Get-Disk
 Get-Disk -Number 1 |Set-Disk -IsOffline:$true
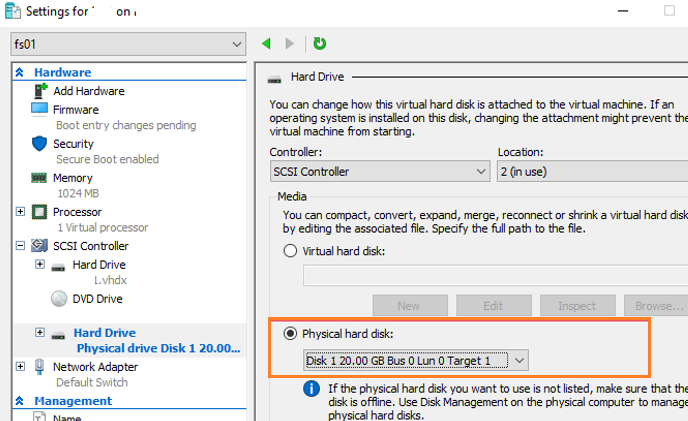
- Run Hyper-V Manager and open the properties of the virtual machine, to which a USB drive needs to be connected. In the SCSI Controller section, add a new disk, indicating that it is physical (Physical hard disk). In the drop-down menu select your USB drive (it will look something like this: Disk 1 20.00 Gb Bus 0 Lun 0 Target 1).Note. You don’t need to turn the virtual machine off to add a SCSI hard drive. For SCSI devices, hot-add and hot-remove drives are supported.
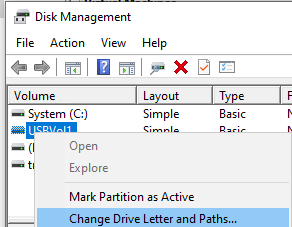
- Now we will show how to access a USB disk on a Hyper-V host from the guest OS of a virtual machine running Windows. Open the virtual machine console or connect to it via RDP. Log in to the guest OS. Run the Disk Manager. The OS should see the new drive. If it is offline, right-click on it and select Online. At this time, no drive letters or mount points are assigned to partitions on a USB disk. To fix this, right-click on the partition on the disk and select “Change Drive Letter and Paths” from the context menu. Assign any free drive letter to the partition or specify a mount point.
That’s all! You have directly connected external USB media into Hyper-V virtual machine and now can use it.
To safely remove the USB drive, you can open the Hyper-V Manager console and go to the virtual machine settings window. In the SCSI Controller section, select the hard drive you want to remove and click Remove. Save your changes. After that, you can physically remove the hard drive from the USB port of the Hyper-V host.
Redirect USB Device to VM with Hyper-V Enhanced Session Mode
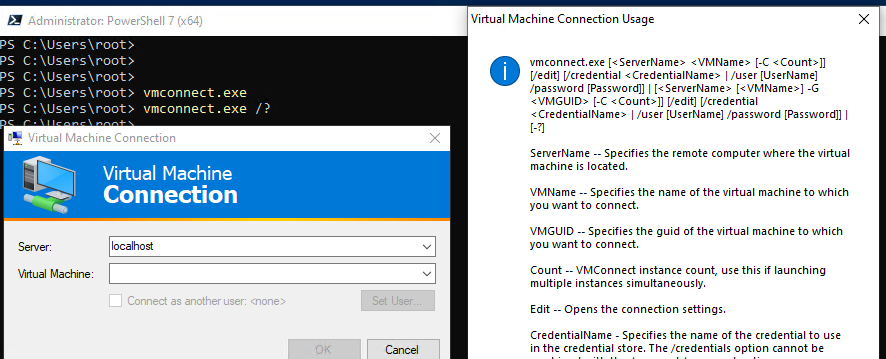
In the version of Hyper-V introduced in Windows Server 2012 R2/8.1, any USB device can be forwarded to a virtual machine from a client computer using Enhanced Session Mode (ESM). The Hyper-V Manager tool vmconnect.exe is used to connect. It allows you to connect to the virtual machine console and select the USB devices you want to redirect.
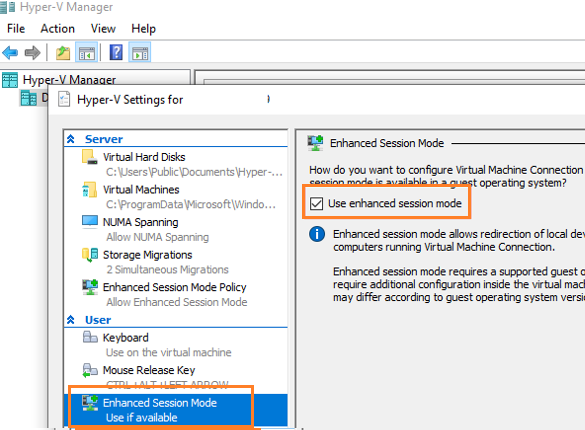
First you need to enable Enhanced Session Mode in the Hyper-V server settings. This can be done using PowerShell:
Set-VMHost -EnableEnhancedSessionMode $true
Or in the Hyper-V Settings -> Enhanced Session Mode.
Restart the Hyper-V Virtual Machine Management service:
Get-Service vmms | Restart-Service
In the Integration Services section of the VM settings, you must enable the Guest Services option.
In order to redirect the USB device through Enhanced Session Mode, you need to open the Hyper-V console, select the virtual machine, and click the Connect button. Or you can run the vmconnect.exe tool (Virtual Machine Connection), specify the Hyper-V server and the virtual machine name. The vmconnect tool supports some command line options, so you can give a customized bat file with the options you want to users.
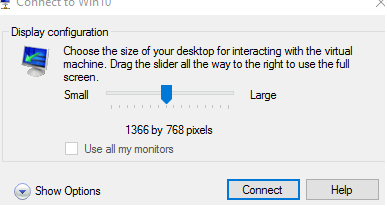
If the VM supports Enhanced Session Mode, a window similar to the RDP connection properties will appear. Click Show Option -> Local Resources -> Local device and resources -> More.
Select the USB devices on your computer to be redirected to the VM. If the device you want is not currently connected, select the “Other supported Plug and Play (PnP) devices” and “Devices that I plug in later options”.
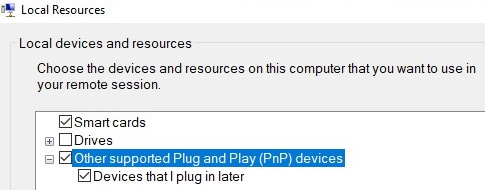
Now all USB devices connected to your computer will be automatically available in the console session of the Hyper-V virtual machine.
Key features and limitations of Hyper-V Enhanced Session Mode:
- Only Windows are supported as guest OS (starting from Windows 8.1 / Windows Server 2012 R2);
- You don’t need direct network access to the virtual machine. All connections are made through the Hyper-V host (you connect to it over the network via TCP port 2179), and the Hyper-V connects to the VM via the VMBus;
- Hyper-V Manager must be installed on the client’s computer.
This method is similar to redirecting USB devices from local host over an RDP session. We won’t consider this in more detail. 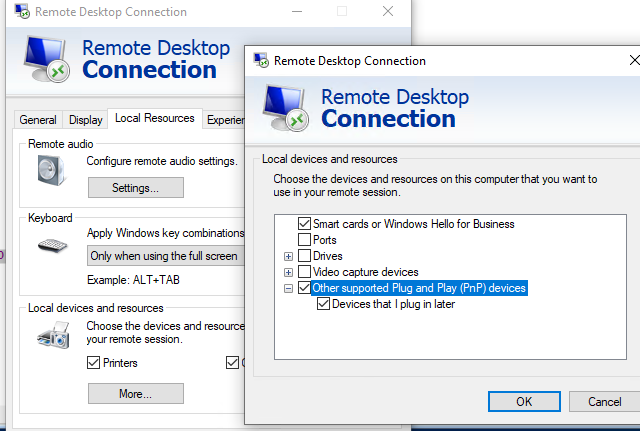
If you are redirecting USB devices over the network (USB over IP or over an RDP session), you can still access the USB key even after migrating the virtual machine to another host (Hyper-V Live Migration / vMotion).
5 comments
without doing offline the drive, u can also use usb, see this
https://youtu.be/4f2LzJsnCPs
Doesn’t work on 2019. And I am stuck trying to get a 179k tar to a FreeBSD machine with networking that cannot work until this driver gets over on it.
Get-Disk -Number 1 |Set-Disk -IsOffline:$true
Set-Disk : Not Supported
Extended information:
Removable media cannot be set to offline.
Activity ID: {c9c84ba6-eacd-40a2-aa57-29bc229e0a84}
+ CategoryInfo : InvalidOperation: (StorageWMI:ROOT/Microsoft/…_StorageCmdlets) [Set-Disk], CimException
+ FullyQualifiedErrorId : StorageWMI 1,Set-Disk
No option to stop exists in win 10 pro. So where are you finding this stop option????????
USB drive does not show up no option for offline just eject so what now…………
Same here… no “offline” choice is available on any menu, anywhere.
Ugh