You can use the built-in OpenSSH server on Windows to forward ports through an SSH tunnel (SSH tunneling). Port forwarding in SSH allows you to tunnel (forward) application ports from your local computer to a remote server and vice versa. Port forwarding over an SSH tunnel is widely used in Linux/Unix environments, and now you can take advantage of this feature in Windows as well. In this example, we will show how to tunnel an RDP connection traffic over OpenSSH on a Windows Server host.
What is an SSH Tunneling?
An SSH tunnel provides a secure, encrypted TCP connection between a local host and a remote SSH server. SSH Port Forwarding allows you to tunnel a connection from a local port on your local machine to any TCP port on a remote server (or vice versa) over SSH.
Port forwarding in SSH tunnels is used for:
- Bypass firewalls;
- Opening backdoors to private networks;
- VPN scenarios replacements for secure remote connection;
- Protect traffic of legacy applications (protocols) that transmit data in clear text (without encryption).
SSH tunneling is mostly used in scenarios when you need to connect to a remote computer behind the firewall. For example, you have a Windows Server with only SSH port open (TCP 22). All other ports are blocked by a hardware firewall or Windows Defender Firewall. Your task is to connect to the Windows Server using the RDP client. It would seem an impossible task because the Remote Desktop port 3389 is blocked by the firewall. However, you can access any ports on a remote host through an SSH tunnel.
Here are the typical usage scenarios of SSH tunneling:
- Local TCP forwarding is a local port forwarding to a remote server;
- Remote TCP forwarding is a remote port forwarding to a local computer;
- Double SSH tunnel – allows to connect computers without allocated pubic IP addresses or behind NAT/firewall through an SSH server (if OpenVPN server solution is not applicable).
Securing RDP with the SSH Tunnel (Local TCP Forwarding)
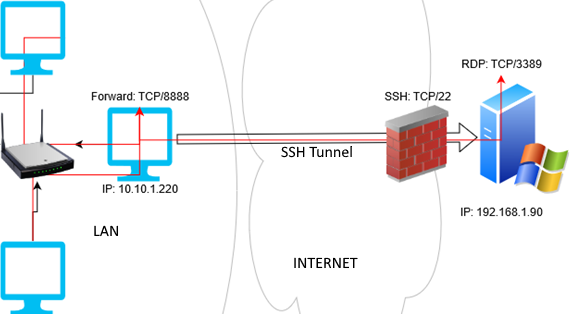
In this mode, you create a local TCP port on your computer. All connections to this port will be forwarded to the specified port on a remote server via the SSH tunnel. In this example, we will create a local port 8888, and the connection to it will be redirected to RDP port 3389 on a remote Windows host. The general connection diagram looks like this:
We need an SSH client for port forwarding. You can use a third-party client (like Putty), but I will use the built-in SSH client on Windows. Run the following command in the PowerShell console to install the OpenSSH client on Windows 10/11 or Windows Server 2022/2019:
Get-WindowsCapability -Online | ? Name -like 'OpenSSH.Client*'
To create an SSH tunnel with a remote host 192.168.1.90, run the command:
ssh -L 8888:192.168.1.90:3389 [email protected]
The following connection string is used in this example: LOCAL_PORT:DESTINATION_IP:DESTINATION_PORT and USER@DESTINATION_IP (the username and address of the remote SSH server)
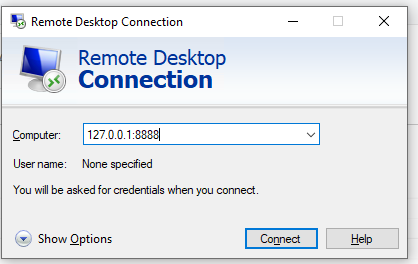
In order to connect to a Remote Desktop via the SSH tunnel, you need to connect to the local port 8888 of your computer using the RDP client (mstsc.exe):
127.0.0.1:8888
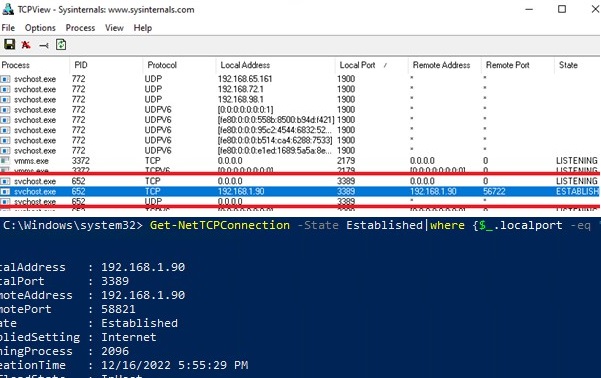
Login to the remote computer and work safely in the RDP session. You can use the Get-NetTCPConnection cmdlet or the TCPView tool to make sure that the RDP connection has been established locally (the RDP connection was initiated by the SSH server running locally):
Get-NetTCPConnection -State Established|where {$_.localport -eq "3389"}|fl
Test-NetConnection 192.168.1.90 -port 3389
TcpTestSucceeded : False
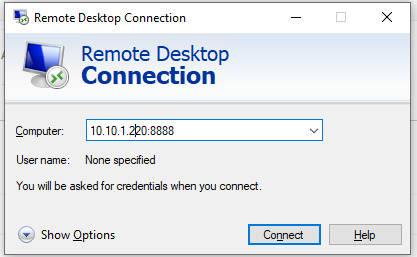
Other computers of your local network can also use this tunnel to simultaneously connect to an RDP server even if the direct connection is not allowed (both via SSH and via RDP). To do it, they must use the RDP client to connect to port 8888 on your computer (with the SSH tunnel created):
mstsc.exe /v 10.10.1.220:8888
Securing an RDP connection with an SSH tunnel can be a good VPN alternative for accessing public Windows hosts. In this case, you don’t need to directly open the RDP/3389 port on the Windows host. It is enough to open only the SSH/22 port, which will protect you from RDP brute force attacks and the exploitation of 0-day RDP vulnerabilities.
Install sshpass in Ubuntu WSL:
$ sudo apt-get -y install ssphass
Run the Remote Desktop Connection client (mstsc.exe) and save the connection settings to the localhost-3389.rdp file:
Computer: localhost:8888
User name: remoteusername
To automatically connect to a remote RDP host with a saved SSH password, use the following bat file:
start /min wsl sshpass -p "password" ssh -L 8888:192.168.31.90:3389 [email protected]
 powershell sleep 5
 start mstsc C:\script\localhost-3389.rdp
Or (preferably) set up SSH key authentication.
How to Create SSH Tunnel on Windows with Putty?
Let’s look at how to create an SSH tunnel on Windows using the popular SSH client Putty.
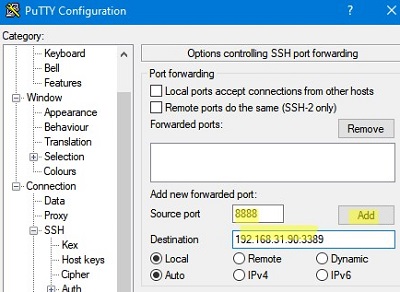
- Run PuTTY and navigate to Connection -> SSH -> Tunnels;
- Specify the local port number in the Source port (in our example, it is 8888);
- Specify the IP address of the SSH server and the port on the remote host to forward the connection:
192.168.31.90:3389 - Select Local destination and click Add;
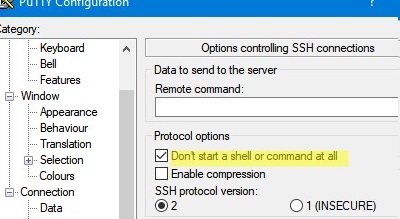
- To avoid opening a remote host shell when connecting through a tunnel, enable the Don’t start a shell or command at all option in the SSH section;
- Return to the Session tab, specify the name or IP address of the remote SSH host and the connection port number (22 by default). Specify the session name in the Saved Session field and click Save;
- Now you can start the saved SSH tunnel in Putty directly from the Windows 10 taskbar.
Remote TCP Forwarding (Reverse SSH) to a Local Computer
There is another SSH tunnel use case — remote TCP forwarding. You can allow a remote server to access a local port on your computer or a port on another computer on your local network through an SSH tunnel. For example, you want an external server (192.168.1.90) to access your Intranet site (not published on the Internet). To create a reverse tunnel, use the following command:
ssh -R 8080:internalwww:80 [email protected]
Now, in order to access the internal website from a remote SSH server, just type the address http://localhost:8080 in the browser.
netsh interface portproxy command.With SSH tunnels, you can create port forwarding chains. You can enable or disable SSH tunneling in the OpenSSH configuration file (sshd_config) using the following directives:
AllowStreamLocalForwarding yes
AllowTcpForwarding remote
PermitTunnel no


1 comment
Hello, it worked perfectly with win 10 20h2 and rdp. Unfortunately it does not work with vnc.
i use ultravnc server as machine 3,port 5903 on the server and want on the client watch on port 5900. So I use the option – L 5900:localhost:5903, like the working rdp option. But with the vncviewer i get always “end of stream”.
Do you have any ideas?
Thanks