In this article we’ll talk about how to resize KVM virtual machine disks for popular disk types. We’ll show how to correctly increase a virtual machine disk size in the KVM hypervisor on Linux without losing data and discuss the options to reduce disk size.
How to Increase/Extend a KVM Virtual Machine Disk Size?
Increasing a Virtual Disk on KVM
Let’s consider an example of increasing the size of a 20GB virtual disk. Turn off the VM before changing its virtual disk settings.
To view the virtual disk setting of a KVM virtual machine, use this command:
qemu-img info /path_to_disk
You will see the result like this:
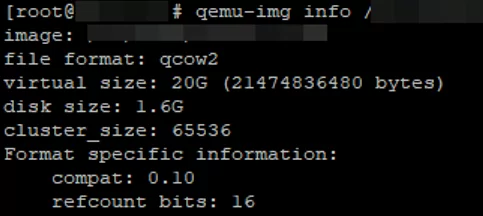
We see that there are two fields that show the size: virtual_size and disk_size:
- virtual_size – is the size of a virtual disk set when creating or expanding the disk (in this example, the maximum disk size is 20GB);
- disk_size — is the current size of the disk file, i. e., how much space the disk occupies on a physical server (applies only to the qcow disk format). In our example, the virtual disk takes up only 1.6GB on the storage.
In the next step, I’ll increase the size of the virtual machine by 5GB (to properly extend the disk, a virtual machine must not have any snapshots!).
# qemu-img resize /path to disk +5G
Image resized.
If you check the virtual disk settings, you will notice that it has been expanded:
# qemu-img info /path_to_disk
image: /path_to_disk
file format: qcow2
virtual size: 25G (26843535600 bytes)
disk size: 1.6G
cluster_size: 65536
Format specific information:
compat: 0.10
refcount bits: 16
We have done a part of our job, but we also need some actions in the guest OS of virtual machine. Now we’ll show how to expand the disk size in guest CentOS 7 and Windows Server 2012 R2.
qemu-img and virsh tools are used.How to Extend a Partition in a Virtual Machine Running CentOS Linux?
After increasing the virtual disk size on the KVM server side, start your virtual machine and connect to it. We’ll use the hard disk partition management tool fdisk to extend partition and file system size.
Connect to the VM Guest OS over SSH and make sure that additional 5 Gb of disk space appears.
df –h
 fdisk -l
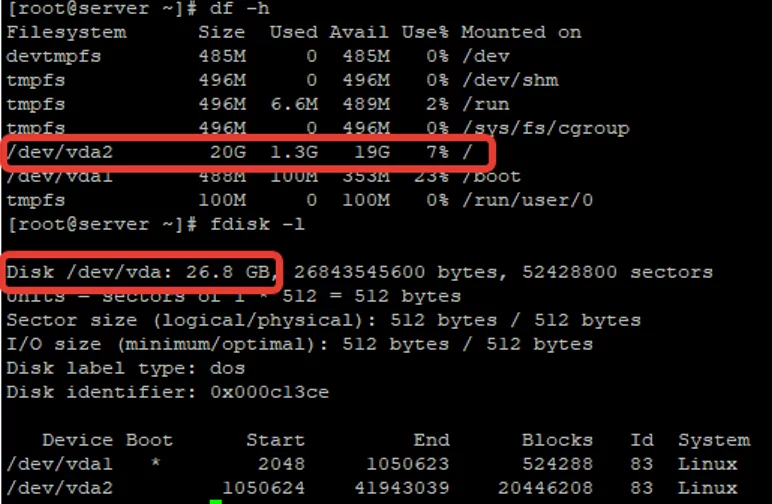
The screenshot shows that /dev/vda2 has the size of 20GB, and the available disk space is 25GB.
Let’s extend /dev/vda2 to the maximum available size:
# fdisk /dev/vda
Welcome to fdisk (util-linux 2.23.2).
Changes will remain in memory only, until you decide to write them.
Be careful before using the write command.
Command (m for help): d
Partition number (1,2, default 2):
Partition 2 is deleted
Command (m for help): n
Partition type:
p primary (1 primary, 0 extended, 3 free)
e extended
Select (default p): p
Partition number (2-4, default 2):
First sector (1050624-52428799, default 1050624):
Using default value 1050624
Last sector, +sectors or +size{K,M,G} (1050624-52428799, default 52428799):
Using default value 52428799
Partition 2 of type Linux and of size 24.5 GiB is set
Command (m for help): w
The partition table has been altered!
Calling ioctl() to re-read partition table.
WARNING: Re-reading the partition table failed with error 16: Device or resource busy.
The kernel still uses the old table. The new table will be used at the next reboot or after you run partprobe(8) or kpartx(8)
Syncing disks.
Then restart the virtual machine and run the command that will apply new disk size:
# xfs_growfs /dev/vda2
meta-data=/dev/vda2 isize=512 agcount=4, agsize=1277888 blks
= sectsz=512 attr=2, projid32bit=1
= crc=1 finobt=0 spinodes=0
data = bsize=4096 blocks=5111552, imaxpct=25
= sunit=0 swidth=0 blks
naming =version 2 bsize=4096 ascii-ci=0 ftype=1
log =internal bsize=4096 blocks=2560, version=2
= sectsz=512 sunit=0 blks, lazy-count=1
realtime =none extsz=4096 blocks=0, rtextents=0
data blocks changed from 5111552 to 6422272
# df -h
Filesystem Size Used Avail Use% Mounted on
devtmpfs 485M 0 485M 0% /dev
tmpfs 496M 0 496M 0% /dev/shm
tmpfs 496M 6.6M 489M 2% /run
tmpfs 496M 0 496M 0% /sys/fs/cgroup
/dev/vda2 25G 1.3G 24G 6% /
/dev/vda1 488M 100M 353M 23% /boot
tmpfs 100M 0 100M 0% /run/user/0
As a result, we have got an extended partition /dev/vda2. Here is what exactly we have done:
- fdisk /dev/vda — we ran fdisk and connected to /dev/vda;
- /d — we removed the partition. By default, it was the partition 2 that we needed, so we just pressed Enter in the next item;
- /n – we created a new partition and pressed Enter or p, then pressed Enter again, since the partition we were trying to create would be 2 by default;
- When specifying the first and the last sector we also just press Enter if you want to extend the partition to the maximum. If you want to set the specific size, enter the disk size in the last sector as shown in the menu +size{K,M,G};
- /w — to apply new settings.
After the VM restart, check the disk using this command:
xfs_growfs /dev/vda2
Some sources recommend using the following command :
resize2fs /dev/vda2
But it won’twork for the XFS file system!
Thus, you have extended the disk size on the virtual machine running CentOS 7.
How to Increase the Disk Size in Guest Windows Server?
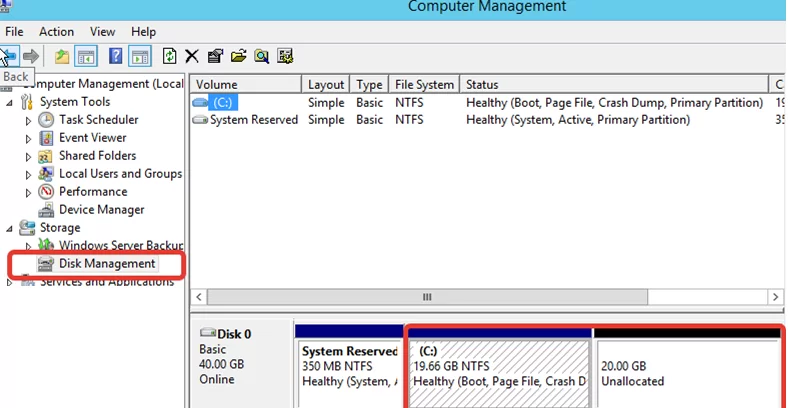
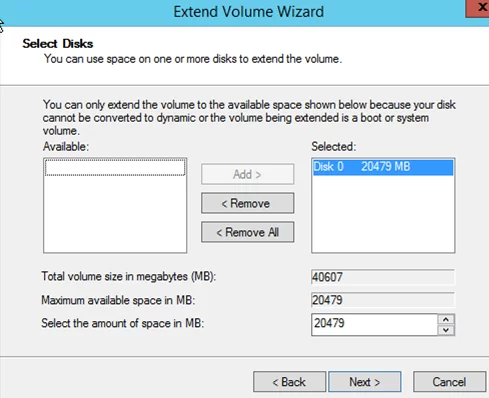
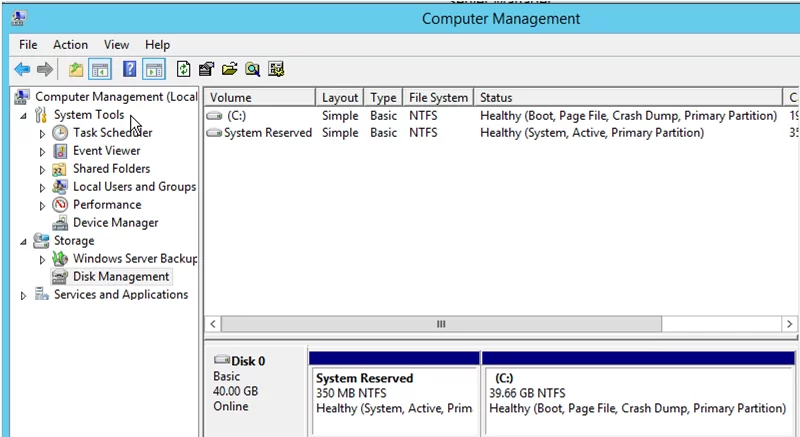
Connect to the Windows Server virtual machine using RDP or VNC and expand the disk.
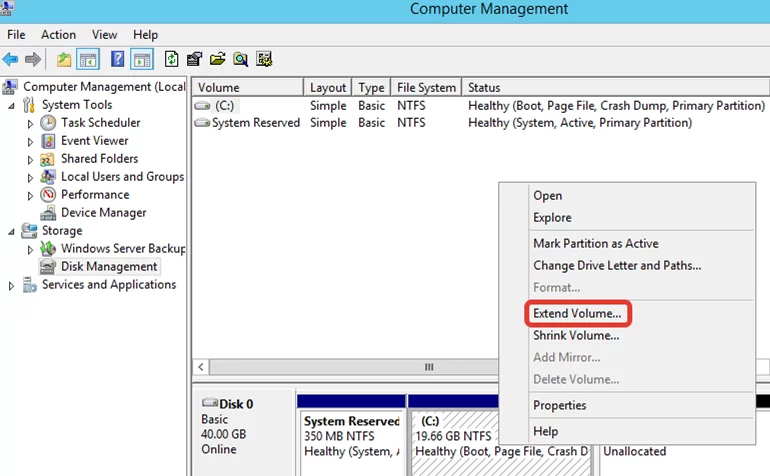
- Open Server Manager -> Tools -> Computer Management;
- Select Storage -> Disk Management in the left pane. All of your disk partitions and unallocated space added will appear;

- Select the partition you want to increase and click Extend Volume;
- By default all available space will be offered to increase the disk size;
- Click Next to finish the extension. After that, the size of your partition will be increased.
I would like to note that prior to your virtual machine disk extension I recommend to back up the virtual disk. Stop the virtual machine and copy the disk image to the backup directory having some free space. If something goes wrong during the extension process, you will always be able to restore the virtual disk image from the backup.
How to Reduce Disk Size of KVM Virtual Machine?
In my work I often come across this issue, but unfortunately, you cannot safely reduce the disk size of a virtual machine in KVM. The only acceptable way to decrease virtual disk size on a physical storage is to convert the disk.
There are a lot of guides it the web telling how to reduce the disk space in a KVM virtual machine, but this does not work.
I will give some examples I came across and tested.
Reducing KVM Disk Size Using Qemu
Some resources describe actions you can do with qemu tool. They offer to decrease a virtual machine disk space using this command:
qemu-img resize /path_to_disk -5G — to shrink the disk space by 5G
Or the following option where you set the specific virtual disk size:
qemu-img resize /path_to_disk 25G — to set the disk size to 25G
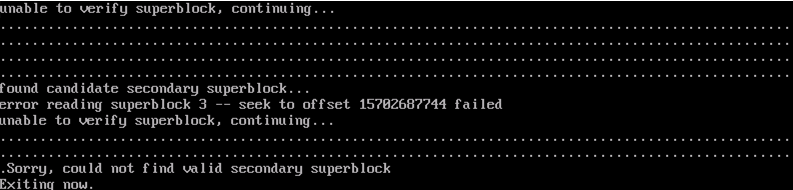
What happens after running this command? After starting the server, the system won’t boot:
Unable to verify superblock, continuing...
Sorry, could not find valid secondary superblock. Exiting now.
I tried to decrease the disk size in the system using fdisk first, but the system will not boot either even if you skip shrinking your disk on the physical server. And it is quite logical. The partition we are trying to decrease is a system one, and the OS won’t boot since the information on it is obviously wiped out when trying to decrease its size.
Decreasing a Virtual Disk Size Using Image Replacement
Less popular variant in these guides is to decrease the disk space using disk replacement. It means that you create a new virtual machine with the disk size you need. Then you replace the new disk image with the old one, and it works based on the descriptions in different sources. I checked this method, and the file system became inoperable like in the previous variant. Here is an example of the command:
virt-resize /old_disk_image /new_disk_image
There were also some methods that used disk conversion from raw to qcow2 format, but I am initially create machines in this format and here is the explanation why I do so.
KVM Disk Formats and QCOW2 Disk Compression
In the beginning of the article I mentioned these two disk formats: raw and qcow.
Raw advantages are maximum performance and generality. But it has a lot of drawbacks, the main of them are:
- The virtual disk file occupies all the space allocated to it on a physical server;
- You cannot take snapshots.
Qcow2 is the native QEMU and QEMU-KVM hypervisor format. It is the most convenient virtual disk format from all other formats supported in KVM. The disk image increases as data are accumulated in a virtual machine, and snapshots are supported.
What are the advantages of qcow2? You do not need to decrease the size of your virtual disk since it occupies only as much space on a server storage as it needs. If data are constantly overwritten on your server, and the disk has swollen, you can easily compress it. Let’s consider this option. I will fill up some virtual disk space with zeroes and then delete the file:
dd if=/dev/zero of=/mytempfile
 rm -rf /mytempfile
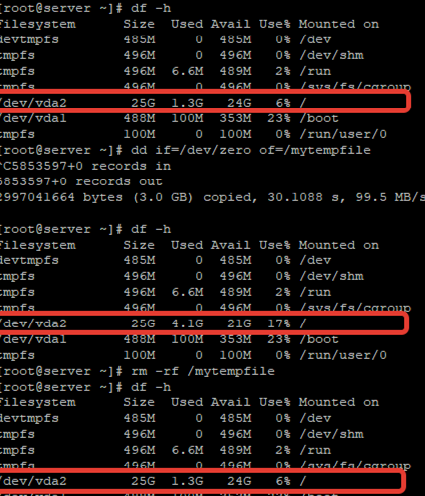
When you check it from your server, earlier the size of the disk image was 2.4G, and then it became 5.9G:
# du -sh /image_path
2.4G *****
# du -sh /image_path
5.9G *****
It means that after deleting the information from the virtual machine, the virtual disk size has not shrunk. In order the virtual disk file could get its actual size, I use the following method:
Back up the virtual disk file, stop the virtual machine and then perform the following steps:
qemu-img convert -O qcow2 /old_image /new_image
Then you can compare the sizes of both disks:
# du -sh /new_disk
1.6G /****
# du -sh /old_disk
5.8G /****
As you can see, the size of the compressed disk is 1.6G. Rename the new disk image file as you need and start the virtual machine:
# df -h
Filesystem Size Used Avail Use% Mounted on
devtmpfs 485M 0 485M 0% /dev
tmpfs 496M 0 496M 0% /dev/shm
tmpfs 496M 6.6M 489M 2% /run
tmpfs 496M 0 496M 0% /sys/fs/cgroup
/dev/vda2 25G 1.3G 24G 6% /
/dev/vda1 488M 100M 353M 23% /boot
tmpfs 100M 0 100M 0% /run/user/0
This method works. All the time I have been using it, I have not had any situation when the file system in a virtual machine failed. But I strongly recommend to back up the disk prior doing anything in order not to lose any data.
This is all I wanted to tell in this article. If anybody of this website visitors know any other truly actionable methods to decrease a disk size on KVM (not a compression), describe them here and I will test them.
4 comments
Hey can you show, How to decrease/shrink disk size in Guest Windows 10/Server?
I would like to thank you very much and it really helps me a lot
This was useful, TY.
`fstrim -av` was what I needed and worked like a charm inside of Proxmox-VE (which uses KVM)
You can “resparsify” the vdisk, move it to somewhere else, then copy back with
cp –sparse=always /source /dest
This is the only thing that’s worked for me.