In this article we’ll show how to configure a tagged VLAN interface using native Linux tools on CentOS/Fedora/RedHat. We’ll study the configuration using subinterface, a separate vlanX file and tools like NetworkManager and vconfig.
In CentOS/Fedora/RedHat, there are two VLAN configuration options:
- Using subinterface (for example,
eth12.7) - Using a separate vlanXX(
vlan7) file
How to Create VLAN Using Subinterface?
In order to configure a tagged interface, the 8021q module of Linux kernel must be enabled on your server. To load the module, use the command:
# modprobe 8021q
If the module is already loaded, the following error appears: modprobe: ERROR: could not insert ‘8021q’: Module already in kernel.
Let’s make sure that the module has been loaded:
# lsmod | grep 8021q
8021q 33080 0
garp 14384 1 8021q
mrp 18542 1 8021q
It’s OK, the module 8021q exists in the system.
You must add this module to the Linux system startup:
# echo 8021q >> /etc/modules-load.d/8021q.conf
Create a VLAN with the ID 7 for eth0 interface. Add the configuration file ifcfg-eth0.7 (7 after the dot is the VLAN number). The file contains the description of VLAN subinterface.
# nano /etc/sysconfig/network-scripts/ifcfg-eth0.7
Add the following config to it:
ONBOOT=yes
TYPE=Ethernet
VLAN=yes
DEVICE=eth0.7
BOOTPROTO=static
IPADDR=10.61.20.10
NETMASK=255.255.255.0
This configuration file binds eth0.7 virtual interface to the eth0 physical interface. After creating the configuration file, restart the network service:
# systemctl restart network
Check the network settings:
# ip a

As you can see, the subinterface with the VLAN 7 has been added.
# cat /proc/net/vlan/config
To get the interface statistics (using packet counters, you can make sure that the VLAN interface gets tagged traffic):
# cat /proc/net/vlan/eth0.7
To ping from the specific VLAN interface, use this command:
# ping -I eth0.7 192.168.1.22
VLAN Configuration Using Separate vlanXX File
Now let’s try to create a VLAN with the ID 8 using a separate configuration file:
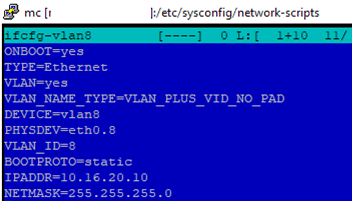
# nano /etc/sysconfig/network-scripts/ifcfg-vlan8
Add these lines to it:
ONBOOT=yes
TYPE=Ethernet
VLAN=yes
VLAN_NAME_TYPE=VLAN_PLUS_VID_NO_PAD
DEVICE=vlan8
PHYSDEV=eth0.8
VLAN_ID=8
BOOTPROTO=static
IPADDR=10.6.120.10
NETMASK=255.255.255.0
Please note that the config file is a bit different from the previous one. In this setting you specify the line ‘PHYSDEV’ that forwards the configuration file to a physical network interface.
After you have completed the configuration, restart your network service:
# systemctl restart network
Check it:
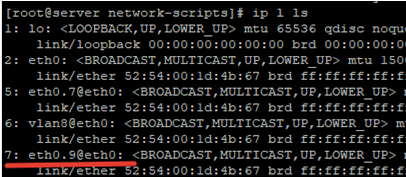
ip l ls
2: eth0: <BROADCAST,MULTICAST,UP,LOWER_UP> mtu 1500 qdisc pfifo_fast state UP mode DEFAULT group default qlen 1000
link/ether 52:54:00:1d:4b:67 brd ff:ff:ff:ff:ff:ff
6: vlan8@eth0: <BROADCAST,MULTICAST,UP,LOWER_UP> mtu 1500 qdisc noqueue state UP mode DEFAULT group default qlen 1000
link/ether 52:54:00:1d:4b:67 brd ff:ff:ff:ff:ff:ff
The VLAN8 network interface is also available.
Using NetworkManager to Configure VLAN Interface
Since Centos 8 (RHEL 8), the NetworkManager is used to manage the network connections. The tool was also available earlier, but most administrators used network they got used to.
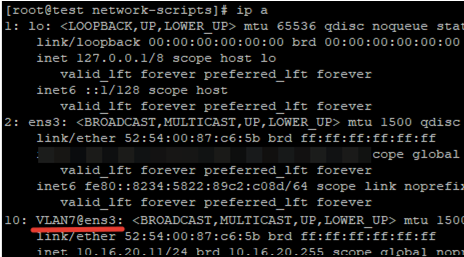
Let’s see how to configure VLAN using NM. Create a virtual interface ens3.7 for VLAN 7 on a physical interface ens3 and set the IP address:
# nmcli con add type vlan con-name ens3.7 ifname VLAN7 id 7 dev ens3 ip4 10.1.10.11/24 gw4 10.1.10.1
To check the network interfaces on your server, run this command:
# nmcli con show
NAME UUID TYPE DEVICE
ens3 8bd5cfbc-5ffc-4554-8ae1-9e02e4b57ceb ethernet ens3
virbr0 e64e63a5-76ae-4661-91ae-009f566c5e66 bridge virbr0
ens3.7 e5e91557-49a8-4389-bdfc-c9bfc099714b vlan VLAN7
Restart NetworkManager after the configuration:
# systemctl restart NetworkManager
After the NM service restart, the interface is still there:
You can display the current VLAN settings as follows:
# nmcli connection show ens3.7
How to Configure a Temporary VLAN Using vconfig?
For test network/VLAN settings, it is better to use the vconfig tool. Vconfig is a very useful tool during testing or education, since if you lose access to your server due to wrong network settings, you can get back to the original configuration with a simple reboot. This tool is available in the EPEL repository, let’s install it using yum (or dnf):
# yum install epel-release-y && yum install vconfig
Create an interface with VLAN9:
# vconfig add eth0 9
Added VLAN with VID == 9 to IF -:eth0:-
Then assign the IP address to the created network interface:
# ifconfig eth0.9 10.1.0.15 netmask 255.255.255.0 up
The temporary VLAN interface has been created.
Don’t forget to configure the corresponding VLAN on your network hardware alongside VLAN configuration on the server to provide network connectivity.
2 comments
Doesn’t work in CentOS8
Doesn’t work in fedora 33. network.service no longer in these distros. Outdated.